Title: FFG:Choosing the High Ground
Post by: RSSFeeder on 21 September 2013, 05:00:03
A Preview of Scenario Creation in BattleLore Second Edition

Fantasy Flight Games recently announced the upcoming release of BattleLore Second Edition, a two-player board game of unit-based fantasy battles in Terrinoth. In every game, you will take command of an army and attempt to lead them to victory. By carefully forging your battle plans, you can deliver the best orders to your troops and defeat your enemies on the field of battle.
Without the necessary forethought, though, you may find yourself entering the battle at a disadvantage. Tough choices and opportunities for customization abound, and in this preview, we’ll examine your setup choices and the impact they have on the game, alongside the potential of campaign play!
The Lay of the Land
When you take the field against your opponent, you must carefully examine your options when choosing the site of the battle. In BattleLore Second Edition, you can determine both the terrain on your side of the battlefield and the opportunities to claim victory points. Each side in the game has seven different scenario cards, and at the beginning of the game, you draw three and must choose one as the site of the coming battle.

Every scenario card has several important parts, graphically illustrating victory point options as well as your possible setup locations.
- Each scenario card shows the terrain setup on your side of the battlefield alongside the placement of victory point banners, which provide victory points if you control them at the end of your turn.
- A number of hexes on the scenario card are colored. These are the hexes where you can place your units once the game begins.
- Special rules and other victory point opportunities are explained in text at the bottom of the scenario card.
- In the bottom left-hand corner, your initiative is shown. Whichever player has the first letter alphabetically, and the lowest number has initiative, and has the benefit of moving first.
As an example of choosing scenario cards, Sam has taken command of the Daqan Lords, and Taylor is playing as the Uthuk Y’llan hordes. Sam wants a scenario card that fits the army and the overall strategy that he has in mind, so he will need a scenario card that supports his strategy in order to have the best chance of victory. The scenario card Sam chooses will determine both where he can deploy his troops and where he will need to fight. At the beginning of the game, Sam and Taylor each draw three scenario cards – Sam draws Mustering the Militia, Damming the Muir River, and Korrina’s Tears.
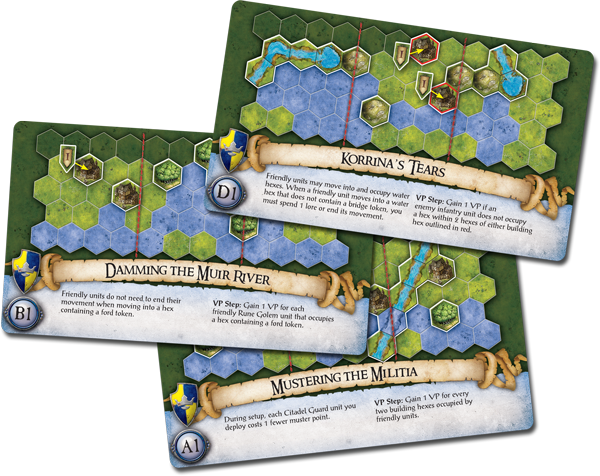
The Mustering the Militia scenario card has the potential setup locations for Sam’s units arrayed in a line, towards his end of the battlefield. The special rules for this scenario card read, “During setup, each Citadel Guard unit you deploy costs 1 fewer muster point,” and “VP Step: Gain 1 VP for every two building hexes occupied by friendly units.”
One strategic way Sam can take advantage of this scenario card is by mustering a large army of Citadel Guard units, and using them to seize both the building hexes on the right of the battlefield and the banner on the left side of the battlefield, which provides victory points to its controller. Mustering the Militia also has a high initiative indicator. With an initiative of “A1,” this card offers Sam his best chance to have the opportunity to make a quick rush with the Citadel Guard before taking a more defensive stance.
The scenario card entitled Damming the Muir River has its setup locations arranged differently than Mustering the Militia. A cluster of possible setup locations is arranged in a wedge formation in the middle of the center section. On this scenario card, the special rules allow Sam to move through a ford without ending his units’ movement, as well as gaining one victory point for each friendly Rune Golem unit that occupies a ford.
There are several possible ways Sam can deploy your units when using this scenario card. The victory point banner on the left flank could be defended by some of your units quickly advancing, while you press forward with the wedge in the center. Unfortunately, forest terrain, which stops movement, blocks the most direct advance from the center into enemy territory, but it also offers a level of protection from an enemy charge. Another option for Sam’s conquest is situating his Rune Golems on the right flank. By moving right from the wedge, he can take advantage of the fact that his units do not stop when crossing fords. After some of the units have crossed, Sam can move the Rune Golems up to hold the fords, providing support while claiming victory points.
Sam’s final option for a scenario card is Korrina’s Tears. This scenario card features a heavy distribution of setup hexes in the left section of the battlefield. Ordinarily, these units would be forced into a choke point when crossing the river before them, but this scenario allows units to move through and occupy water hexes by spending lore – a vital resource collected during battle and at the end of each turn. Korrina’s Tears also introduces an opportunity for victory points by keeping enemy forces at least two hexes away from the two building hexes, which also possess vital banners.
.png)
In order to take full advantage of the opportunities offered by this scenario card, Sam will need to clear his opponent’s units away from both of the buildings in the center section. By spending lore to cross the river without a ford, he can bring his army forward on the left flank, then swing it left to force his enemy away from the building hexes. While the bulk of his forces are maneuvering, a few of his units in the center and right flank must keep the Uthuk Y’llan from claiming the buildings for themselves, lest they achieve a crippling lead in victory points. A final consideration for this scenario card is the low initiative indicator. With an initiative rating of “D1,” Sam will usually move second. Therefore, it would be important to optimize his movement and advance his plans as quickly as possible if he plans on using this aggressive strategy.
After viewing the scenario cards he has drawn, Sam knows the prolonged defensive action that he sees in Mustering the Militia doesn’t match the army and strategy that he wants to use today. Korrina’s Tears looks like a good alternative option, but Sam also doesn’t think he wants to be locked into an aggressive attack. He knows that the Uthuk Y’llan often excel on offense, and is worried that they might be able to neutralize his left flank attack. Damming the Muir River offers a range of possible actions. By choosing this card, Sam decides that he can push the attack if he needs to, but he also has strong defensive terrain with the forests in the center and the river on the right flank. Sam chooses Damming the Muir River as a scenario card.
Taylor has also chosen a scenario card, and both players reveal simultaneously.

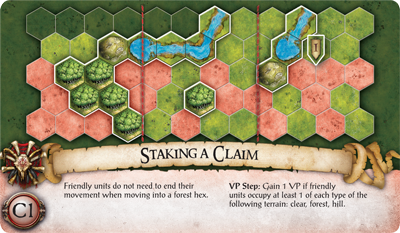
Sam sees that Taylor has chosen Staking a Claim. This scenario card allows her units to move through forest terrain freely, but Sam is reassured by observing that rivers block the principal attack routes in both the center and on the right flank. His units will be able to take advantage of their ability to move through fords, but Taylor’s units will be hampered by these choke points. Both players place terrain on the battlefield, and take turns placing one ford. Both players have chosen the ground for their fight, but before the battle begins, they must muster their armies and place them strategically, as we’ll describe in our next preview.
The Continuing Battle
On top of the possible combinations of scenario cards in BattleLore Second Edition, you have the option to engage in a narrative campaign, chronicling the efforts of the Daqan Lords’ garrison at Nordgard Castle to hold off the coming Uthuk Y’llan invasion. When playing the campaign, you and your opponent both begin by using the scenario cards labeled “A1.” Your choices have consequences beyond the battle though, because after the battle is resolved, the victor is able to choose which “B” scenario card he wants, whereas the loser has no choice. The campaign continues as you and your opponent progress alphabetically through the scenario cards.
Every battle counts in a campaign, and you and your opponent will keep track of your victory points from game to game. Can the Daqan Lords throw back the barbarian assault, or will the Uthuk Y’llan and the minions of Chaos expand their borders into new lands? Only you can decide by playing through the narrative campaign for BattleLore Second Edition.
Brace for Invasion
Are you ready to take command? Your army awaits you! Continue to visit our website and look for more previews to master the intricacies of battlefield tactics and strategy. Join us for our next preview, as we look at the possibilities of mustering an army, and look for BattleLore Second Edition at your local retailer in the fourth quarter of 2013.
...Source: Choosing the High Ground (http://www.fantasyflightgames.com/edge_news.asp?eidn=4366)
Title: Re: FFG:Choosing the High Ground
Post by: EvilGinger on 21 September 2013, 05:04:30
will have to report this to our delightful FLGS Spirit Games...
>:DGinger