Title: FFG:Scouting the Battlefield
Post by: RSSFeeder on 23 November 2013, 06:00:03
A Look at Setup and Scenario Building in Warhammer: Diskwars

“Viktor gazed out over the plain and his heart sank. Countless ranks of warriors were calmly arraying themselves for battle, forming up in regiments, dragging bizarre war engines into position and driving their chariots out to the flanks.”
–Warhammer
In our last two previews for Warhammer: Diskwars, we’ve looked at the game’s melee and ranged combat. We’ve also reviewed a number of the unique disk keywords and abilities that give the game greater tactical depth.
Today, we’ll explore the game’s rules for setup and scenario building. These rules ensure that all your games are unique, and they allow you to make a few critical decisions that will heavily impact the full course of your battles.
Control the Battlefield to Control the Battle
In truth, the battles of Warhammer: Diskwars begin before the first shot is fired, before the first blade is drawn, and even before you and your opponent march your regiments onto the field of battle. They begin in setup, as you and your opponent first scout the battlefield and receive your orders.
After you establish your play area (3’ x 3’), you and your opponent (or opponents) proceed through four steps in which you’ll establish tie breaks for your match, receive your marching orders, and give shape to the section of the Old World that you’ll seek to conquer:
Determine Initiative Order
|

To determine your initiative order, you and your opponent roll six-sided dice and add any of your heroes’ unspent recruitment points (which we’ll explore more fully in our next preview on army building). The player with the highest adjusted roll wins the right to assign a single initiative token to everyone in the game.
This is a critical step because it establishes tie breaks and determines who gets to select the game’s active scenario ability in the next step of setup.
Throughout the game, your initiative order serves as a tie breaker, both when you and your opponent reveal the same strategy on your command cards and when you have scored the same number of points by the end of the game. In all situations, the player with the lowest numbered initiative token wins a tie.
However, if you win the adjusted roll to determine initiative, you may still choose to place yourself higher in the initiative order. In a multiplayer game, you may want to act later in each early round, so that your opponents may focus on wearing each other down until you’re ready to pounce. Additionally, the player with the highest numbered initiative token gets the first chance to make crucial decisions in all the other steps of setup, as we’ll see below.
Determine Player Objectives
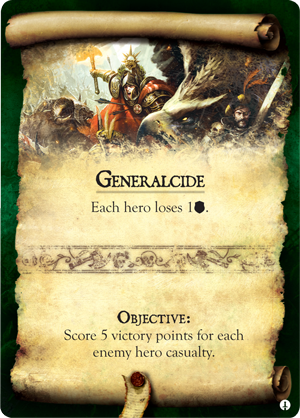
Once you’ve determined initiative order for the game, the player with the highest number initiative token (or “last player”) shuffles all the scenario cards, draws two, and chooses to place one of them face-up near the battlefield. This becomes the active scenario card for the game.
Each scenario card has two text boxes. The top box is its scenario ability, and the bottom is its objective.
 Throughout the game, the scenario ability on the active scenario card will impact your battles:
- If you select Generalcide as your active scenario card, all heroes lose one stamina, and players have to think far more carefully about the situations in which they’re willing to risk their heroes.
- If you select Conquest, you can alter the shape of the battlefield by placing one of your units on any piece of terrain that you place. Perhaps you’ll start with your archers high atop a tower, or place a ferocious melee unit close to your opponent’s deployment zones atop a piece of terrain that blocks line of sight.
- While it may hurt to give up the initiative order, it’s worth going last to be be able to boost an army that focuses heavily on ranged attacks with the scenario ability of Rain of Arrows. Likewise, if your army is more focused on melee, and your opponent’s benefits more from ranged attacks, it may be worth going last to prevent your opponent from gaining an extra attack die for each ranged attack.
After the last player selects the game’s active scenario card, you shuffle all the remaining scenario cards together, and deal one face-down to each player in the game.
Your face-down scenario card now serves as your secret objective. Each game of Warhammer: Diskwars is played over five rounds, and at the end of five rounds, the player with the most points is the winner. However, the ways that you can score points are determined by your secret objective. Accordingly, each of your games will be different because you must adapt your strategy to meet your goal:
- For example, if you’re dealt Rain of Arrows as your objective, you get one point for each enemy unit destroyed. In this case, it pays to prey upon the weak. Any unit your opponent leaves vulnerable is a potential point. While this is your objective, you have no incentive to go after your opponent’s deadliest units unless you need to shut them down.
- On the other hand, if you’re dealt Generalcide, you score five points for each enemy hero you destroy, but you get nothing for the little units. You need to go after the big bosses, and you’ll find yourself playing a radically different game than if you were dealt Rain of Arrows.
- Furthermore, not all victory conditions are directly related to destroying enemy units. Charge! rewards you for seizing vital terrain, so if this is your objective, you’ll want to find ways to keep your units alive long enough to make a late-game push for your opponent’s deployment zones.
Create Deployment Zones
After you’ve received your secret objective, you continue through setup by creating your deployment zones.
You create deployment zones with the deployment cards that you shuffle and deal onto the battlefield. In each game, you deal a number of deployment cards equal to all the regiments in the game. Thus, if you’re playing a two-player game in which each player has two regiments, you’ll deal four deployment cards onto the battlefield.
Again, the last player gets the first chance to select a deployment card. Then, players continue taking turns selecting deployment cards until all of them have been taken.
Each deployment card has two sides. One side has no text and simply features a big, red arrow and a deployment value of three. The other side, which features text, introduces a unique ability and a variable deployment value.

When you select a deployment card, you place it along your edge of the battlefield with either side face-up. If you place two or more deployment cards so that they’re immediately adjacent, they form a single, larger deployment zone.

Any special abilities on deployment cards in a combined deployment zone apply to the whole zone. Likewise, the deployment value of the zone is equal to the sum of the deployment values on all its deployment cards.
Place Terrain
The next step of setup is to select and place terrain. You begin by shuffling all of the terrain cards and placing four of them face-up next to the battlefield. Beginning with the last player, you and your opponent (or opponents) take turns selecting terrain cards and placing the corresponding piece of terrain onto the battlefield.
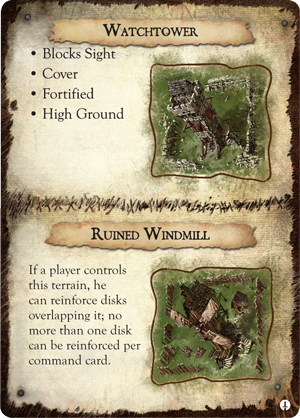
Each terrain piece is dual-sided, and these two sides introduce different combinations of terrain abilities to the battlefield.
Blocks Sight: This terrain blocks line of sight.

Terrain with the Blocks Sight ability prevents ranged attacks between two units if it would intersect any line drawn between them.
A unit retains line of sight to its opponent if a line can be drawn from any of its edges to any of its opponent’s edges.
Cover: A ranged attack that targets a disk overlapping this terrain rolls one fewer battle dice (to a minimum of one). This does not affect scatter rerolls.
Dangerous: (![]() or
or ![]() ). If your disk overlaps this terrain after a flip or after being reinforced, you have to roll a six-sided die and deal an amount of the specified damage type to that disk equal to the result of the roll. This doesn’t end your disk’s movement action, and you don’t roll for damage when you deploy disks on dangerous terrain.
). If your disk overlaps this terrain after a flip or after being reinforced, you have to roll a six-sided die and deal an amount of the specified damage type to that disk equal to the result of the roll. This doesn’t end your disk’s movement action, and you don’t roll for damage when you deploy disks on dangerous terrain.
 Defensive: A disk overlapping this terrain gains the swift (
![]() ) keyword.
) keyword.
Fortified: A disk overlapping this terrain gains immune (impact damage).
High Ground: A disk overlapping high ground can draw line of sight across anything that blocks sight.
Rough: If a disk overlaps rough terrain after a flip, it must immediately stop moving. A disk does not have to stop moving after a flip if it was already overlapping that rough terrain prior to the flip.
As you can see, terrain pieces and their abilities can drastically impact the shape of your battlefield. Naturally, you’ll want to select your terrain to play to your army’s strengths or to hinder your opponent. Still, your opponent will be thinking the same thing, so you may find yourself electing to place a terrain piece just to ensure that you can place its most disruptive abilities facedown, removing them from play.
Deploy Disks
The last player again takes the first action in the final step of setup, placing a number of disks in each of his deployment zones equal to its total deployment value.
This is your first chance to actually position units on the battlefield, and it’s a step of setup in which it’s good to have the lowest initiative number so that you can see how your opponent deploys his units before you deploy yours.
Depending upon the values of your deployment zones, you may not be able to deploy all the disks in your army. In that case, all remaining disks are set aside into your reserve. You can bring a unit from your reserve into the game by using an action during your activation phase to reinforce it, bringing it onto the battlefield within the bounds of one of your deployment zones.
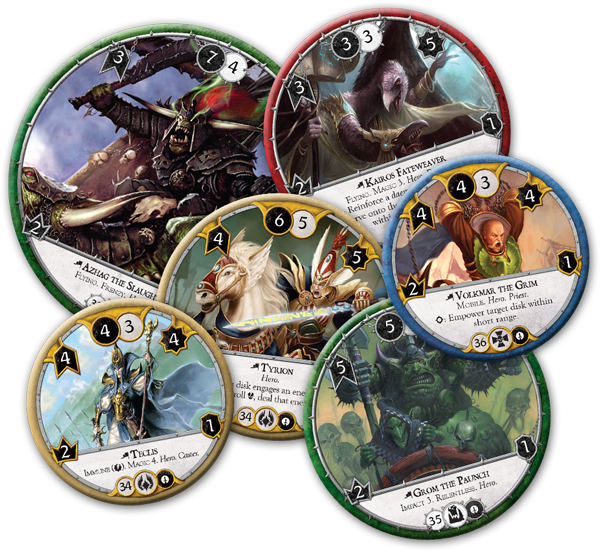
Heroes in Warhammer: Diskwars do not hide in the reserve. They are eager to lead their troops into battle, and all your heroes must begin the game in your deployment zones.

You place your deployment cards just beneath the edge of your battlefield,
and their corresponding deployment zones extend into the battlefield to medium range.
The Battles Begin!
Once your troops take to the field, it’s up to you to lead them to victory!
You and your opponent may have the same objectives, or you may have different goals. Either way, clashes and casualties are inevitable. Games play out in just five rounds, so you’ll want to push for fast gains, but you’ll need to be careful that you don’t overextend your forces and fall into a trap. No matter what strategy you pursue in your game, it’s important to remember that it starts before the first shot is fired; it begins in setup!
Warhammer: Diskwars is on its way, and the Old World is yours for the taking. Head to your local retailer to pre-order your copy today.
Then stay tuned for our next preview in which we look at army building.
...Source: Scouting the Battlefield (http://www.fantasyflightgames.com/edge_news.asp?eidn=4514)