RSSFeeder
Global Moderator
Deep One
 
Karma: 0
 Offline Offline
Posts: 3916

|
 |
« Reply #135 on: 05 August 2014, 21:32:06 » |
|
Adventure Time!The Fire at Will and The Big Wave Expansions for Dungeon Fighter Are Now Available
Fire at Will and The Big Wave, two element-themed expansions for Dungeon Fighter, are now available at your local retailer. The dungeon will never be the same again now that you can bring fire and water into the mix. Fire and water elemental magics let heroes burn monsters down or wash them out. More bold – and unproven – heroes joins the fray. Odd and terrible new creatures attempt to thwart your progress through the dungeon, while new dice throws and elemental dice offer players fresh dexterity challenges. Whether you play with fire, get your feet wet, or make your dungeon sizzle by combining the elements, Fire at Will and The Big Wave will enhance your dungeon-fighting adventure. Burning Down the Dungeon Our first preview sampled the flames of Fire at Will. Burn tokens can set monsters ablaze and shorten their life span, but monsters can also deal burn tokens to heroes. Experience points, earned whenever you choose not to use a special ability, give you access to fire magic spells, which may protect you from damage or empower you against a particularly vicious monster. In order to use these spells, however, you must cast your die into the flames – over a firewall, through rings of fire, and into the center of a fireball. 
Melissa, The Fire Sorceress, brings her demon-slaying expertise and her pyromania to the dungeon, which is made more dangerous by the fact that it, too, is on fire. The fire element die gives heroes increased ammunition in their battles against monsters, dealing up to three points of damage whether it lands on target or not. With Melissa’s help and some fire magic in your arsenal, you’ll have no trouble dodging explosions or extinguishing the monsters’ flames.  Making a Splash Making a Splash
In our second preview, we swam around in The Big Wave. We took a tour of the murky underwater caves that make up the dungeon in The Big Wave, and the pirate Jack Parrot made your acquaintance. A slippery character, Jack is fond of picking pockets and mimicking other heroes’ special abilities. His years of swashbucking have shaped him into a talented fighter, as good at slaying monsters as he is at saving his own skin. We also looked at some of the dice throws of this expansion and the three tricky, turquoise, water element dice. Depending on where they land, these cubes may rain incomparable destruction down upon monsters – or they may do you more damage than good. Either way, you’ll be thirsting to throw them as often as possible. Monstrous Adventure Our last preview introduced you to the Final Boss monster of each expansion. Guarding the dungeon’s exit in Fire at Will is the dreaded and mythical Bullrog, whose flaming breath and explosive temper may light heroes on fire. Hopefully, your party of heroes will be adept enough in fire magic to turn him into a heap of smoldering ash. Lurking in The Big Wave is the most ancient and terrible sea creature imaginable – The Great Cthulhu himself. Given that merely seeing him causes heroes to partially lose their ability to do water magic, imagine how awful it is to be wrapped in his tentacles. To send this horror back into the depths you’ll need not only solid dungeon-fighting and dice-throwing skills, but also unparalleled, undauntable bravery. 
Ferocious monsters of all sorts – smoking ones, slimy ones, fire-breathers, sea witches – await you in Fire at Will and The Big Wave. Fortunately, you’ll have elemental magic, kerosene, and maybe even some grog to aid you in your quest. Are you ready to plunge into dungeon-fighting adventure? Download the rules from the Dungeon Fighter support page and pick up your copies of Fire at Will and The Big Wave from a local retailer today! ... Source: Adventure Time!
|
|
|
|
|
 Logged
|
|
|
|
RSSFeeder
Global Moderator
Deep One
Karma: 0
Offline
Posts: 3916
|
|
« Reply #136 on: 06 August 2014, 06:00:08 » |
|
The Terrors That Lie DormantA Preview of The Sleeper Below Deluxe Expansion for Call of Cthulhu
“The Thing of the idols, the green, sticky spawn of the stars, had awaked to claim his own. The stars were right again, and what an age-old cult had failed to do by design, a band of innocent sailors had done by accident. After vigintillions of years great Cthulhu was loose again, and ravening for delight.”
–H.P. Lovecraft, The Call of Cthulhu Call of Cthulhu: The Card Game is full of strange and terrible creatures that lie just beyond the edges of our world. The vast majority of all humanity remains blessedly unaware of their existence, and it is only this mass ignorance that allows society to continue to function. Indeed, if you were to scour the world’s asylums, eccentric museums, and dirty street corners, you might find a few of those unfortunate souls whose psychic sensitivities alerted them to the worlds and monsters that lurk beyond the thin veil of our reality. Their existences strain even the most disciplined minds, and those who suddenly recognize them most often fall to madness. In The Sleeper Below, the seventh deluxe expansion for Call of Cthulhu, these creatures and the truths of their existence are given shape through an all-new mechanic, and as you might expect, it can terrify those who uncover its secrets. It may even drive you mad. Currently exclusive to the Cthulhu faction, the Dormant keyword allows you to bring a card into the game, placing it on the table, in such a way that it is attached to a story but not quite an Attachment.  It continues in that half-dead state, a card without text or type, until the story to which it is attached is won. Then, at that point, it wakes, and anything can happen: It continues in that half-dead state, a card without text or type, until the story to which it is attached is won. Then, at that point, it wakes, and anything can happen: “During your operations phase, as a standard player action you may pay X to attach a card with the Dormant keyword facedown to a story as a Dormant card. X is the number of success tokens you have at that story. Limit 1 per story per turn. When that story is won, you may play that card reducing its cost to 0. Dormant cards are considered ‘in play’ but do not count as Attachment support cards.” With the introduction of this new mechanic, The Sleeper Below explores a wealth of new ground in order to better reflect the horrific nature of the Cthulhu faction upon which it focuses. Naturally, you’ll find a Dormant version of Cthulhu (The Sleeper Below, 19), but the great Ancient One isn’t the only unfathomable horror that you’ll awake. Other Dormant cards, like Fiona Day (The Sleeper Below, 15), may introduce great evils of their own, whether they do so intentionally or unwittingly. For more about the Dormant mechanic, we turn to lead developer Brad Andres. Lead Developer Brad Andres on the Dormant Terrors of The Sleeper Below Iä! Iä! Cthulhu Fhtagn! The Dormant mechanic that appears in The Sleeper Below originally spawned from a desire to find a new way to evoke the terrifying emergence of the great Cthulhu, rising up from deep below the waves. It fuses mechanics and flavor, so that when you play a Dormant card onto a story, you add a lurking sense of horror and mystery to the game. Like all the best elements of Call of Cthulhu: The Card Game, Dormant cards add a touch of terror and uncertainty to your mind games and grand designs. When you attach a Dormant card to a story, you cause your opponent to consider what the consequences of winning that story may be. If he steps beyond The Seventh Gate (The Shifting Sands, 12), will he encounter the doomed Lost Civilization of Irem (The Sleeper Below, 27)? Or might he unleash the feral power of a Hunting Wendigo (The Sleeper Below, 16)? 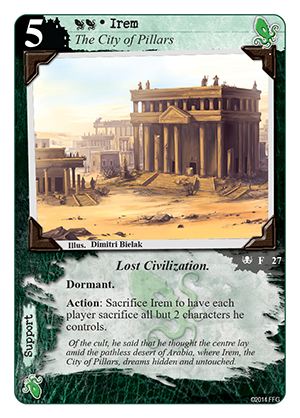 
At the root of this uncertainty is the fact that cards with Dormant can pack a devastating punch and tilt the odds of the game in your favor. For example, From the Depths (The Sleeper Below, 34) triggers a huge tempo surge when you play it, but it is even better if your opponent helps you to activate it for free! The threat of allowing you free access to an event like this can prompt your opponent to hesitate to finish stories wherever you have placed a dormant card, and it’s not inconceivable that he’d abandon a story completely, even if he’s only one success token away. Accordingly, Dormant cards can buy you time to rebound from early losses, and you might take back a story you would have lost if your opponent kept pushing.  Or you might be able to capitalize upon your opponent’s hesitation by focusing on other stories after your opponent has wasted his time on a story he no longer wishes to win. Or you might be able to capitalize upon your opponent’s hesitation by focusing on other stories after your opponent has wasted his time on a story he no longer wishes to win. With any new mechanic, it’s important to make sure that it interacts with the game in a number of different ways, and if you ever find yourself in a bind without the time or resources to get a Dormant character into play, you could just seize upon that fleeting moment when The Stars are Right (The Sleeper Below, 33). This event allows you to jump a Dormant character directly into play for one devastating turn before it goes back to rest. While using The Star are Right to jump a Dormant character into play won’t allow you to trigger that character’s Disrupt effect, the ability to raise a mighty character like Cthulhu from the deeps, if even just for an instant, adds another layer of surprise to your Dormant strategy, and it can make your opponent groan when he realizes he will just have to deal with that character again as soon as that story is won! To Wake the Slumbering Terrors The new Dormant mechanic in The Sleeper Below is just one of the ways that this seventh deluxe expansion for Call of Cthulhu: The Card Game gives new life to the dark and sinister cult of Cthulhu. In fact, the cult’s many Cultists feature prominently among its cards, and in our next preview, developer Damon Stone offers a glimpse of the many evils these power-hungry individuals may soon unleash! ... Source: The Terrors That Lie Dormant
|
|
|
|
|
Logged
|
|
|
|
RSSFeeder
Global Moderator
Deep One
Karma: 0
Offline
Posts: 3916
|
|
« Reply #137 on: 06 August 2014, 14:30:32 » |
|
Dash RendarPreview the Wave V Upgrade Designed by 2012 World Champion Doug Kinney
“Go back and stand by the manual release for the landing claw.”
–Han Solo Soon, the YT-2400 Freighter Expansion Pack for X-Wing™ will allow Rebel players to head to battle with the game’s first turret-mounted cannons. Simultaneously, it marks the arrival of the first two upgrades designed by the game’s World Champions, Stay on Target and the Dash Rendar crew upgrade. In our last preview of the expansion, 2013 World Champion Paul Heaver led us through the design of Stay on Target and gave us a look at how it may play in the game. Today, 2012 World Champion Doug Kinney shines a light on the development of the Dash Rendar crew upgrade. Dash Rendar is one of the Star Wars galaxy’s most renowned smugglers, and as Doug Kinney explains, he thrives in tight situations and places that would very likely spell the end of less talented individuals. 
Doug Kinney on Designing the Dash Rendar Crew Upgrade In The Empire Strikes Back, we saw the Millennium Falcon interact with a number of different objects in space. At different points, Han Solo flew his ship into an asteroid field, landed inside of one of them, and attached the Falcon to an Imperial Star Destroyer before detaching and floating away with its trash. When I had the chance to work with the game’s developers to develop an upgrade for X-Wing, I thought about the interactions that ships had with obstacles, and I thought that it might be a cool, new game mechanic to have a ship that could ignore the effects of obstacles. Allowing an entire squad to completely ignore the effects of obstacles would be too powerful, so to ensure that this new mechanic would not be too game-breaking, the developers and I worked to determine how the ship would ignore obstacles and limit its impact. There were a number of different ways to approach how a ship could ignore obstacles. Obstacles affect ships both in the Activation Phase and in the Combat Phase, and to limit the impact, Dash Rendar was designed according to an “either/or” approach. My aim was to allow a ship to ignore obstacles during the Combat Phase, but still be penalized during the Activation Phase. However, the game’s developers took this mechanic a step further by including another card that would allow a ship to ignore obstacles during the Activation Phase, but not during the Combat Phase.
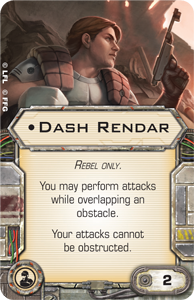
The second step was to limit this new mechanic to a single ship, and the game’s developers addressed this concern by ensuring that the mechanic appeared only on a couple of unique cards. My mechanic appeared on the new Dash Rendar crew upgrade, and they utilized the Dash Rendar pilot card to introduce the other half of the mechanic. Making this mechanic unique to Dash Rendar meant that no single ship could completely ignore obstacles. If you want to have Dash Rendar pilot the Outrider, you can ignore obstacles during the Activation Phase, but you’ll still need to pay attention to them during the Combat Phase. If you want Dash Rendar to crew your ship, you won’t be able to use his unique pilot ability during the Activation Phase, but you may still attack during the Combat Phase even if your base overlaps an obstacle. Dash Rendar in the X-Wing Metagame What does Dash Rendar add to the game? When you use the Dash Rendar crew upgrade, you gain a little room to fly more unpredictably, knowing that overlapping an obstacle won’t be as detrimental as it normally would. On the other hand, if you see Dash crewing a ship across the table from you, you have to account for greater range of possible maneuvers during the Planning Phase, understanding that your opponent might fly into an obstacle in order to get a better shot. Crew slots are a precious commodity, and we already have many viable options for crew upgrades. Still, since he costs only two squad points, I suspect that Dash Rendar will contend for one of those slots in a number of builds, simply because he adds a new element of flexibility to your maneuvering choices. We have all had games where one of our ships just barely overlaps an obstacle at a crucial point in the game, denying it an attack that could secure the victory. The new Dash Rendar crew card ensures that you’ll get to make that critical attack, and that it cannot be obstructed. It’s most likely that you’ll see Dash Rendar on large ships, since they cover more surface area and are, thus, more susceptible to obstacles. Still, when the Rebel Aces expansion introduces the new B-wing/E2 modification, I think Dash Rendar may see some play time on B-wings as well. Consider, for example, the following ship build: 
Blue Squadron Pilot with Advanced Sensors, B-wing/E2, and Dash Rendar
Total Squad Points: 28 If your Blue Squadron Pilot finds himself forced into a tight spot by enemy ships, he could potentially use Advanced Sensors to barrel roll before performing a two-speed Koiogran-turn maneuver that causes him to overlap an obstacle. Previously, this combination of maneuvers would cost the Blue Squadron Pilot his chance to attack, and it would, thus, likely be one of the last options chosen. With the Dash Rendar upgrade, though, your B-wing would still be able to attack, making this selection of maneuvers more of a viable option in an otherwise suboptimal situation. 
After the Imperial player correctly anticipates your Blue Squadron Pilot’s maneuver and flies into position to block him, Dash Rendar still allows him to take a Range “1” shot after pursuing an unexpected avenue of escape!
I was honored to help design a card for X-Wing, and I believe I was able to work with the developers to introduce a new and interesting mechanic to the game. Have fun, make friends, and fly casual! Equipping the Outrider Both as a pilot and as a crew upgrade, Dash Rendar adds an exciting new element to the game. However, he’s not the only the pilot in the YT-2400 Freighter Expansion Pack, and he wouldn’t have enjoyed quite the same level of success he had if it weren’t for his signature YT-2400, the Outrider. In our next preview, we’ll take a closer look at the YT-2400 Freighter Expansion Pack, exploring what its other pilots and upgrades add to the game. Moreover, we’ll look at its unique place in the game as the first large ship with the barrel roll in its action bar and how that may lead to new interactions with other ships, as well as the expansion’s new debris cloud obstacle tokens. ... Source: Dash Rendar
|
|
|
|
|
Logged
|
|
|
|
RSSFeeder
Global Moderator
Deep One
Karma: 0
Offline
Posts: 3916
|
|
« Reply #138 on: 06 August 2014, 23:00:02 » |
|
Playing the CourtiersA Preview of the Characters in The Last Banquet
I’d like to make a toast. To all my loyal subjects in attendance tonight, from the castle servants, to the Trader, to my dear Baroness, whose attendance at this banquet is truly an honor. Thank you for your loyalty in this era of turmoil and civil strife. I am certain that none of you would ever betray me.
–The King Enter a world of courtly posturing and deadly intrigue in The Last Banquet. In this large-group game for six to twenty-five players, you and your friends take on the roles of royalty, nobles, commoners, and even servants attending a magnificent banquet. Six different scenarios divide the characters into competing factions, which have a different objective in each scenario, from murdering the king or queen, to rescuing the princess from captivity or securing part of a luxurious estate. Will you curry royal favor, or commit treason to ascend to the throne? 
Today’s preview introduces you to a few of the characters scheming to get ahead at court. You’ll learn some of the words and actions you can choose to play, and how status shapes the characters’ behaviors. But remember: a kindly demeanor and friendly words do not necessarily indicate good intentions, and servants can be just as crafty as courtiers. In this court, it’s best to be careful about who you trust and, above all, who you sit next to at dinner.  Suit the Action to the Word Suit the Action to the Word
Every character in The Last Banquet has a set of actions and dialogue that goes with them. The phrases at the top of the card may be used at the start of gameplay to introduce your character or whenever you perform your basic action. The baroness, for example, can make two players switch places with each other, saying, “A good arrangement benefits everyone.” Of course, she could mean that sincerely or ironically – it’s up to you. Under the basic rules, you can perform only the basic action. If the more expansive full rules are being used, you have two actions to choose from and a favor action that can perform with the consent of whoever plays the patron. The baroness can either switch places with someone, saying, “I am here to maintain my courtly contacts,” or relocate a player belonging to her faction with the words, “You should listen to this person. His ideas could be of great use to us.” She can also ask the host to grant her a favor action, saying, “If it please the court, I will hold my tongue until a later hour.” If the host agrees, the baroness can then act again at the end of the turn. You can convey a variety of intents through the given dialogue. The baroness might switch places with someone in order to avoid sitting next to the Princess, or because she wants to convey a secret message to the Baron. Her tone could be businesslike or cloyingly innocent, she could be revealing her true intentions or cleverly trying to mask them. Status Games Guests from all rungs of society are attending The Last Banquet, and of course, servants present to make the event run smoothly – though not necessarily smoothly for the royalty. Each character has a specific social status. The royalty are highest on the social ladder, then the nobility. Members of court, although obedient to the king and queen, still have higher status than those who are not part of the court. Lowest status are the independent characters, who tend to have little regard for social stratification and operate without adhering to its rules. But don’t be fooled: even characters who seem more occupied with profit or religion than with political drama have vested interests in who sits on the throne. Your status at court doesn’t determine how much power you have. The queen may become the victim of the duchess’ gossip, and the king is at the mercy of whoever provides him food and drink. Status is, however, linked to initiative, which affects when a player speaks and whether they ever have to relinquish their seat. Some actions also affect only players of a specific status. The trader, for instance, can pull the royalty and nobility towards him to view his expensive wares. Many actions can’t affect royalty at all, so you must often manipulate others to get close to the king and queen.  
Click the image to see the reverse side of the card Power Players At court every action is political and everyone has influence. The jester and the duchess may not be the king’s appointed advisors, but they are as capable of political manipulation as anyone else at court. They may even be better at these dangerous games than the king himself. The jester uses laughter and folly to create chaos at the banquet table. With the words “all of life is folly” he can cause every member of a faction to close their eyes, spin around, then open their eyes and rush to the first unoccupied spot they can find. You could use this action to save the queens’s life, or cause the abbot to lose his share of an estate. The jester’s favor action is one of the most powerful in the whole game: choosing two players within the same faction and social status, the jester forces them to switch characters, perhaps transforming the juggler into a wizard, or the gamekeeper into a lady’s maid. Her gossip-mongering may seem frivolous, but the duchess knows how to use words as weapons. If she says, “Tell me the latest gossip,” she can draw two players within her faction to her sides, perhaps placing an assassin in between her and the king. Or, she can cleverly ask someone within her faction, “Have you heard the latest rumors?” Then, the Duchess will move next to that player, placing herself in a better position to prevent a royal crisis – or create one. 
Have Your Day in Court All the courtiers and commoners present at The Last Banquet have secret motivations and clever tricks up their lavish sleeves. Whether plotting behind the king’s back or openly striving to get ahead, you and your friends will enjoy taking part in this sensational courtly drama. Our next preview will explore some of the scenarios that you can play in The Last Banquet. Prepare to take your place at the royal table! Check The Last Banquet minisite for more details and pre-order your copy from your local retailer today! ... Source: Playing the Courtiers
|
|
|
|
|
Logged
|
|
|
|
RSSFeeder
Global Moderator
Deep One
Karma: 0
Offline
Posts: 3916
|
|
« Reply #139 on: 07 August 2014, 07:30:02 » |
|
Building a HiveDeveloper Tim Huckelbery on Creating Hive Desoleum for Dark Heresy Second Edition
“They call this the bottom of the hive. Hah! I know for a fact there is a whole lot more even farther down…”
–Omar Endish, Purveyor of Sacrosanct Salvage Millions of planets fill the galaxy in Warhammer 40,000, and no two are exactly the same. Hive worlds, forge worlds, feral worlds, and death worlds are vastly different from each other, and even within these categories, planets differ massively. In Dark Heresy Second Edition, you and your fellow Acolytes journey to countless unique planets across the Askellon sector, including Hive Desoleum, a decaying hive held together by ancient oaths. Today, developer Tim Huckelbery explores the process of creating Hive Desoleum and the strange peoples who inhabit it. Tim Huckelbery on Creating Hive Desoleum It all started with a hive ganger. Or more precisely, what she looked like. While creating new art descriptions for The Lathe Worlds, one of the earlier Dark Heresy books, we wanted to include a hive ganger image. Hives and the vicious gangers that inhabit them are an iconic part of Warhammer 40,000, and it was natural to include them. The issue was that a firm description of a hive ganger’s appearance is non-existent. There’s no such thing as “typical” or “normal” in the 41st millennium, so we couldn’t truly say our proposed hive ganger looked typical. Each ganger looks different, depending on the gang she belongs to. Each hive has its own groups of hive gangers, unique to that hive, and each world has unique hives. For us to create a hive ganger and bring her to life properly, we had a bit of work to do – we needed to build a world.  The first thing we did was create a gang for our ganger to walk alongside. Drawing inspiration from films, we decided that most gangs in our new hive would belong to gang affiliations, with each affiliation featuring an iconic fighting method, weapon type, or even clothing style. Our new gang, the Bloodlines, would be one of the Fleshcutter gangs, all obsessed with bladed weapons and ritual scarring. With one gang affiliation down, we went on to create more gang affiliations, such as the Death Masks, Tech-Gangers, Painted Throngs, and Cloudsboys. While the gangs were still rough ideas, we stepped back to create the setting these gangs would inhabit: Hive Desoleum itself. The first thing we did was create a gang for our ganger to walk alongside. Drawing inspiration from films, we decided that most gangs in our new hive would belong to gang affiliations, with each affiliation featuring an iconic fighting method, weapon type, or even clothing style. Our new gang, the Bloodlines, would be one of the Fleshcutter gangs, all obsessed with bladed weapons and ritual scarring. With one gang affiliation down, we went on to create more gang affiliations, such as the Death Masks, Tech-Gangers, Painted Throngs, and Cloudsboys. While the gangs were still rough ideas, we stepped back to create the setting these gangs would inhabit: Hive Desoleum itself.
We wanted to make this hive unique, and we decided that the hive wouldn’t run on cash or hard currency, but instead would rely on an elaborate network of oaths that tied everyone in the hive together in a network of debts and obligations. Every citizen of the hive would carry an oath-cog to track his own oaths. Lower workers wore simple mechanical devices, as their oaths lay predominantly with their overseer. The rulers owned much more elaborate versions, more like a brass snowstorm of tiny, whirring cogs and gears, so large that servitors had to carry the intricate mechanisms. This also led to concepts for normal clothing within the hive, thus leading to refinements in what gangers wore to rebel and stand out from the crowds. The oath-cogs worn by the hive’s Enforcers could even be detached and used as brutal melee weapons. The oath system completely drove the people’s customs and the hive’s operations, adding another wonderful piece to the Warhammer 40,000 setting. Once the hive started coming together, the planet as a whole was next. We decided Desoleum possessed vast wastelands of irradiated glass and sand, with acidic oceans and gigantic creatures drifting through the abyssal depths. We also included some primordial xenos ruins, buried beneath radioactive sand, but always attracting those who sought alien relics for sale or adoration. Now that the hive and the planet were complete, it was time for us to return to developing the gangs of Desoleum. Each of the gang affiliations received specific, named gangs and histories, plus a detailed sample ganger to use as a development aid for each gang. We added Chaos cults, mutant enclaves, and religious sects, alongside hive nobles and ancient hive structures like the Spine to add more mystery to the setting. Everything in Desoleum got attention, from the heights of Apex, where the hive rulers lives in opulence, to the deadly ruins and slums of the Underhive. I especially liked working in the depths far beneath the surface, the lawless areas that can seem to stretch on forever. For me, the only thing cooler than a hive is what may lurk beneath it. In these dark reaches, prospectors prowl the shores of underground seas, searching for lost archaeotech amidst mutant settlements and heretical worshippers. Here, wonders and terrors beyond imagining can be found. 
It was a lot of work for just one art piece, but it was truly worth it. I really enjoyed developing this wonderful setting, and found myself using it and its peoples in other books as we worked on Dark Heresy Second Edition. Hive Desoleum was our first major location for the Askellon sector, and your Acolytes should have an exciting time exploring this massive hive and rooting out its heresies and dangers! Enter the Hive Thanks, Tim! Your adventures in Dark Heresy Second Edition lead you across the exotic worlds of the Askellon sector to visit worlds ranging from Hive Desoleum to worlds untouched by mankind. Prepare to investigate heresy across the galaxy, and preorder Dark Heresy Second Edition at your local retailer today! ... Source: Building a Hive
|
|
|
|
|
Logged
|
|
|
|
RSSFeeder
Global Moderator
Deep One
Karma: 0
Offline
Posts: 3916
|
|
« Reply #140 on: 07 August 2014, 16:00:02 » |
|
You Are Humanity's Last HopeThe Alien Invasion Begins with XCOM: The Board Game
Paris has fallen. New York is a pile of rubble spilling into the Atlantic. Alien attacks against Nanjing and Changzhou prompt widespread panic throughout the streets of Shanghai. Defense satellites detect UFOs in orbit over Mexico, Russia, and Brazil. Military responses have proven ineffectual. Fear and anxiety lead to widespread riots. Human civilization stands upon the brink of collapse… You are humanity’s last hope. In XCOM: The Board Game, you and up to three friends assume the roles of the leaders of the elite, international organization known as XCOM. It is your job to defend humanity, quell the rising panic, and turn back the alien invasion. Where the world’s militaries have failed to stand against the alien invaders, you must succeed. To do so, you must make strategic use of the resources available to you. You must launch Interceptors to shoot down alien UFOs, assign soldiers to key missions, research alien technology, and use that technology to defend your base, all while you try to keep the world from collapsing just long enough that you can coordinate one final mission to repel the invaders for good. 
Innovative Digital Enhancement
The most notable aspect of XCOM: The Board Game is the way that it incorporates a free and innovative digital app into the core of its gameplay, then uses the app to promote a unique play experience unlike anything you and your friends have previously encountered in a board game. This digital companion will be available both as a downloadable app and as an online tool. The app’s primary function is to coordinate the escalating alien invasion, randomly selecting from one of five different invasion plans. Each invasion plan represents a general outline that the alien commanders will use to coordinate the arrival of new UFOs, plan strikes against your base, and respond to your successes or failures as it seeks to conquer Earth. The app manages all of these tasks and heighten’s the game’s tension as it forces you to respond in real-time. Then, after you move quickly to coordinate your response, you engage the enemy in the untimed resolution phase and feed the results to the app. Based upon these results, the app launches the invasion's next strikes. 
Two UFOs appear over North and South America
Additionally, the app teaches you the rules, controls the information that your satellites provide you, and tracks the progress of your resistance efforts, even as it allows you to enjoy the game at any of three levels of difficulty: Easy, Normal, or Hard. 
A crisis card | | The use of this app does more than simply streamline your play experience and track your turns in real-time. It also permits a uniquely dynamic turn structure. While the variety of game phases remains the same from round to round, the order in which you and your friends must play through them may change, as may the number of a given phase. As a result, while you’ll want to know where UFOs appear before you deploy your Interceptors, the alien invaders may be able to disrupt your satellite intel and force you to deploy your Interceptors on patrol with limited or no knowledge of the UFOs current whereabouts. Similarly, you may be forced to think about the costs of resolving the world’s crises before you know how many troops you’ll need to commit to your base defense. The effect of the app, then, is to immerse you deep into the dramatic tension at the core of XCOM: The Board Game, and it ensures that the game presents a challenging and cooperative (or solo) experience like no other. Just like the XCOM department heads that you represent, you’ll need to keep cool heads in order to prevail. Inside XCOM Strategic Command XCOM’s resistance efforts are spearheaded by its four leaders, each of which is represented by one of the game’s player roles: Commander, Chief Scientist, Central Officer, and Squad Leader.  Commander Commander
| | The Commander is responsible to manage XCOM’s budget and must be foresightful enough to know when best to access the organization’s emergency funding and how best to allocate it. Additionally, the Commander makes the tough decisions about where to assign XCOM’s limited number of Interceptors to global defense. Wherever you commit your Interceptors, you have a chance of destroying UFOs and slowing the spread of panic. Wherever you don’t commit your Interceptors, fear and anxiety are bound to run rampant. | 
The Commander is responsible for assigning Interceptors to global defense
 Chief Scientist Chief Scientist
| | If you and XCOM are to have any chance of successfully repelling the alien invaders, you’ll need better technology. The Chief Scientist’s responsibilities include studying advanced technology, learning how to harness it, manufacturing better weapons and armor, and equipping the rest of the organization with the tools they need to survive. Of course, only a limited number of scientists possess the necessary training and intellect to quickly dissect, analyze, and replicate alien technology. Part of your job as Chief Scientist, then, is not only to decide how best to direct the organization’s research efforts but also to prioritize between them, allocating more scientists to the projects you decide will best benefit the war effort. |  Central Officer Central Officer
| | The Central Officer serves as the communications relay between XCOM and the outside world. This means you manage the organization’s satellite network, and it is your job to ensure that the organization remains alert to potential threats, communicates and coordinates its efforts effectively between branches, and scrambles as many alien transmissions as possible. Succeed, and you’ll reduce the number of UFOs in orbit. Fail, and you’ll suffer communications blackouts that will force you to act blindly in the midst of a war, the likes of which Earth has never known. Additionally, the Central Officer communicates all of the information provided by the game’s digital app to the players. The clock is always running, so it’s vital that you share all relevant information quickly and clearly. |  Squad Leader Squad Leader
| | In the end, XCOM needs boots on the ground to confront the alien invaders, and it’s the Squad Leader’s job to ensure that the right troops are tackling the right missions. As the invasion escalates, you must assemble strike teams to meet the aliens in battle. Simultaneously, you must assign soldiers to defend the XCOM base, and you’ll need to strike an effective balance. If your base falls, so do you. So does the earth. Still, you need to succeed at missions to win. Each mission you complete brings you closer to uncovering a means of launching one final, fatal blow against the alien invaders. | 
The Squad Leader is responsible for assigning troops to missions
All four player roles are vital to XCOM’s success, and you and your friends must divide them among yourselves in every game. Your soldiers won’t succeed without the upgrades your scientists can research, nor will you be able to launch successful Interceptor strikes against UFOs unless you acquire good intel from your satellite network. Can You Find a Way to Defeat the Unknown Foe? With its free companion app and distinctive player roles, XCOM: The Board Game evokes all the fear, desperation, and heroism that lie at the heart of the popular and acclaimed XCOM computer games. All the while, it immerses you in a wholly unique play experience. For more about the game, including its push-your-luck dice system, you can visit the game’s description page. Also, keep your satellites in place for future transmissions, including a series of previews, in which we’ll explore the game and its components in greater detail, and if you're headed to Gen Con Indy 2014, be sure to stop by our booth in the exhibit hall where we'll be running demos all weekend long! XCOM: The Board Game is scheduled to arrive at retailers in the fourth quarter of 2014. Until then, destroy UFOs. Research alien technology. Defend your base. Uncover the alien invasion plan. Should you fail, humanity is doomed. ... Source: You Are Humanity's Last Hope
|
|
|
|
|
Logged
|
|
|
|
EvilGinger
Moderator
Great Old One
   
Karma: 29
Offline
BoardgameGeek: Evilginger
Posts: 5339
I speak only of the Evilerginger who is coming
|
 |
« Reply #141 on: 07 August 2014, 17:36:35 » |
|
Very iffy about the APP - even if I so want the game  Ginger Ginger |
|
|
|
|
Logged
|
seek solace in the doom of empires and the death of great kings
|
|
|
RSSFeeder
Global Moderator
Deep One
Karma: 0
Offline
Posts: 3916
|
|
« Reply #142 on: 08 August 2014, 00:30:03 » |
|
A Wizard Is Never LateA Preview of The Road Darkens Saga Expansion for The Lord of the Rings
“With you and your faithful servant, Gandalf will go; for this shall be his great task, and maybe the end of his labours.”
–Elrond, The Fellowship of the Ring Earlier, we announced the upcoming release of The Road Darkens, the Saga Expansion for The Lord of the Rings: The Card Game that carries players forward from the events of The Black Riders and into a series of events drawn directly from the second half of The Fellowship of the Ring. From the Council of Elrond through the breaking of the Fellowship, The Road Darkens thrusts you directly into Frodo’s company, challenging you to find your way through some of the most dramatic scenes in Tolkien’s literature. However, the expansion draws upon its source material for more than just its scenarios. Today, Caleb Grace, one of the game’s developers, reveals the new hero card appearing in The Road Darkens. A Light in the Dark I have a love/hate relationship with sequels, especially movie sequels. When I see a movie I like, my first thought is, “That was great! I hope they make another one!” However, it seems like whenever I do watch the sequel to a good movie I typically find myself thinking, “That was terrible. I wish they had quit after the first one.” Still, every now and then, that rare sequel is released that’s not only as good as the first but actually manages to translate everything I loved about it into a wholly fresh and inspiring experience. That’s always a very special moment for me, and that’s the way I feel about the sequel to The Black Riders Saga Expansion, The Road Darkens! Now, I realize that my comments just set the bar pretty high for this box, but that’s just how confident I am that players will enjoy what’s in it. I’ve seen a lot of reviews of The Black Riders, and The Road Darkens promises to offer another generous helping of those things that people enjoyed about its predecessor: iconic player cards, interesting and thematic scenarios, and more boons and burdens for Campaign Mode!  There will be time to review the expansion’s scenarios later, but in this article I’d like to look at a few of the new player cards. There are two new heroes in The Road Darkens. The first is a new Fellowship sphere version of Frodo Baggins (The Road Darkens, 1), complete with a brand new ability. The second is one that I know players have been anxious to see in The Lord of the Rings: The Card Game – Gandalf (The Road Darkens, 2)! There will be time to review the expansion’s scenarios later, but in this article I’d like to look at a few of the new player cards. There are two new heroes in The Road Darkens. The first is a new Fellowship sphere version of Frodo Baggins (The Road Darkens, 1), complete with a brand new ability. The second is one that I know players have been anxious to see in The Lord of the Rings: The Card Game – Gandalf (The Road Darkens, 2)!
There were many heroes that we could have chosen for this box, but the most exciting option was always Gandalf. We knew we wanted to make a hero version of the mighty wizard at some point, and this was the most logical time. I remember being excited when Elrond told Frodo that Gandalf would be a part of the Fellowship in the book. I thought, “Alright! They might actually have a chance!” I felt safer knowing he was with them. And why not? There was no end to the things he could do! That astounding resourcefulness was the first thing I wanted to represent with the Gandalf hero. That’s why he’s a neutral hero; I didn’t want him to be limited to one Sphere of influence. I also wanted the experience of playing with him to feel “wizardly.” An Istari hero had to feel different from a Warrior, Noble, Ranger, and so forth. So we came up with an ability that’s entirely unique: “Play with the top card of your deck faceup. Once per phase, you may play the top card of your deck as if it were in your hand. When playing a card this way, Gandalf is considered to have the printed Leadership, Lore, Tactics, and Spirit icons.” Gandalf always seemed to know something that nobody else did, and now you can, too. Playing with the top card of your deck faceup creates a lot of interesting advantages. One great combo is using Gandalf with Expert Treasure Hunter (The Hobbit: On the Doorstep, 17) to gain an extra card draw every time you quest successfully. It can also help you and your friends know which player is the best to grant the extra card draw from Gléowine (Core Set, 62) each round. The second part of Gandalf’s ability helps him fit into any deck type. He can be especially useful in a dual-Sphere deck. In most dual-Sphere decks, two of your three heroes belong to one sphere while only one belongs to the other. Gandalf, however, can count for either Sphere, depending what’s on the top of your deck. For example, if I only have one Spirit hero, that typically means that I’ll have to wait two turns in order to play a two-cost Spirit ally. But with Gandalf, if that ally is on the top of my deck during the planning phase, I can use one resource from Gandalf and one from my Spirit hero to play that ally as if it was in my hand. Not only does that put my ally into play, but it’s also a subtle form of card draw because now there is a new card on the top of my deck. If that card happens to be an event, I might be able to play it later that round. Some great cards to find on top of your deck this way are A Test of Will (Core Set, 50), Secret Paths (Core Set, 66), and Feint (Core Set, 34). Using his ability, Gandalf can play any of those cards and make a big difference that truly makes him feel like a great wizard. Staves and Spells  That leads us to the next of today’s cards. After all, where would a wizard be without his staff? You had to know if we were going to create a Gandalf hero that we would make Gandalf’s Staff (The Road Darkens, 8). And so we did! Of course, it only attaches to Gandalf, and this is what it says: That leads us to the next of today’s cards. After all, where would a wizard be without his staff? You had to know if we were going to create a Gandalf hero that we would make Gandalf’s Staff (The Road Darkens, 8). And so we did! Of course, it only attaches to Gandalf, and this is what it says:
“Action: Exhaust Gandalf’s Staff to (chose one): choose a player to draw 1 card, add 1 resource to a hero’s resource pool, or discard a shadow card from a non-unique enemy.” Probably the biggest drawback to playing the Gandalf hero is that it means nobody can use the Gandalf ally. Playing the Core Set ally version of Gandalf and deciding which of his three abilities to trigger has always been fun, so we designed his staff to give you a fun choice as well. Lastly, we wanted to make a truly amazing Spell event for Gandalf players to wow people with, so we came up with Flame of Anor (The Road Darkens, 7). A one-cost neutral event, it reads: “Action: Add Flame of Anor to the victory display and discard the top card of your deck to ready an Istari character you control. That character gets +X Attack until the end of the phase where X is the discarded card’s cost.” Gandalf rarely revealed the full extent of his power, but when he did, it always made an indelible impression upon everyone who stood witness. That was the feeling we went for when designing this Flame of Anor. We wanted people at the gaming table to say, “That was awesome!” Of course, balancing those type of effects in a card game is a real tightrope walk: 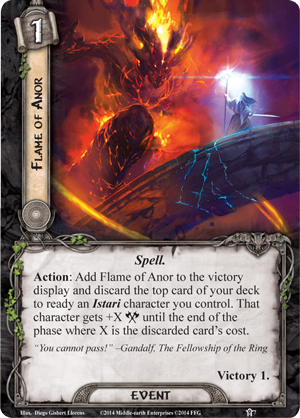 Overdo it, and it can make the game too easy; moderate it too much, and everyone’s disappointed. Our solution was ultimately to ensure the card was added to the victory display when it was played. This ensured that a player could not use this effect more than three times in a game. Overdo it, and it can make the game too easy; moderate it too much, and everyone’s disappointed. Our solution was ultimately to ensure the card was added to the victory display when it was played. This ensured that a player could not use this effect more than three times in a game. With that failsafe in place, we were free to make a really fantastic Spell event. Not only do you ready an Istari character for the cost of a single neutral resource and a discard, but if you play it right, that discard will add a significant value to your wizard’s Attack Value. Of course, Gandalf’s ability can help you choose the best time to take that action. Imagine finding a six-cost Beorn (Core Set, 31) on the top of your deck that you can discard to ready Gandalf and give him six extra points to his Attack Value until the end of the phase! Are you excited yet? That was only three of the different cards in the box! We’ll take a look at some of the other cards in the next preview article when we look at the expansion’s three new scenarios. Thanks, Caleb! The Road Darkens allows you to join Frodo Baggins along some of the darkest moments of his epic journey, but the fact that you’ll be able to call upon the aid of a wizard as powerful as Gandalf means that there’s still hope for Middle-earth. Gandalf, his staff, Flame of Anor, and all the other thematic cards from The Road Darkens are now starting their own epic journey to retailers everywhere, so head to your favorite local retailer today to pre-order your copy! ... Source: A Wizard Is Never Late
|
|
|
|
|
Logged
|
|
|
|
RSSFeeder
Global Moderator
Deep One
Karma: 0
Offline
Posts: 3916
|
|
« Reply #143 on: 08 August 2014, 09:00:03 » |
|
Draw Their FireAnnouncing the Second Force Pack in the Rogue Squadron Cycle
“I owe the Outrider the best. She’s brought me home when any other ship would have scattered me across space.”
–Dash Rendar Fantasy Flight Games is proud to announce Draw Their Fire, the second Force Pack in the Rogue Squadron cycle for Star Wars™: The Card Game! Draw Their Fire offers more support for the main theme of the Rogue Squadron cycle: ace pilots and the starships they fly. With the new pilot (X) keyword, your Pilot units can command iconic fighters and capital ships in massive interstellar dogfights, while a new fate card brings the tension of flying starfighters to your edge battles. You’ll find the relentless Fighters of Black Squadron, pilot experimental starships such as the TIE defender, or help Qu Rahn defend the secrets of the Valley of the Jedi within Draw Their Fire. 
Sometimes, facing your enemy head-on leads only to defeat. If you need combat tricks and ways to evade your opponent’s defenses, look no further than the Smugglers and Spies of the galaxy. In Draw Their Fire, you’ll find new ways for your smugglers to escape any Imperial blockades. Make Your Escape  The objective set begins with The Daring Escape (Draw Their Fire, 731) objective. This objective offers two resources to help you afford the best starships and pilots for your smuggling operations. To find the pilots willing to run an Imperial blockade, however, you’ll have to visit a Spacer Cantina (Draw Their Fire, 734). Within this cantina’s walls, you’ll find dozens of pilots – both those who only claim to be the best, and those who truly are the best. Once you find the pilot you want to hire, the Spacer Catina not only provides a resource to pay their fee, it also reduces by one the cost and pilot cost of the first Pilot card you play each turn. If you have a covert job to run, the Spacer Cantina is where you’ll find your pilot. The objective set begins with The Daring Escape (Draw Their Fire, 731) objective. This objective offers two resources to help you afford the best starships and pilots for your smuggling operations. To find the pilots willing to run an Imperial blockade, however, you’ll have to visit a Spacer Cantina (Draw Their Fire, 734). Within this cantina’s walls, you’ll find dozens of pilots – both those who only claim to be the best, and those who truly are the best. Once you find the pilot you want to hire, the Spacer Catina not only provides a resource to pay their fee, it also reduces by one the cost and pilot cost of the first Pilot card you play each turn. If you have a covert job to run, the Spacer Cantina is where you’ll find your pilot.
This objective set also includes a copy of Stay on Target (Draw Their Fire, 702), one of two new fate cards included in the Rogue Squadron cycle. Playing this card in your edge battle contributes two Force icons to your total, and it also allows you to put a Pilot card into play from your hand or discard pile as an enhancement on a friendly Vehicle unit. Dropping a pilot into a ship in the midst of battle can quickly turn the tide of combat, making Stay on Target an invaluable addition to any deck focused on piloting Vehicles. One Pilot you may choose to slip in with Stay on Target is Dash Rendar’s Droid and co-pilot, LE-BO2D9 (Draw Their Fire, 732), or “Leebo.” Leebo is a skilled mechanic and pilot, and with him at the controls, any starship moves faster. While Leebo is attached to a Vehicle as a Pilot enhancement, you may remove the enhanced unit from the engagement immediately after it resolves a strike, allowing you to fire quickly and escape before your opponent can shoot you out of the sky. Combined with a unit like the Blockade Runner (Edge of Darkness, 323), LE-BO2D9 can prove a nightmare for any dark side player to handle.  Although Leebo can pilot any Vehicle, he’s at his best in Dash Rendar’s own ship: the Outrider (Draw Their Fire, 733). The Outrider is a YT-2400 light freighter, massively modified for additional speed and weapon power, making it deadly in combat. The true power of the Outrider, however, lies in its Action, which reads, “During an engagement, focus a Pilot card attached to this unit to have this unit participate in the engagement on your side.” By focusing the Pilot of the Outrider, you can bring this unit into an engagement suddenly, even after your opponent’s defending units have focused to strike. Although Leebo can pilot any Vehicle, he’s at his best in Dash Rendar’s own ship: the Outrider (Draw Their Fire, 733). The Outrider is a YT-2400 light freighter, massively modified for additional speed and weapon power, making it deadly in combat. The true power of the Outrider, however, lies in its Action, which reads, “During an engagement, focus a Pilot card attached to this unit to have this unit participate in the engagement on your side.” By focusing the Pilot of the Outrider, you can bring this unit into an engagement suddenly, even after your opponent’s defending units have focused to strike.
The Outrider gains even more maneuverability by pairing it with Leebo. You can focus Leebo to bring the Outrider into an engagement, and once it strikes, Leebo’s Reaction removes it from the engagement, keeping the ship safely out of reach of enemy unit damage. You might even use the Stay on Target fate card in an edge battle to suddenly attach a Pilot to the Outrider, setting your opponent up for a nasty surprise when the Outrider joins the engagement. Of course, not even the Outrider can escape from every possible trap. That’s why this objective set includes Punch It (Draw Their Fire, 735). Whenever a friendly Vehicle unit is targeted by an enemy card effect, you can play Punch It to force your opponent to choose a different eligible target, giving you the chance you need to make another daring escape. Evasive Maneuvers You’ll find plenty of support for your flying aces in the Draw Their Fire Force Pack, whether you escape at the last second with Leebo and the Outrider or enter battle with Black Squadron TIE pilots. Get to the flight deck, and look for Draw Their Fire at your local retailer in the fourth quarter of 2014! ... Source: Draw Their Fire
|
|
|
|
|
Logged
|
|
|
|
RSSFeeder
Global Moderator
Deep One
Karma: 0
Offline
Posts: 3916
|
|
« Reply #144 on: 08 August 2014, 17:30:03 » |
|
Tempting FatePreviewing Light and Dark Fate in Talisman: The Woodland
The sounds of pounding drums and raucous laughter fill your ears. Suddenly, the woods in front of you part to reveal a shadowy glade, crowded with mischievous Piskies, cackling Boggarts, darting Storm Sylphs and other faerie creatures. Seated above them all on a throne of black antlers is King Oberon, smiling at the chaotic revels. Upon seeing you, he speaks with a thundering but amused voice, “Mortals are not often welcome at my court, intruder, but perhaps you may be. It is a question of fate, and the wrong answer may cause you to lose your life.” The Woodland expansion for Talisman 4th Edition opens up for you the realm of the Fae. In this uncouth forest you may discover splendid Objects, acquire helpful Followers, and develop your Strength and Craft. If you have bad luck, however, the mischievous faeries may steal your possessions and cause you to become lost in the woods. The Woodland is governed by its own particular laws: animals possess Craft, paths often shift, and Fate takes on greater significance than ever before. Today’s preview reveals how this expansion transforms the rules for fate both inside and outside of the Woodland region. You will also learn more about the fearsome and spiteful King and Queen of the Fae, Oberon and Titania. All the Fae, but especially their King and Queen, judge you by your fate. Chances are that you will be welcomed by either the King and his court or the Queen and hers – but certainly not by both. 
Light and Dark Fate tokens in Talisman have always had a dark blue side and a gold side, but the color of your fate token made no difference: it permitted you to reroll one of your own die. The Woodland introduces a difference between light fate (the golden side faces up) and dark fate (the blue side faces up). Spending a token of light fate allows you to reroll a die that you rolled, but spending a token of dark fate allows you to force another player of your choice to reroll a die. A character with more light fate than dark is lightbound, and one with more dark than light is darkbound. Equal amounts of dark and light fate make you unbound, and if you are entirely without fate, you are fateless. Many spaces and cards in The Woodland region affect you differently based on your fate, and being lightbound does not necessarily mean that good things will befall you. Unbound characters often go unaffected by cards in The Woodland, but fateless characters must typically resolve the negative effect of a card. Wandering through the Woodland without any fate could quickly sap away your character’s lives.  At the beginning of the game, and when gaining fate outside of the Woodland region, you may choose what color of fate to gain, taking a step towards ultimately becoming lightbound or darkbound. Your choice may not last long inside the Woodland, however, since Events and Strangers in the faerie realm can alter your fate as they please. Perhaps you have mostly light fate when you encounter the Wyrdling. Since you are lightbound, the Wyrdling causes you to lose all of your light fate and forces you to fight it in battle. Having lost all your light fate, you are now either darkbound or fateless. The Storm Sylph, a dark faerie, causes darkbound characters to gain more dark fate and lightbound characters to lose their fate. At the beginning of the game, and when gaining fate outside of the Woodland region, you may choose what color of fate to gain, taking a step towards ultimately becoming lightbound or darkbound. Your choice may not last long inside the Woodland, however, since Events and Strangers in the faerie realm can alter your fate as they please. Perhaps you have mostly light fate when you encounter the Wyrdling. Since you are lightbound, the Wyrdling causes you to lose all of your light fate and forces you to fight it in battle. Having lost all your light fate, you are now either darkbound or fateless. The Storm Sylph, a dark faerie, causes darkbound characters to gain more dark fate and lightbound characters to lose their fate.
The Mask of the Moon, if you are fortunate enough to come upon it, provides some defense against outside manipulation of your fate. This Magic Object enables you to change the color of a fate token once per turn, enabling you to become darkbound If you anticipate encountering Oberon in the future, or unbound if you simply want to pass through the Woodland unscathed. Fell and Wrath The dark Fae have eternally despised humans and tormented them for sport. As ruler of the dark Fae, Oberon shares their contempt, but will occasionally grant favors to a darkbound mortal who may further his own designs. Darkbound characters who encounter Oberon therefore profit from the meeting, gaining one Strength and stealing a Follower or Object from another character. Towards lightbound and fateless characters Oberon is ruthless and cruel, taking away their light fate, a possession, and half of their lives. Similarly Oberon’s Gate and Oberon’s Bow only benefit darkbound characters: Oberon’s Gate allows you, if darkbound, to teleport to any space with a faceup Enemy on it, in any region except for the Inner Region. If you are lightbound or fateless, however, the character to your left chooses where you will move. Oberon’s Bow allows the darkbound to spend a dark fate to take a life from a nearby character. Casting your lot with Oberon and the dark Fae enables you to harm others, but be careful: Oberon won’t protect you against harm or against his own faeries’ mischief. A Spirit of No Common Rate Proud Titania, beautiful and deadly, leads the light Fae. Like all of her subjects, she is innately well-disposed to mortals, generous to her admirers but certain to punish any who offend her. If you encounter her when lightbound, she gives you Spells, Objects, additional Craft, and even Lives. From the darkbound, she takes Spells, Lives, and fate. 
Titania also delights in doing the opposite of her husband, so whatever Oberon does for the darkbound, she seeks to invert or undo. Oberon’s Gate forces a darkbound character to encounter an Enemy; Titania’s Gate sends a lightbound character towards an Object of his choice. Oberon’s Bow allows you to take life from other characters; Titania’s Wand grants you the ability to cast whatever spell is placed upon that card by spending a light fate. The quarrel between the King and Queen is ancient and eternal, and you may get caught in the middle of it. If you can play them off against each other, encountering Titania and Oberon one after the other may make you extremely powerful. If they choose to take their anger out on you, it could entirely consume your fate and your lives. Face Your Fate The new rules for fate introduced in The Woodland can be played in any game of Talisman: use light fate to change the outcome of your own dice rolls, and dark fate to change the dice rolls of other players. Only within the Woodland region, however, can you experience the full effects of light and dark fate. Whether you seek to control your fate, or prefer to give yourself up to fate’s twists and turns, you will find your journey in every region of Talisman enriched by this innovation. Keep checking the minisite for more information about this expansion and pre-order Talisman: The Woodland at your local retailer today! ... Source: Tempting Fate
|
|
|
|
|
Logged
|
|
|
|
RSSFeeder
Global Moderator
Deep One
Karma: 0
Offline
Posts: 3916
|
|
« Reply #145 on: 09 August 2014, 02:00:02 » |
|
Feral Creatures and Ancient RelicsPreview the Mythology School of Magic in Bestial Forces
Aviliana’s slippers made no sound as she stalked her quarry down the stone corridor. At the intersection ahead of her, the boggart chittered to itself and shifted the treasure on its shoulders. With a shout of command, Aviliana sprang forward, beating her leathery wings to cover the distance in an instant. The boggart vanished before her clutching fingers. Again. As Aviliana picked herself up, a furious snorting behind her suggested she had bigger problems than catching boggarts. Just when it seemed like your magical duels couldn’t become more chaotic, rampaging minotaurs, trickster genies, and fiery drakes arrive to prove you wrong. The advent of six strange and exotic creatures in the Bestial Forces expansion for Wiz-War makes your battles in the labyrinth more intense than ever. Whether you grant yourself the powers of the beasts, or summon these creatures to do your will, you’ll find new magic in Bestial Forces. 
You’ll find more than just creatures in this expansion, however: three new schools of magic await wizards of every kind. In today’s preview, we’ll explore the Mythology school of magic, and the monstrous beasts and relics you command when you master this school’s spells. Creatures Born of Magic 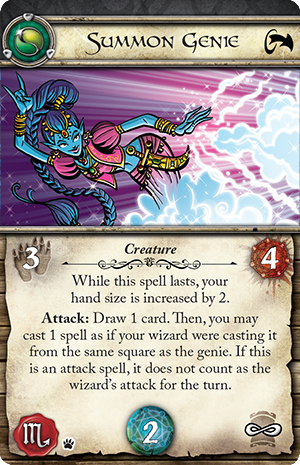 The creatures from folklore and ancient myths that fill the Mythology school of magic open plenty of new opportunities for claiming victory, whether you steal treasure or fight to vanquish your opponents. You can summon a creature by playing the corresponding Magic card, but a price must be paid. To give life to your creature, you must roll the four-sided die and take damage equal to the result minus one. Any damage you take is added to the creature’s base life, which is found on the right border of its Magic card. Once you’ve taken the damage, the creature is placed adjacent to you on the game board, ready to do your bidding. The creatures from folklore and ancient myths that fill the Mythology school of magic open plenty of new opportunities for claiming victory, whether you steal treasure or fight to vanquish your opponents. You can summon a creature by playing the corresponding Magic card, but a price must be paid. To give life to your creature, you must roll the four-sided die and take damage equal to the result minus one. Any damage you take is added to the creature’s base life, which is found on the right border of its Magic card. Once you’ve taken the damage, the creature is placed adjacent to you on the game board, ready to do your bidding.
To send your wild minion into the maze to do your bidding, you must activate the creature by spending two movement points during your turn. Activating your creature allows it to move throughout the labyrinth, attack other wizards, and defend your treasures. When activated, a creature may move spaces equal to its base move, which is shown on the left border of the corresponding Magic card. A creature can also attack during its activation, either by using an ability shown on its card, or when you cast a creature attack spell. Of course, the creatures you summon possess drastically different abilities. Some creatures are extremely magical in nature, using spells easily. Calling the genie to your side, for example, increases your hand size and allows you to cast spells as if your wizard were in the genie’s space. Alternatively, a boggart cannot attack, but it can carry treasure on your behalf, and its small size and agility make it adept at evading enemy spells. Others are weapons of brute force, unleashed on the other hapless inhabitants of the labyrinth. When you summon a minotaur, it runs wild through the labyrinth, charging any wizard that enters its line of sight. No matter what creature you summon into the midst of your magical duels, it’s certain to make an impact. Relics of the Past You’ll find plenty of new power in this school of magic, in addition to mythological creatures. Bestial Forces introduces a new item type to your arsenal of magical weapons and trinkets: the relic. Relics are items of extraordinary power, granting awe-inspiring abilities to their wielder. Thor’s Hammer gives you a weapon to throw at any obstacle in your way. You can throw Thor’s Hammer at another wizard to deal three damage, or you can use it to destroy a cracked wall or door, allowing you to blast your way through anything that stands in your way. What’s more, Thor’s Hammer always returns to you after being thrown, meaning you can use it again and again.  
Ilmarinen’s Astrolabe, on the other hand, allows you to reroll a die once anytime you roll a die. In addition, this item keeps your maintained spells from counting against your hand size, greatly expanding the amount of spells you can have at your disposal. Another relic, the Eye of Horus, can even keep you from suffering any magical damage, safeguarding you from the vast majority of your opponent’s tricks and spells. While you carry a relic, however, you cannot pick up treasure or another relic. Whether you use your relic to get you safely to your opponent’s treasure, or use it to hunt down your opponents, every relic is sure to have a dramatic impact on your magical battles. Unleash Your Wild Magic No matter which schools of magic you draw upon, Bestial Forces will change your wizard duels forever. Summon your creatures and gather your relics, and join us next week as we explore the fearsome spells within the Draconic school of magic. Preorder Bestial Forces at your local retailer today! ... Source: Feral Creatures and Ancient Relics
|
|
|
|
|
Logged
|
|
|
|
RSSFeeder
Global Moderator
Deep One
Karma: 0
Offline
Posts: 3916
|
|
« Reply #146 on: 09 August 2014, 10:30:03 » |
|
The Cult of CthulhuA Preview of The Sleeper Below Deluxe Expansion for Call of Cthulhu
“I shall never sleep calmly again when I think of the horrors that lurk ceaselessly behind life in time and in space, and of those unhallowed blasphemies from elder stars which dream beneath the sea, known and favoured by a nightmare cult ready and eager to loose them upon the world whenever another earthquake shall heave their monstrous stone city again to the sun and air.”
–H.P. Lovecraft, The Call of Cthulhu In our last preview of The Sleeper Below deluxe expansion for Call of Cthulhu: The Card Game, we looked at how its new Dormant mechanic will soon give new shape to the nameless, unfathomable horrors that lurk just beyond the edges of human perception. Today, as we continue to tremble with fear at the mere thought of their arrival, we turn our attentions toward the many dark and evil Cultists who dedicate themselves to summoning forth and unleashing these terrors upon the world. As we begin our exploration, developer Damon Stone leads us deep into the Cult of Cthulhu, exploring its origins and its evil intent. Developer Damon Stone on the Cultists of The Sleeper Below  The Cthulhu Mythos describes a cold universe, one that is neither malign or evil but, worse yet, utterly indifferent to the existence of humankind. We are not even pawns being played by vastly superior beings. We are not even considered. As members of the human race, however, we seek to find some sort of meaning in our actions and to feel that we are in some way relevant to the world around us. As we explore these concerns in the face of cosmic horrors and beings so vastly ancient and alien to us that they are like unto gods, the human mind slips, shies away, or shatters. The Cthulhu Mythos describes a cold universe, one that is neither malign or evil but, worse yet, utterly indifferent to the existence of humankind. We are not even pawns being played by vastly superior beings. We are not even considered. As members of the human race, however, we seek to find some sort of meaning in our actions and to feel that we are in some way relevant to the world around us. As we explore these concerns in the face of cosmic horrors and beings so vastly ancient and alien to us that they are like unto gods, the human mind slips, shies away, or shatters.
However, in their attempts to assert control or prove themselves worthy of continued existence, some people choose not to cower in terror or fight against intrusions from beyond. Rather, they choose to serve and bring about the return of the Ancient Ones, even if that means they will serve their new masters only as pets. These are the Cultists of Cthulhu Mythos. Each Cultist has his or her own reason for siding with Cthulhu and his ilk, so we wanted to ensure that the majority of the Cultists in The Sleeper Below would be able to find a home in any Cthulhu deck, not just one dedicated to the Cult. This means that each finds its own ways to contribute to the cause, from the lowly Initiate of Dagon (The Sleeper Below, 1) to the Bone Sculptor (The Sleeper Below, 10), who pillages graveyards for the bone to work his magical craft. However, there are also some Cultists who don’t just serve the Cult, but direct it. These include the likes of the harbinger Gustaf Johansen (The Sleeper Below, 3), who announces the coming tide, and the tortured artist Henry Anthony Wilcox (The Sleeper Below, 13),  who becomes more intractable each time a new member is inducted to the Cult of Cthulhu, even as he inspires them to more terrifying actions. Figures such as these may prove useful in a range of decks, but they derive tremendous benefits from a deck with numerous Cultists. who becomes more intractable each time a new member is inducted to the Cult of Cthulhu, even as he inspires them to more terrifying actions. Figures such as these may prove useful in a range of decks, but they derive tremendous benefits from a deck with numerous Cultists. Meanwhile, the cultists themselves serve a singular purpose, and that is to awaken Cthulhu. While each, in some fashion, makes sacrifices to help prepare the way, there are some more dedicated worshipers, like Fiona Day (The Sleeper Below, 15), who are just as willing to sacrifice the lives of the cultists themselves if it will help further the reach of Cthulhu. Moreover, these Followers of R’lyeh see all who do not serve the Ancient Ones as enemies to be sacrificed under their long knives. With his mind warped by the whisperings from beneath the sea, a single crazed cultist can lead a whole team of investigators along a trail of murder, madness, and mayhem, but in force these cultists are flexible, fierce, and not to be ignored, despite their ravings… Iä! Iä! Cthulhu Fhtagn! Cultish Activities Of course, as is their wont, the Cultists from The Sleeper Below will work to insinuate themselves into as much of the game as possible, and this should be relatively easy for them since Cultist is one of the game’s most wide-spread traits and themes. Within the Cthulhu faction, itself, your Cultists will find numerous opportunities to explore foul Tomes and summon creatures of unfathomable power. Cultists willing to sacrifice themselves to the cause can help you bring into our world such calamitous beings as the Ruinous Star Spawn (The Sleeper Below, 14) and the Ancient One Kassogtha (The Sleeper Below, 18), or their blood may fuel the sorceries of characters like Carl Stanford (Secrets of Arkham, 28).  
Also, since their ultimate aim is to wake the great Cthulhu, you’ll never want to take any Cultist at face value; you should always remain mindful of the greater dangers Underneath the Surface (The Twilight Beckons, 5). In fact, the Cultists from The Sleeper Below give new fuel to cards like Underneath the Surface and, in a way, reinvent them in a new context. Such cards come with truly steep costs, demanding that you sacrifice resources, characters, and card draw. However, these costs are now significantly mitigated by the card draw that Gustaf Johansen provides, the search effect of Summon the Sleeper (The Sleeper Below, 24), and the necromantic powers of the Spell Foul Induction (The Sleeper Below, 31). In the right deck, these cards allow you to have your Cthulhu and your Cultists, too.  
Moreover, since the Cultist trait is so prevalent throughout Call of Cthulhu: The Card Game, many of the cards that you’ll find in The Sleeper Below, like Foul Induction, may grant new strength to decks that also incorporate Cultists from other factions. Who knows what unholy resilience the expansion will add to such Cultists as the Performance Artist (Core Set, 87), Victoria Glasser (Core Set, 82), Corrupted Midwife (Ebla Restored, 51), or even a lowly Dabbler in the Unknown (Core Set, 152)? It’s unclear how much they’ll benefit from the new expansion, but it’s certain that they’ll hear the winds of change howling around them. Pre-Order Your Copy Today The Cult of Cthulhu is gaining in strength, and The Sleeper Below is soon to wake! This seventh deluxe expansion for Call of Cthulhu: The Card Game is coming soon. In fact, Gen Con Indy attendees will find early copies on sale at our booth. If you haven’t already dedicated yourself to the Cult of Cthulhu, it’s not yet too late, even if you’re not headed to Gen Con Indy. Don’t allow yourself to be devoured. Head to your local retailer and pre-order your copy of The Sleeper Below today! Note: The Sleeper Below will not be legal during the Call of Cthulhu: The Card Game 2014 North American Championship Tournament held on Friday, August 15th. It will, however, be legal for the Call of Cthulhu: The Card Game Summer Tournament, which takes place on the afternoon of Saturday, August 16th. ... Source: The Cult of Cthulhu
|
|
|
|
|
Logged
|
|
|
|
RSSFeeder
Global Moderator
Deep One
Karma: 0
Offline
Posts: 3916
|
|
« Reply #147 on: 09 August 2014, 19:00:03 » |
|
STAR WARS (TM): ArmadaA Miniatures Game of Tactical Fleet Battles in the STAR WARS Galaxy
Product image not final. Pending Licensor approval.
“General, there’s a fleet of Star Destroyers coming out of hyperspace in sector four.”
–The Empire Strikes Back Fantasy Flight Games is proud to announce the upcoming release of Star Wars™: Armada, a two-player miniatures game of epic fleet battles in the Star Wars galaxy! Massive Star Destroyers fly to battle against Rebel corvettes and frigates. Banks of turbolasers unleash torrential volleys of fire against squadrons of X-wings and TIEs. Engineering teams race to route additional power to failing shields. Laser blasts and explosions flare across the battlefield. Even a single ship can change the tide of battle. In Star Wars: Armada, you assume the role of fleet admiral, serving with either the Imperial Navy or Rebel Alliance. You assemble your fleet and engage the enemy. Using the game’s unique maneuver tool, you steer your capital ships across the battlefield, even while squadrons of starfighters buzz around them. Then, as these ships exchange fire, it’s your job to issue the tactical commands that will decide the course of battle and, perhaps, the fate of the galaxy. 
The Armada Core Set contains ten unpainted squadrons, three pre-painted capital ships, nearly one hundred cards, an innovative maneuver tool, a range ruler, six command dials, nine custom attack dice, and all the tokens that you need to engage the enemy and battle for the fate of the galaxy!
Space Battles on a Galactic Scale Winning a battle between capital starships requires more than raw firepower. It requires the coordinated activity of hundreds – even thousands – of crew. As a ship’s commanders belt out orders, gunners rain fire upon enemy ships, and engineering teams race to keep their ship’s shields and hull intact, often rerouting power where it’s needed most. Armada allows you to bring one or more of these massive ships to battle, along with whole squadrons of starfighters. To win, you must issue commands, direct your fleet’s movement, coordinate its fire, sustain its defenses, and do all of this while remaining mindful of your battle objective. More than that, you’ll need to master every aspect of the ships in your fleet. You need to become intimately familiar with your ship’s design, its firing arcs, its attacks and defenses, and the way that it uses the game’s unique maneuver tool to set its course. 
The game’s unique maneuver tool. (Product image not final. Pending Licensor approval.)
This maneuver tool is one of the game’s most innovative features and adds a unique feel to the way your capital ships must accommodate for inertia as they maneuver through the stars. 
Using the game’s unique maneuver tool, a Rebel player plots a “3” speed maneuver for his Nebulon-B escort frigate
Capital ships can’t easily vary their speeds or execute hairpin turns like the starfighters that buzz around them. Accordingly, you only use the maneuver tool to maneuver your capital ships. Then, even as it makes it easy for you to set a ship’s course, the game’s maneuver tool lends an element of realism to its pitch and yaw. As an example of how Armada uses its maneuver tool to realistically portray the different ways its capital ships can maneuver, we can consider the differences between the CR90 and the Victory-class Star Destroyer. 
The speed chart for the CR90 (left) alongside that of the Victory-class Star Destroyer (right).
The CR90 is both capable of tighter turns and faster, with a maximum speed of "4" versus the Star Destroyer's maximum speed of "2." At speed "2," while the Star Destroyer can adjust the maneuver tool only one click at the second joint, the CR90 can adjust its course one click at the first join and two clicks at the second. Still, the faster the CR90 flies, the fewer clicks it can adjust its course through the initial range increments. Another important consideration is that capital ships in Star Wars: Armada fire before they move, so when you set your ship’s course, you’re always trying to set yourself up for a good shot in the next round. However, the more powerful your ship, the less nimble it is, and the harder it is to adjust your actions on the fly. Altogether, the maneuver tool and the rules for ship movement work in tandem to force you to always look ahead. Successful fleet admirals excel at planning their attack strategies well in advance of their initial engagements. Capital Ships in Combat Armada balances the awesome scale of the Star Wars galaxy’s ships and space warfare with intuitive ship designs and accessible rules for issuing commands and resolving combat that make for rich, engaging, and highly tactical play experiences. Capital ships are extremely powerful war machines, but they’re also massive and sophisticated vessels that can’t swiftly react to every development in the heat of battle. Accordingly, the key to flying these vessels effectively is learning how to plan ahead. You want to issue your commands in such a way that your crews will be ready to execute them at just the right times. Each of your pre-painted capital ships has a command value, which determines how many commands it will have in its stack at any given point in time. During setup, you secretly build your initial command stack, selecting from any of four different commands, each of which provides a different advantage. Once you have locked your selections, you place the commands in your stack in the order of your choice. Then, during each round of game play, you secretly select and assign a new command to your ship, placing it at the bottom of your command stack, before you reveal the command at the top of your stack and gain its benefits. 
A Rebel player selects a command for his Nebulon-B escort frigate by framing it within his command dial’s fastener (1). Then, he places it at the bottom of his command stack, to be revealed in a future round (2).
You might launch a screen of TIEs to intercept incoming X-wings. You might concentrate your fire on an incoming capital ship. You might scramble to repair your shields. Or if you reveal a command that doesn’t offer an immediate benefit, you can place a token on your ship and save a lesser version of that command’s benefits for later use. Notably, the larger and more powerful your ship, the less quickly it can react to your commands. Most of the more powerful ships, like the Victory-class Star Destroyer, feature higher command values that force you to plan your actions two or more rounds ahead of time. In this way, the command stack doesn't just reflect the various actions your ships can take; it also reflects how swiftly they can adjust to the changing tides of battle. After your ship resolves its command, it can perform up to two attacks. These can be directed against the same target or against different targets. However, these attacks must originate from two different hull sections and can only target ships or squadrons within range of those hull sections’ firing arcs. 
Ships are all divided into four sections, each of which has its own firing arc, shield rating, and attack value. Here, we see a Victory-class Star Destroyer presented next to its base.
The number and type of dice you roll for your attacks depend upon the ship, the hull section from which its attack originates, and the range of the attack. 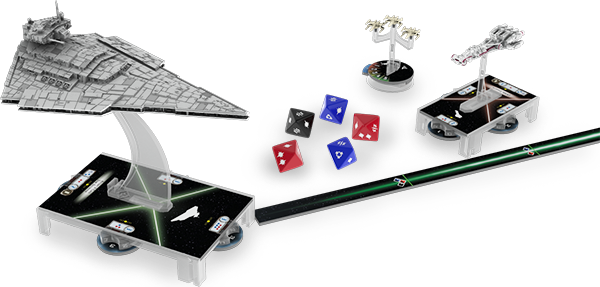
Each of the game’s attack dice presents a different effective range and spread of possible results
Meanwhile, each ship offers a number of defenses from enemy fire. Each ship’s hull is reinforced to withstand enemy fire, though larger ships like the Victory-class Star Destroyer can withstand much more than smaller ships like the Corellian corvette. Meanwhile, each section of your ship’s hull has a shield rating, indicating how many hits its shields can absorb before enemy fire damages the hull directly. Moreover, in the heat of battle, you need to decide when and how to make use of your ship’s defense tokens. With these, you can angle your deflector shields and perform evasive maneuvers to reduce the amount of damage your ship suffers. Squadrons of Starfighters Although Star Wars: Armada is built around the galaxy’s many capital ships, you’ll almost certainly want to fly one or more squadrons of starfighters in your fleet, both to threaten enemy ships and to defend your ships from enemy squadrons. 
An X-wing squadron is shown connected to its base which tracks its remaining hit points (shown here at "5") and whether or not it has activated. Here, the blue tab on the left of the base indicates that the squadron has not yet activated. Once the squadron has activated, the tab is pushed through to the other side and displays its orange end. | | Your squadrons are highly adaptable and flexible collections of starfighters, and only a foolish fleet admiral would overlook the tactical options that they can bring to a battle. While squadrons don’t pack the raw power or resilience of the capital ships they accompany, they come with their own rules for movement and combat that make them far more capable of occupying and threatening the exact portion of the battlefield that you choose. If left unchecked, a swarm of starfighters can tear down even the most massive of capital ships, and while capital ships can return their fire, any shot directed at squadrons is a shot not taken at a larger ship. Furthermore, capital ships don’t use their primary weapons while attacking squadrons; they have to use their anti-squadron armament, which is typically much less effective. Add to this the fact that some squadrons are led by such skilled pilots as Luke Skywalker, who can bypass a capital ship’s shields when he attacks, and you’ll find that squadrons are far more than an afterthought. They’re powerful weapons that skilled fleet admirals will be able to integrate into their larger strategies. Meanwhile, even though the squadrons in Armada aren't pre-painted like the capital ships, they are presented in colors intended to complement their fleets. Winning the Battle to Win the War In addition to its ships and squadrons, Armada shapes your Star Wars battles with twelve different objective cards. Each game uses one of these objectives, which introduces special rules and helps to define the narrative of your battle. Are you tracking down a specific target? Are you contesting a key outpost? Are you trying to intercept key intel? 
Objective cards challenge you to adapt your tactics in each battle
Importantly, the game’s objectives change the ways that you’ll score points in each battle, and they force you and your opponent to adapt your strategies, leading to tremendous replayability. The Enemy Fleet Is Coming into Firing Range Star Wars: Armada is due to arrive at retailers in early 2015, and Rebel and Imperial fleets will then battle for the fate of the galaxy! 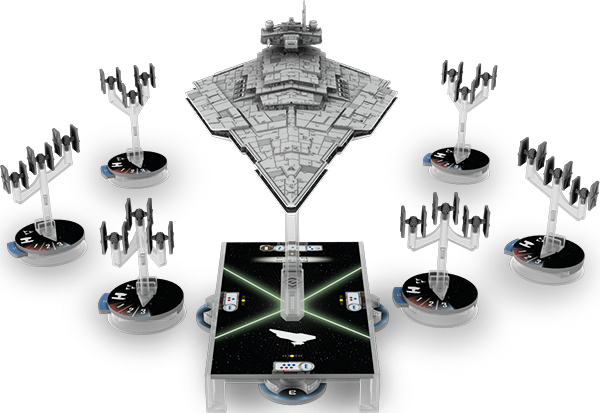
An Imperial fleet heads to battle, led by a pre-painted Victory-class Star Destroyer
In the meantime, you can visit the game’s description page to find more information and keep your eyes open for our upcoming series of previews, announcements of future expansions, and other news. Plus, if you’re headed to Gen Con Indy, you can stop by our booth for a free demo of its epic fleet battles! ... Source: STAR WARS (TM): Armada
|
|
|
|
|
Logged
|
|
|
|
RSSFeeder
Global Moderator
Deep One
Karma: 0
Offline
Posts: 3916
|
|
« Reply #148 on: 11 August 2014, 22:00:03 » |
|
Blast into ActionA Preview of the YT-2400 Freighter Expansion Pack for X-Wing (TM)
In the fifth wave of X-Wing™ expansions, the Rebellion gains access to a new large-base starship, the YT-2400. This fast and resilient light freighter comes with thirteen standard weapon emplacement points, making it an extremely customizable vessel, and an attractive option for smugglers, mercenaries, and others looking to fly a heavily armed “transport.” In our earlier previews of the YT-2400 Freighter Expansion Pack, we’ve looked at two of its upgrades, Stay on Target and Dash Rendar. Designed by the 2013 and 2012 World Champions, respectively, these upgrades grant your starships greater freedom to race across the battlefield and unleash fire upon enemy ships from advantageous positions. In addition to these upgrades and the Dash Rendar ship card, which also permits novel movement in the Activation phase, the YT-2400 comes with the barrel roll action, making it the first large ship able to perform this action without an upgrade. Accordingly, in today’s preview, as we take a closer look at this versatile and resilient light freighter, we will focus on what its maneuverability may soon add to your games of X-Wing. 
A 360-degree view of the YT-2400 light freighter.
Swerving Through Space While several of the galaxy’s more talented pilots, like Han Solo, were already able to wrench their large-base starships through barrel rolls thanks to the elite pilot talent, Expert Handling, the YT-2400 makes the action available to all its pilots. Accordingly, the YT-2400 Freighter Expansion Pack introduces the game’s first official rules for using the barrel roll maneuver with large-base ships. When you perform a barrel roll with a large-base starship, instead of placing the narrow edge of the straight “1” template alongside it, you must line up the template’s long edge against the edge of your ship’s base. This rule is also reflected in the game’s official FAQ (pdf, 6.5 MB), and while it limits the amount of forward, backward, and lateral movement that a barrel roll grants your large ships, you’ll find that the barrel roll continues to provide an extremely advantageous freedom of movement, especially when paired with pilots whose high pilot skill values allow them to barrel roll out of enemy firing arcs. In fact, even with this official rule, the YT-2400 and other large-base ships continue to benefit more from the barrel roll – based upon total distance covered – than smaller fighters. 
The above diagram illustrates the amount of forward and lateral movement the TIE interceptor can derive from a barrel roll.
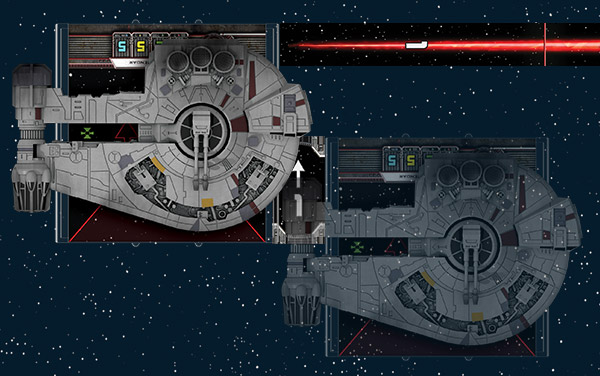
By contrast, when the YT-2400 performs a barrel roll, the edge of its firing arc moves laterally one full range increment and can move nearly half a range increment forward.
While there are a number of advantages inherent to a barrel roll, several upgrades from the YT-2400 Freighter Expansion Pack further enhance the action’s utility. For starters, Lone Wolf rewards you for distancing yourself from other friendly ships.  “When attacking or defending, if there are no friendly ships at Range 1–2, you may reroll 1 of your blank results.” “When attacking or defending, if there are no friendly ships at Range 1–2, you may reroll 1 of your blank results.”
For a mere two squad building points, this elite pilot talent offers one free die reroll every time you attack or defend while you keep your distance from allied ships. Of course, a timely barrel roll or two can help you quickly get into position to activate this card’s effects, even if you begin by flying in formation earlier in the game. Then, it’s worth noting that if one of your most powerful starships is flying all by itself, it’s likely to become a target. Once again, here, the barrel roll action comes in handy. After you see where your opponent’s starfighters are ending their maneuvers, you can roll out of their firing arcs, or even if you can’t roll out of their firing arcs, you may be able to roll to increase the range between your ships. And if you’re able to maintain your distance, other options become available to you. The Outrider Title allows you to equip a turret-mounted cannon like the Heavy Laser Cannon. However, when you upgrade your YT-2400 with the Outrider Title, it can no longer perform primary weapon attacks, and maintaining at least one range increment between you and your foes becomes absolutely critical. Again, this is another situation in which the barrel roll shines. Flying the YT-2400 in Your Rebel Squad Its tremendous maneuverability and its ability to fire a Heavy Laser Cannon in a 360-degree arc can make the YT-2400 a valuable addition to any Rebel squadron, but you’ll still need someone to pilot it.
 |
With a pilot skill value of “7,” Dash Rendar is the most elite of the ship’s pilots, as well as its most notorious. His high pilot skill value allows him to move after most of his enemies will have already activated, and his unique pilot ability allows you him to fly right at an asteroid before taking a barrel roll to get away from it and line up a shot.
|
Moreover, Dash is the only pilot who can voluntarily barrel roll onto one of the new debris cloud tokens. Normally, you can't perform a barrel roll if it would cause you to overlap an obstacle, but Dash's unique ability allows him to ignore that rule, as well as the negative consequences pilots typically suffer for entering a debris cloud:
- He ignores the stress token the debris cloud normally assigns.
- He doesn't need to roll an attack die. Normally, a player rolls one attack die and suffers one critical damage on a
 result. result.
Even more importantly, a ship that is overlapping a debris cloud token during the Combat phase may still perform attacks, meaning that if Dash finds himself outnumbered and flies into a debris cloud to take advantage of the cover it provides, he'll still be able to retaliate.
 |
Like Dash, “Leebo” appears as both a pilot and as a crew member. A Cybot Galactica LE series repair droid, the pilot version of “Leebo” helps to ensure that your ship avoids the nastiest of critical hits. As a crew member, “Leebo” allows his ship to perform a free boost action in exchange for suffering one ion token. This is the first “ion cost” introduced on an upgrade, but at just two squad points, crew “Leebo” is half the price of an Engine Upgrade and frees up the slot for another modification, like Experimental Interface or Counter-measures, both of which also appear in the YT-2400 Freighter Expansion Pack. |
 |
The third and final unique pilot in the YT-2400 Freighter Expansion Pack is Eaden Vrill, Dash Rendar’s former Nautolan co-pilot, and he rolls an extra die whenever he makes a primary weapon attack against a stressed opponent. Naturally, if you’re looking to include Eaden Vrill in your squad, you’ll want to add some means of stressing your opponents. You could wait for your opponent to Push the Limit or perform a Koiogran-turn, but it’s more likely than not that if you’re flying with Eaden Vrill, you’ll also want to equip some of your ships with Flechette Torpedoes. |
Blast into Action! Combined with its barrel roll, turret weapon, and upgrades, the YT-2400’s pilots look to make an immediate impact upon the game’s combats as soon as they drop out of hyperspace.
Keep your eyes open. The YT-2400 Freighter Expansion Pack is coming soon. Head to your local retailer to pre-order your copy today! ... Source: Blast into Action
|
|
|
|
|
Logged
|
|
|
|
RSSFeeder
Global Moderator
Deep One
Karma: 0
Offline
Posts: 3916
|
|
« Reply #149 on: 12 August 2014, 06:30:04 » |
|
Ruthlessness and IntimidationA Preview of the VT-49 Decimator Expansion Pack for X-Wing (TM)
“We shall double our efforts.”
–Moff Jerjerrod In our past previews of the fifth wave of X-Wing™ starship expansions, we’ve looked more closely at the YT-2400 Freighter Expansion Pack, its starship, its pilots, and its upgrades, which include a pair of upgrades designed by the game’s 2012 and 2013 World Champions. Today, we turn our attention to the other side of the Galactic Civil War. While the Rebels are busy recruiting new smugglers and outfitting transport ships with turret-mounted Heavy Laser Cannons, the Imperials are quietly and efficiently preparing to launch their imposing VT-49 Decimator into battle. However, once it arrives to the battlefield, this warship will be anything but quiet! The VT-49 Decimator is the first Imperial vessel to feature a primary weapon that can threaten a full 360-degrees, and it’s designed to crash into battle headlong. 
A 360-degree view of the VT-49 Decimator
Straight Ahead, Guns Blazing The VT-49 Decimator is not a subtle starship. It’s the largest of the starships introduced thus far to standard play, and even though it shares the same size base as the YT-2400, it dwarfs that light freighter, towering above it, just as its top-down silhouette nearly swallows every portion of its base. 
The VT-49 Decimator's maneuver dial | | In battle, the Decimator is a blunt weapon. The warship’s turret weapon allows it to fire at any enemy that gets within range, but its design abandons agility entirely, relying instead upon the strength of its shields and heavily reinforced hull to withstand enemy fire. Even its actions are entirely attack-oriented. The Decimator comes with the focus and target lock actions, but since it has no agility dice to roll on defense, its focus tokens will normally offer rerolls only on your attacks. Moreover, while the fact that the starship employs a turret weapon means that its pilots can fly past enemy fighters and fire at them from outside their arcs, the Decimator is not a nimble ship. Its maneuver dial consists mostly of straight maneuvers and banks. It can perform hard turns only at “2” and “3” speeds, and it has no Koiogran-turn whatsoever. When you fly the Decimator, you’ll likely either try to skirt the edges of the battlefield, circling your foes at distance, or you’ll ram into them with Captain Oicunn, who deals a damage to each enemy ship with which he collides. Skirting the Edge If you’re looking to skirt the edge of the battlefield and exchange volleys with those ships that manage to keep you within their firing arcs, you might want to consider offering the command of your VT-49 Decimator to Rear Admiral Chiraneau or Commander Kenkirk.  
If you’re looking to keep your Decimator at Range “3” of enemy ships for as long as possible, Rear Admiral Chiraneau is an excellent pilot. While his unique ability doesn’t directly offer him a benefit at Range “3,” it may discourage enemy pilots from closing in on him while they have other targets. Meanwhile, Rear Admiral Chiraneau can call upon any number of upgrades to further reinforce his tactics. Adding an Engine Upgrade to his Decimator, would allow Chiraneau to take advantage of the boost action, an action that’s particularly potent on large-base ships, which gain more total movement out of it than smaller ships. Also, because he can equip an elite pilot talent, Chiraneau gain additional maneuverability through the use of Expert Handling or Daredevil. Or he could simply sacrifice all of those options in favor of a more potent attack. Rear Admiral Chiraneau is one of the best candidates for the Expose upgrade;  when he voluntarily reduces his ship’s agility, he doesn’t actually lose any defense dice. He just gains an attack die. when he voluntarily reduces his ship’s agility, he doesn’t actually lose any defense dice. He just gains an attack die. Of the three unique pilots in the VT-49 Decimator Expansion Pack, Commander Kenkirk is the one most concerned with defense. When his Decimator loses its shields and receives at least one damage card, Kenkirk increases its agility value by one, meaning that it suddenly rolls as many defense dice as the smaller YT-1300. Players looking to take advantage of this late-blooming defense might want to further crew Commander Kenkirk’s Decimator with Ysanne Isard, who grants it a free evade action, and Moff Jerjerrod who can save the ship from suffering the most destructive critical hits. In fact, since Moff Jerjerrod can sacrifice other crew to save the ship from critical hits, his inclusion lends new strength to the inclusion of an Intelligence Agent or Navigator, or even both. The Direct Approach The expansion’s final unique pilot, however, takes an entirely different approach to combat. Captain Oicunn prefers the direct approach. After he executes a maneuver that causes his ship to overlap one or more enemy ships, each of those enemy ships he ends up touching suffers one damage. While most Decimator pilots try to avoid flying their ships within Range “1” of enemy fighters, Captain Oicunn thrives on getting into the thick of action as quickly as possible, and several of the expansion’s upgrades help to further flesh out this hyper-aggressive approach to battle.  Although Captain Oicunn won’t be able to fire at any ships with which his Decimator is in contact (and they won’t be able to fire at him), it’s likely that his tactics will place him within firing range of at least one enemy fighter, especially if he’s slamming into the middle of an enemy formation. In this case, Ruthlessness is an excellent choice for his elite pilot talent. If Captain Oicunn can’t use it to finish off the fighter at which he’s firing, then he should be able to use it to deal a second point of damage to the ship with which he’s collided. You can further enhance this collision-focused strategy by upgrading Oicunn’s Decimator with the Dauntless Title and the Anti-Pursuit Lasers modification from the Lambda-class Shuttle Expansion Pack. Although Captain Oicunn won’t be able to fire at any ships with which his Decimator is in contact (and they won’t be able to fire at him), it’s likely that his tactics will place him within firing range of at least one enemy fighter, especially if he’s slamming into the middle of an enemy formation. In this case, Ruthlessness is an excellent choice for his elite pilot talent. If Captain Oicunn can’t use it to finish off the fighter at which he’s firing, then he should be able to use it to deal a second point of damage to the ship with which he’s collided. You can further enhance this collision-focused strategy by upgrading Oicunn’s Decimator with the Dauntless Title and the Anti-Pursuit Lasers modification from the Lambda-class Shuttle Expansion Pack.
Alternatively, Intimidation costs one squad point less and allows Oicunn to further support his squadmates. This elite pilot talent does less for Captain Oicunn’s starship directly than Ruthlessness, but it may be more effective overall if he’s partnered with a mini-swarm of “Howlrunner” and three Academy Pilots. In this case, you may also wish to swap out your Anti-Pursuit Lasers in favor of the Tactical Jammer modification. With both Intimidation and a Tactical Jammer, Captain Oicunn can both reduce his foe’s defense and obstruct the attacks his enemies fire at his squadmates. Crush the Rebellion Heavily armed and armored, the VT-49 Decimator was one of the galaxy’s most feared Imperial warships, and gaining command of one was seen as a great accomplishment and point of pride for Imperial officers rising through the ranks. 
Soon, you’ll be able to pilot your own VT-49 Decimator into battle and smash into your foes. The VT-49 Decimator Expansion Pack is coming. Head to your local retailer to pre-order your copy today! ... Source: Ruthlessness and Intimidation
|
|
|
|
|
Logged
|
|
|
|
|


