RSSFeeder
Global Moderator
Deep One
 
Karma: 0
 Offline Offline
Posts: 3916

|
 |
« Reply #165 on: 18 August 2014, 15:30:03 » |
|
Day TwoWatch a Video Recap of the In-Flight Report and the Second Day of Gen Con-white.png) 
Today was our second day at Gen Con Indy 2014, and we're ready for plenty more action to come! Gen Con today witnessed this year's annual Fantasy Flight Games In-Flight Report, where several of our newest and most exciting games were announced and introduced to you. What are some of our newest upcoming releases? You'll have to watch the video to find out! You'll also find updates from the Gen Con retail booth, the tournament scene, and the demo tables. Gen Con has been amazing for everyone here so far, and we're excited to see what happens tomorrow! Watch the video recap of Gen Con Day Two above or on YouTube. We've had tons of exciting news so far, and there's still plenty of Gen Con to go! Check back tomorrow night for another video recap of our time at Gen Con Indy 2014. ... Source: Day Two
|
|
|
|
|
 Logged
|
|
|
|
RSSFeeder
Global Moderator
Deep One
Karma: 0
Offline
Posts: 3916
|
|
« Reply #166 on: 19 August 2014, 00:00:03 » |
|
Scum and VillainyAnnouncing the Introduction of the Third X-WING (TM) Faction
“This bounty hunter is my kind of scum, fearless and inventive.”
–Jabba the Hutt Fantasy Flight Games is proud to announce that in the sixth wave of starship expansions for X-Wing™ the galaxy’s Scum and Villainy will join the game's fast-paced space battles as its third faction! The ranks of the Scum and Villainy faction are filled with many of the Star Wars galaxy’s most notorious bounty hunters, pirates, and Black Sun agents. You’ll find such infamous figures as Boba Fett, IG-88, Greedo, and Prince Xizor. These Scum live outside the law, do their best to remain at the periphery of the ongoing Galactic Civil War, and allow no one – no one – to threaten their profits. Whenever Rebel or Imperial forces dare to interfere with their illicit dealings, Scum head to battle, and they do so in some of the best starfighters that money can buy, such as Slave I, IG-2000, and the MandalMotors StarViper-class attack platform. These expensive and technologically advanced starships are further supported by a number of mainstays that have proven their efficiency over the course of numerous battles. 
Four separate expansion packs introduce the galaxy’s Scum to X-Wing:
- Most Wanted Expansion Pack
- StarViper Expansion Pack
- M3-A Interceptor Expansion Pack
- IG-2000 Expansion Pack
These four Wave VI expansions establish the Scum and Villainy faction as a collection of individuals bound by common interests, but ultimately less interested in teamwork and collective victories than personal gain. Accordingly, the faction’s unique pilot abilities encourage different types of squadrons than those commonly employed by Rebel and Imperial players. Moreover, while credits can buy ships, credits can also improve them, and many Scum upgrade their ships with expensive and illicit technologies, several of which are represented by a new type of upgrade, the illicit upgrade,  . As far as the galaxy’s Scum are concerned, if the Empire bothered to make such technology illegal, it must be potent. . As far as the galaxy’s Scum are concerned, if the Empire bothered to make such technology illegal, it must be potent. Most Wanted Expansion Pack How does a new faction enter X-Wing with enough firepower to take the fight to Rebel and Imperial forces? It starts with the Most Wanted Expansion Pack and its slate of thugs, hired guns, pirates, and spice runners, as well as a new version of the galaxy’s most feared bounty hunter, Boba Fett. 
Most Wanted is a collection of ship cards, upgrades, tokens, and dials that allow you to repurpose some of your existing starships for use within the Scum faction. You’ll find support for the Firespray-31, HWK-290, Y-wing, and Z-95 Headhunter. Additionally, you’ll find three starfighter miniatures that have been given alternative paint schemes and re-outfitted for use by the Scum faction: two Z-95 Headhunters and one Y-wing.
- One Y-wing miniature with an alternative, Scum-themed paint scheme
- Two Z-95 Headhunter miniatures with Black Sun paint schemes
- Four Scum faction Firespray-31 ship cards
- Four Scum faction HWK-290 ship cards
- Six Scum faction Y-wing ship cards
- Six Scum faction Z-95 Headhunter ship cards
- Nineteen upgrade cards
- Maneuver dials and tokens for your Scum Firespray-31, HWK-290, Y-wing, and Z-95 Headhunters
So that you can pilot your ships, Most Wanted introduces twenty ship cards, the most for any X-Wing release to-date. It also allows you to upgrade your starships by outfitting them with any of its nineteen upgrade cards, including a host of new Salvaged Astromech upgrades  , modification and Title upgrades for your Y-wings, new secondary weapons (one of which is illicit), and a trio of Scum only crew members that includes the infamous Rodian bounty hunter, Greedo. , modification and Title upgrades for your Y-wings, new secondary weapons (one of which is illicit), and a trio of Scum only crew members that includes the infamous Rodian bounty hunter, Greedo. With all of its ships, pilots, upgrades, dials, and tokens, the Most Wanted Expansion Pack comes with everything that you need to send your Scum into battle and derive a profit from your illegal investments! StarViper Expansion Pack Designed by MandalMotors in direct collaboration with Prince Xizor, the StarViper-class attack platform was one of the most formidable fighters in the galaxy. 
The StarViper Expansion Pack features one pre-painted StarViper miniature, sculpted at 1/270 scale and brought to life in X-Wing as a potent, well-balanced ship that can quickly destroy opposing ships even while evading enemy fire. Dual laser cannons provide the StarViper a primary attack value of three, which is partnered with an agility value of three, shields of one, and a sturdy hull value of four. To these already impressive statistics, the StarViper adds a uniquely loaded maneuver dial and an action bar that features both the barrel roll and boost actions, allowing you to dart about the battlefield with ease. Naturally, you’ll be able to field Prince Xizor in the Virago, the prototype StarViper that he helped design. Outfitted with even more advanced technology than standard StarVipers, the Virago Title allows you to make use of the various system and illicit upgrades, like the Accuracy Corrector and Inertial Dampeners, that appear among the expansion pack’s nine upgrade cards. M3-A Interceptor Expansion Pack The lightest starfighter designed by MandalMotors, the M3-A “Scyk” interceptor featured a weapon mount capable of handling nearly any weapon and a price tag low enough that the Hutt Cartel and Car’das smugglers were enticed to purchase it in large quantities and make it a mainstay of their fleets. 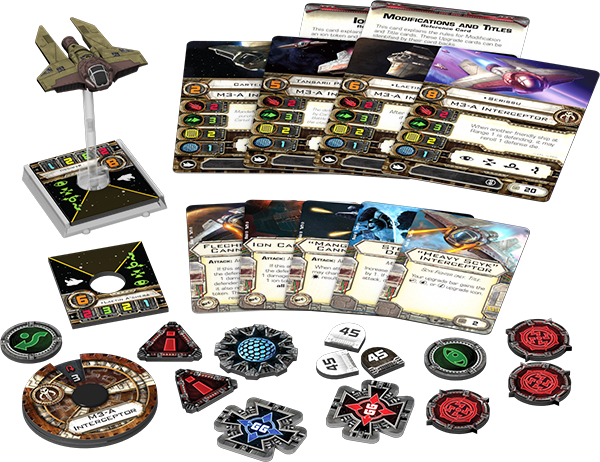
The M3-A Interceptor Expansion Pack includes one M3-A interceptor miniature, which comes pre-painted and sculpted at the game’s standard 1/270 scale. A light and nimble vessel, the M3-A interceptor starts with two attack, three agility, two hull, and one shield. However, the expansion pack’s five upgrades include the “Heavy Scyk” Interceptor Title and no fewer than three cannons, meaning that you’ll find plenty of options for adapting your Scyk to fit the role you want it to play within your fleet. Additionally, the M3-A Interceptor Expansion Pack introduces two unique and two non-unique ship cards, a maneuver dial, and all requisite tokens. IG-2000 Expansion Pack A heavily modified Aggressor assault fighter, IG-2000 was the signature vessel of one of the galaxy’s deadliest bounty hunters, the Assassin Droid IG-88. 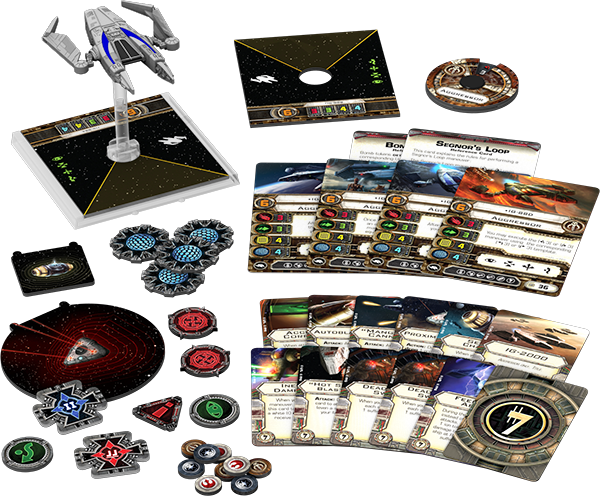
Because IG-88 had no need for life support systems and no reason to fear the gravitational effects of maneuvers that would kill organic pilots, the majority of the space within the IG-2000 was devoted to engines and weapon systems, making the starfighter every bit as fearsome as its ruthless pilot. In X-Wing, the IG-2000 is a powerful, large-base starfighter with three attack, three agility, four shields, and four hull. It can boost, it can evade, it can target lock, it can equip two cannons simultaneously, and it can whip through space at high speeds while performing the demanding Segnor’s Loop maneuver. The IG-2000 Expansion Pack features one carefully detailed and pre-painted IG-2000 miniature at 1/270 scale, along with four ship cards, twelve upgrade cards, a maneuver dial, and all the tokens you need to hunt down your prey and obliterate it. Notably, the IG-2000 Expansion Pack is the first X-Wing expansion that doesn’t feature any non-unique ship cards. Instead, each of its four ship cards represents one of the four identical IG-88 models that share a single mind. They all share the same pilot skill value of “6,” and the non-unique IG-2000 Title upgrade allows you to link their abilities. The more IG-88s you bring into battle, the more lethal they become. Strike from the Shadows “You will never find a more wretched hive of scum and villainy.”
–Obi-Wan Kenobi  Throughout the classic Star Wars trilogy, we catch several glimpses of the galaxy’s Scum and Villainy. We see them in Mos Eisley, gathered aboard the command deck of the Executor, and amassed at Jabba’s palace on Tatooine. They may do their best to remain outside the conflicts of the Galactic Civil War, but they form an integral part of the Star Wars universe, exerting profound influence over the lives of millions, including many of the Rebel Alliance’s greatest heroes. Throughout the classic Star Wars trilogy, we catch several glimpses of the galaxy’s Scum and Villainy. We see them in Mos Eisley, gathered aboard the command deck of the Executor, and amassed at Jabba’s palace on Tatooine. They may do their best to remain outside the conflicts of the Galactic Civil War, but they form an integral part of the Star Wars universe, exerting profound influence over the lives of millions, including many of the Rebel Alliance’s greatest heroes.
Likewise, the galaxy’s Scum and Villainy will soon form an integral part of your X-Wing experiences, exerting a profound effect upon the game’s evolving metagame. How will TIE swarms fare against squads led by IG-88 and the Virago? How will X-wing and B-wing pilots used to the TIE’s limited firepower cope with Scum squads that equip the nimble Scyk with potent laser cannons? What will happen when the Black Sun outbids the Empire for the services of Boba Fett, the galaxy’s deadliest bounty hunter? You’ll soon have the opportunity to explore these situations in your games of X-Wing. The Most Wanted, StarViper, M3-A Interceptor, and IG-2000 Expansion Packs are all scheduled to arrive at retailers in the fourth quarter of 2014. In the meantime, keep your eyes open for previews of these new Wave VI expansions and other X-Wing news! ... Source: Scum and Villainy
|
|
|
|
|
Logged
|
|
|
|
RSSFeeder
Global Moderator
Deep One
Karma: 0
Offline
Posts: 3916
|
|
« Reply #167 on: 19 August 2014, 08:30:03 » |
|
Day ThreeWatch a Video Recap of our Third Day at Gen Con Indy 2014
Today was our third day at Gen Con Indy 2014, and it was undoubtedly one of our best days so far. In today's video recap, you'll get a closer look at each of the separate parts that make up the Fantasy Flight Gen Con experience. You'll get a closer look at the demo tables, including a more detailed look at the tactical fleet battles of Star Wars™: Armada. You'll find out more about what's hot and what's sold out from our retail booth. And finally, you'll learn more about the tournaments for some of Fantasy Flight's Organized Play games, including the debut Worldeater Tournament for Warhammer 40,000: Conquest. Get a closer look at each of these aspects in the video recap below! Experience the fun and excitement of Gen Con Indy Day Three in the video on YouTube. Day Three has drawn to a close, but there's still a whole day of Gen Con to go! Stop by our booth and visit if you're attending Gen Con Indy 2014, and stay tuned for the final video recap tomorrow night. ... Source: Day Three
|
|
|
|
|
Logged
|
|
|
|
RSSFeeder
Global Moderator
Deep One
Karma: 0
Offline
Posts: 3916
|
|
« Reply #168 on: 19 August 2014, 17:00:03 » |
|
Day FourWatch a Video Recap of the Final Day of Gen Con Indy 2014
Today marked the final day of Gen Con Indy 2014, and though we're sad to see the best four days in gaming conclude, we still had a fantastic final day. In today's video recap, you'll find more details on everything that happened on our final day at Gen Con Indy. You'll get a closer look at the gameplay of XCOM: The Board Game and the beta version of our newest Star Wars™ roleplaying game, Force and Destiny. You'll get an update from the tournament scene to learn more about the climatic finals for Android: Netrunner and X-Wing™, as well as the Worldeater Tournament for Warhammer 40,000: Conquest. Watch the video recap below, and start making plans now to join us here next year! Watch the video recap on Gen Con Indy Day Four on YouTube. Thanks for watching our video recaps of Gen Con Indy 2014, and we hope to see you here in person next year! ... Source: Day Four
|
|
|
|
|
Logged
|
|
|
|
RSSFeeder
Global Moderator
Deep One
Karma: 0
Offline
Posts: 3916
|
|
« Reply #169 on: 20 August 2014, 01:30:05 » |
|
The Lost RealmThe Fourth Deluxe Expansion for The Lord of the Rings: The Card Game
“Many evil things there are that your strong walls and bright swords do not stay. You know little of the lands beyond your bounds. Peace and freedom, do you say? The North would have known them little but for us.”
–Aragorn, The Fellowship of the Ring Prepare to face dangers that would freeze the blood of lesser folk… Fantasy Flight Games is proud to announce the upcoming release of The Lost Realm, the fourth deluxe expansion for The Lord of the Rings: The Card Game! Middle-earth is a richly detailed world, full of different lands and peoples and creatures, and their untold stories lie at the heart of The Lord of the Rings: The Card Game, which is set during the seventeen ominous years that follow the events of Bilbo’s birthday party and lead up to Frodo’s departure from the Shire near the beginning of The Fellowship of the Ring. Within the game, we’ve already trekked through the shadows of Mirkwood and the abandoned halls of Khazad-dûm. We’ve fought alongside the heirs of Númenor to turn back the Orcs of Mordor, and we’ve risked our lives to help the White Council find any knowledge and strength that might help forestall the Shadow and Middle-earth’s impending doom. Now, we turn our attentions toward the lands of the North, which at first seem quiet and tame in comparison to the wild roads we’ve traveled. However, the truth is that this peace is purchased at a cost, and a high one at that. Here, the Rangers of the North have dwelt for many generations, ceaselessly roaming the lands and hunting the servants of the Enemy. These noble Dúnedain work in secret, and are often met with scorn by the simple folk they protect. Still, that is the way they would have it, and their countless, secretive efforts come to light with the heroes, player cards, and three new scenarios of The Lost Realm. 
With its 165 cards, The Lost Realm brings new focus to the wilds of the North, where a handful of Rangers tirelessly follow their prey in order to safeguard the quiet and simple lands to their south. As part of this focus, The Lost Realm introduces two new Dúnedain heroes, numerous Dúnedain allies, and a wealth of player cards that reward players for engaging enemies. Additionally, The Lost Realm relates the dangers of the North in nine new encounter sets that you and your friends will use to play through the expansion’s scenarios. These encounter sets also lay the foundation for your future journeys into the Angmar Awakened cycle of Adventure Packs. For more information about how The Lost Realm allows you to confront these perils alongside the Rangers of the North, we turn to lead developer Caleb Grace. Lead Developer Caleb Grace on the Rangers of The Lost Realm “Lonely men are we, Rangers of the wild, hunters – but hunters ever of the servants of the Enemy; for they are found in many places, not in Mordor only.”
–Aragorn, The Fellowship of the Ring The Dúnedain theme in The Lost Realm was inspired by the passage from The Fellowship of the Ring in which Aragorn explains to Boromir how the Rangers of the North have long protected the free peoples of Middle-earth.  These Rangers were the greatest hunters of their time, and their constant vigilance drives the majority of the expansion’s player cards. These Rangers were the greatest hunters of their time, and their constant vigilance drives the majority of the expansion’s player cards. Not only was this a fun theme to explore, it opens a lot of exciting new possibilities in the game. While many of the game’s most successful strategies focus on maintaining a low threat in order to avoid engaging multiple enemies at once, the Rangers work very differently. They actively seek out their foes and gain strength from being engaged with them. One great example of this theme is an ally unlike any other: Dúnedain Hunter (The Lost Realm, 4). Though this Dúnedain ally has attributes typically found on an ally with a cost of four or more resources, he costs zero. That is because the Dúnedain Hunter has a Forced effect that triggers when he enters play: “After Dúnedain Hunter enters play, search the top 5 cards of the encounter deck for a non-unique enemy and put it into play engaged with you. If no enemy enters play by this effect, discard Dúnedain Hunter. Shuffle the encounter deck.” The Rangers were always scouring the hills and woods for signs of the Enemy’s servants, aiming to remove any threat they might pose, and that’s why the Dúnedain Hunter isn’t content to wait for enemies to appear from the encounter deck. Instead, he brings the enemy to you. But why would you want to engage an enemy? Is the reward really worth the risk of engaging an Orc, or Troll, or Nazgûl? If you include enough Dúnedain and Ranger cards in your deck, the answer is “absolutely!” Aside from allowing you to gain a powerful ally without paying any resources, the Dúnedain Hunter’s ability to engage an enemy opens up some amazing combos. 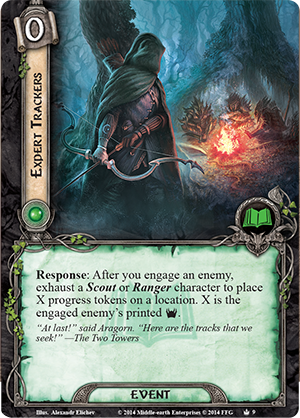 For example, immediately after you put that enemy into play engaged with you, you can exhaust the Dúnedain Hunter to play Expert Trackers (The Lost Realm, 9): “Response: After you engage an enemy, exhaust a Scout or Ranger character to place X progress tokens on a location. X is the engaged enemy’s printed threat strength.” This lore event allows you to track the enemy you just engaged back to its lair, be it the active location or a location in the staging area, and then explore it, potentially well before you’d be able to travel to it. For example, immediately after you put that enemy into play engaged with you, you can exhaust the Dúnedain Hunter to play Expert Trackers (The Lost Realm, 9): “Response: After you engage an enemy, exhaust a Scout or Ranger character to place X progress tokens on a location. X is the engaged enemy’s printed threat strength.” This lore event allows you to track the enemy you just engaged back to its lair, be it the active location or a location in the staging area, and then explore it, potentially well before you’d be able to travel to it.
But that’s not the only advantage the Dúnedain gain from being engaged with enemies. During the same planning phase that you play Dúnedain Hunter and Expert Trackers, you could also play Sarn Ford Sentry (The Lost Realm, 5) and trigger her Response effect: “After Sarn Ford Sentry enters play, draw 1 card for each enemy engaged with you.” The Dúnedain possessed an uncanny ability to observe their quarry without being detected, and in this way they were able to gain knowledge of their enemy’s movements. The Sarn Ford Sentry’s ability represents that knowledge with card draw based on the number of enemies you are engaged with. Even drawing one card can make a huge difference, but with a well-crafted Dúnedain deck, it isn’t difficult to draw three or more cards when the Sarn Ford Sentry enters play. Of course, no one can stay engaged with three or more enemies indefinitely, and it will eventually become necessary to destroy those enemies. That is why The Lost Realm also includes a new Tactics hero who excels at just that – the Chieftain of the Dúnedain, Aragorn (The Lost Realm, 1). 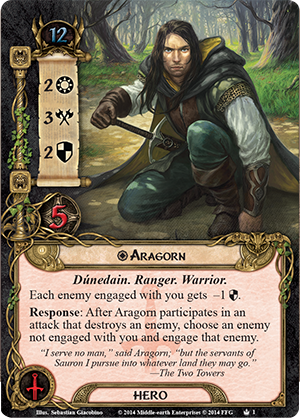 While previous versions of Aragorn have stressed his abilities as a guide and protector, this Tactics version emphasizes his mighty fighting prowess and peerless hunting skills. In the books, few could match Aragorn’s skill at arms. His presence in battle was enough to inspire his companions and intimidate his enemies. This is represented in the first line of his text: “Each enemy engaged with you gets -1 defense.” If you’re going to be engaged with multiple enemies at once, that one-point reduction of their defense can make a big difference when it comes time to deal with them. While previous versions of Aragorn have stressed his abilities as a guide and protector, this Tactics version emphasizes his mighty fighting prowess and peerless hunting skills. In the books, few could match Aragorn’s skill at arms. His presence in battle was enough to inspire his companions and intimidate his enemies. This is represented in the first line of his text: “Each enemy engaged with you gets -1 defense.” If you’re going to be engaged with multiple enemies at once, that one-point reduction of their defense can make a big difference when it comes time to deal with them.
The second line of his text represents his skill as the greatest hunter of his time: “Response: After Aragorn participates in an attack that destroys an enemy, choose an enemy not engaged with you and engage that enemy.” This effect is incredibly versatile in its uses. Is there an enemy in the staging area that is just waiting to pounce once your threat goes up at the end of the round? Use Aragorn to turn the tables on that enemy by engaging it and giving it a penalty to defense, making it that much easier to defeat, potentially within the same Combat phase that you engaged it. Is your teammate engaged with an enemy he can’t handle? Just destroy an enemy engaged with you, and Aragorn can draw that enemy away from your friend’s heroes. Aragorn’s versatility is fitting for a hero who accomplished so many different tasks before and throughout The Lord of the Rings, and it can easily make him the centerpiece of any deck built around the Dúnedain trait. Knowledge of the Enemy What evils will the Dúnedain uncover in The Lost Realm? The expansion’s three scenarios pit your heroes against a rising tide of Orcs, Undead, and even Sorcery. Moreover, the expansion also introduces a number of side quests that your heroes will be able to explore even as they hunt the Dark Lord’s servants throughout the North. You can find more information about the expansion and its Dúnedain, scenarios, and side quests on the expansion’s description page, and we’ll share even more details about The Lost Realm and its cards in an upcoming series of previews. The Lost Realm is scheduled to arrive at retailers early in 2015. Until then, stay vigilant and continue your work to shield Middle-earth’s simpler folk from terrors that would freeze their blood! ... Source: The Lost Realm
|
|
|
|
|
Logged
|
|
|
|
RSSFeeder
Global Moderator
Deep One
Karma: 0
Offline
Posts: 3916
|
|
« Reply #170 on: 20 August 2014, 10:00:06 » |
|
BattleLore: CommandAnnouncing a Digital App of Tactical Battles in Terrinoth
For a moment it seemed that the tide of war might have turned, but it was only a moment. The Uthuk Y’llan have returned more powerful than ever. They storm throughout Terrinoth, laying waste to our land and massacring our people. With these bloodthirsty demons clamoring at our gates, we place our hope in you, Commander, knowing that you have the knowledge of lore to awaken the Rune Golems and the military talents to lead our forces to victory. This is the last chance to save Terrinoth. You must defeat the Uthuk Y’llan. Fantasy Flight Games is proud to announce BattleLore: Command, a digital game for iOS, Android, and PC, based on the tactical board game BattleLore Second Edition. Take command of the noble Daqan Lords’ army in a single-player campaign to vanquish the vicious Uthuk Y’llan from Terrinoth, or control either army in battles against a friend on the same wireless network. With vividly-realized battlefields and engaging animations, Battlelore: Command brings tactical combat to life. Watch a video trailer of BattleLore: Command above! Formidable Opponents and Challenging Missions The single-player campaign against the Uthuk Y’llan takes you throughout Terrinoth on a series of unique missions, from Hernfar Isle in the middle of the fast-flowing River Lothan, the ancient Tomb of Pelius and the sand-covered Steppes. Depending on the mission, your troops must keep the enemy from burning homes, recover powerful magical artifacts, or stop the massacre of innocent people. You begin a battle by mustering an army particularly suited to the current mission and strategically deploying your forces. In the first battle, the only Daqan units available to you are the Yeoman Archers and Citadel Guards. As the campaign progresses and missions become more difficult, other types of units come into your command: mounted Riverwatch Riders, monstrous Rune Golems made of living stone, and mighty flying Roc Warriors. Every unit has a special ability that may be activated in combat. Yeoman Archers can shoot twice if they do not have to move before firing; Rune Golems can stun the enemy so that it cannot move, attack, or retreat. 
The Uthuk Y’llan army also grows over the course of the campaign. At first, only Blood Harvesters and Viper Legions, mortals transformed by dark magic, terrorize the land. Soon, however, demons come to their side: rabid Flesh Ripper Brutes threaten the Daqan cavalry, the Obscene unrelentingly bludgeon their opponents, and titanic Chaos Lords spread destruction across the battlefield. Of course, the Uthuk Y’llan units also have special abilities in combat: Viper Legions can poison enemy units, Flesh Ripper Brutes unfailingly wound any weakened units they attack. In the multi-player Skirmish mode, you and your friend select a scenario to play and deploy the most powerful armies possible using the full range of units. Each scenario takes place on a different battlefield and has a different victory condition, from utterly destroying your opponent’s forces to merely preventing them from advancing into your territory. The Daqan Lords and the Uthuk Y’llan each possess unique strengths for a commander to utilize – and unique vulnerabilities to exploit. 
Commands, Maneuvers, Tactics, and Lore Combat begins once the armies have been mustered and deployed. Sometimes the enemy advances immediately, other times you will have the opportunity to attack first or take a stronger position. You have a limited set of commands, each governing a different number of units in the three sections of the battlefield. Some commands focus on the left flank, right flank, or the center, others allow allow you to make a line advance, or to move three units of a specific type no matter their location. Plan your movements and positions carefully. You could try to outflank the enemy and ambush them, gang up on an isolated unit, or pull your forces back and wait for a better opportunity. Occupying a building shields a unit from the first hit scored against it, while surrounding an enemy unit enables you to pin them, which deals additional damage beyond any hits you score. Positioning your units close together may prevent them from being pinned, or from having to retreat. A 360 degree view of the battlefield enables you to see your position, and the enemy’s, from any vantage, to zoom in close to forests or strategic chokepoints or pull back and view the entire battlefield at once. 
BattleLore: Command rewards good tactics, but there is a random component to combat. Every unit has a combat value that determines how many “dice” are rolled in an attack. As the combat results are revealed, animations show you the exact effect of the attack: archers take aim and shoot, Flesh Ripper Brutes roar and rear up to attack, retreating units turn and run, slain Rune Golems crumble into lifeless stone and dust. Combat in BattleLore: Command consists of more than blade meeting blade. Lore powers, activated either during an attack or defensively at the end of your turn, endow armies with fantastical abilities. Enchanted Arrows allows Yeoman Archers to hit any target on the battlefield, regardless of distance or obstacles that block line of sight. Stalwart Defenders allows all Daqan units to ignore one damage and one retreat during an enemy turn. The Uthuk Y’llan can use Chaos of Battle to force the Daqan army to move randomly around the field, or Blood Sacrifice to strategically weaken one unit in order to add strength to another. 
Take the Battlefield BattleLore: Command provides an engaging and challenging combat experience, both for expert players of the board game and for players who are entirely new to BattleLore. Its missions will test and develop the tactical skills of any commander, whether leading the Daqan Lords in the defense of their homeland or ravaging Terrinoth with the Uthuk Y’llan. Prepare to command an army in battle against its greatest foe. Look for Battlelore: Command in the App store, Google Play and Amazon Marketplace in the last quarter of 2014. ... Source: BattleLore: Command
|
|
|
|
|
Logged
|
|
|
|
RSSFeeder
Global Moderator
Deep One
Karma: 0
Offline
Posts: 3916
|
|
« Reply #171 on: 21 August 2014, 03:00:03 » |
|
Follow the Jedi PathJoin the STAR WARS (R): Force and Destiny (TM) Beta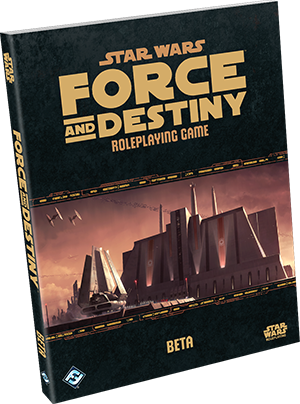
“My ally is the Force. And a powerful ally it is. Life creates it, makes it grow. Its energy surrounds us and binds us. Luminous beings are we... not this crude matter.”
–Yoda Fulfill your destiny as one of the galaxy’s few remaining Force users! You’ll soon have your chance to join the beta test for the Star Wars®: Force and Destiny™ Roleplaying Game. The third of three epic, cross-compatible Star Wars roleplaying systems, Force and Destiny will soon be made available for beta testing through our webstore and participating retailers. 
Inherit the Legacy of the Jedi Knights To encapsulate the operatic grandeur of the Star Wars universe, the Star Wars Roleplaying Game is related across three epic, cross-compatible roleplaying systems. Each system offers a unique approach to the Star Wars universe, each Core Rulebook contains all the information you need to run a full campaign, and all three systems share the same core mechanics, meaning you can easily use materials from all three systems within a single campaign.
You have questions about the beta test? We have answers:
|
|
The first of these installments, Star Wars®: Edge of the Empire™, focuses on the adventures and struggles of those smugglers, scoundrels, colonists, and other characters who live on the fringes of the galaxy, just at the edge of the Empire’s influence. Adventures in the second installment, Star Wars®: Age of Rebellion™, thrust players into the midst of the ongoing Galactic Civil War. As they try to help the rag-tag Rebel Alliance to overthrow the tyrannical Galactic Empire, the heroes may gather intel, rally new recruits, launch surgical strikes, or engage in deadly dogfights. Force and Destiny is the game’s third standalone installment, and allows players to follow in the footsteps of those nigh-mythical guardians of peace and justice—the Jedi Knights. Your characters possess the rare and dangerous ability to touch and use the Force, the energy field that binds and surrounds every living thing. It is up to them whether they use this power to try and fight the forces of injustice and oppression, or if they give into the darkness and temptation within and become agents of evil. Fulfill Your Destiny Lead Developer Sam Stewart offers further insight into the nature of the Force and Destiny roleplaying experience, and a couple of the mechanics that give it shape: “Force and Destiny shares the same ruleset as Age of Rebellion and Edge of the Empire, allowing the three games to be played separately or in concert. Each of the three games are unique, however, thanks to the stories they tell and certain game mechanics that enhance the telling. The Morality mechanic is one of these, and central to the Force and Destiny experience. “Morality is the counterpart to Duty from Age of Rebellion and Obligation from Edge of the Empire. Even so, where Duty and Obligation represent external commitments and relationships, Morality represents a character’s internal struggles. As such, each character keeps track of his own Morality, although it can also affect a character’s relationships with his friends and enemies. 
“Our goal was to create a game mechanic that represents the spiritual battles between good and evil that we see throughout the Star Wars movies. We watch Luke Skywalker struggle with making the right decision, and we see the consequences – both good and bad – of his actions. We also had to relate our game mechanic to the Force, and the balance between light and darkness. “A character’s Morality runs along a track that stretches between one and 100. Higher values represent characters who are more virtuous “paragons” of the Force. Lower values represent characters who may be in danger of falling to the dark side of the Force, or even those who have already embraced evil and joined the darkness. However, a character’s Morality is always in motion. Good characters can fall and become evil, and even the vilest Dark Lord of the Sith may find a chance for final redemption. “We represent this motion using the second part of the Morality mechanic: Conflict. Conflict is what PCs earn during the course of a game session for performing ‘bad’ deeds. They can earn Conflict by using the dark side of the Force to manifest Force powers. They may also earn Conflict by failing fear checks; after all, fear leads to anger, and anger leads to hate. Of course, a PC who does something truly evil, such as murdering innocents, is guaranteed to earn a lot of Conflict! “At the end of each session, each character’s total Conflict is combined with a random modifier. The more Conflict a PC has, the more likely his Morality decreases. The less he has, the more likely that his good deeds may outweigh his bad, and that his Morality will stay the same, or even increase. This was done deliberately, because we wanted to ensure that taking a little Conflict was seen as a reasonable risk by players. Why not use the dark side just once to manifest a crucial Force power, or steal a small item to further the story? Surely, a couple Conflict won’t hurt. “In this way, we’ve turned Morality into a narrative mechanic that rewards players who make principled decisions over the long term, while tempting them with selfish choices in the short term. The very real ramifications of one’s moral choices are key to the experience of playing Force users, and they’re something I think players will find very compelling.” Ready, Are You?  The Jedi are all but extinct. Their legacy is maintained only by a wise master and a young farm boy turned Rebel hero. Is it your destiny to help rebuild the Jedi order? The Jedi are all but extinct. Their legacy is maintained only by a wise master and a young farm boy turned Rebel hero. Is it your destiny to help rebuild the Jedi order?
The Star Wars: Force and Destiny beta is a limited edition, 256-page softcover rulebook, and it includes all the information players and GMs need to begin epic campaigns, full of personal conflicts and Force powers, all set within the Star Wars galaxy and drawing upon one of its most resonant themes. However, it is important to note that some of the elements in this beta are not representative of the final product. Much of the art and background material has been removed to provide a more concise playtesting experience, and some contents may change between the beta and the final product. Keep your eyes peeled for more information about the Force and Destiny beta. Otherwise, as you wait for your chance to get involved, you can learn more about the game from its description page. ... Source: Follow the Jedi Path
|
|
|
|
|
Logged
|
|
|
|
RSSFeeder
Global Moderator
Deep One
Karma: 0
Offline
Posts: 3916
|
|
« Reply #172 on: 22 August 2014, 04:30:03 » |
|
Dark Wings, Dark WordsA Dire Message Is Now Available for A Game of Thrones: The Card Game
A scrap of leather fluttered down into her lap. When she read the dry brown words, her black mood grew blacker still. Dark wings, dark words. The ravens never brought her glad tidings.
–George R.R. Martin, A Dance with Dragons A Dire Message, the final Chapter Pack in the Conquest and Defiance cycle for A Game of Thrones: The Card Game, is now available at your local retailer and online through our webstore! You’ll find the conclusion of the Conquest and Defiance cycle in this Chapter Pack, expanding the cycle’s major themes even further. A host of new and powerful prized cards await, as well as vital support cards for multi-House decks. Even as A Dire Message continues these new themes, you’ll also find new, prized versions of iconic characters and locations, including Robert Baratheon, the Iron Throne, and Mad King Aerys. 
Among these new cards, House Martell finds plenty of new ways to outwit their opponents and control enemy characters! Outwit Your Opponent  Unlike the northmen of House Stark, who slay their enemies in battle, or the schemers of House Lannister, who use their intrigues to kneel enemy characters, many of House Martell’s most potent effects use clever tricks to return enemy characters to their owner’s hand. With cards like A Game of Cyvasse (A Change of Seasons, 57) or Ghaston Grey (Forging the Chain, 34), House Martell keeps troublesome characters out of play, and you’ll gain more tricks to continue this theme in A Dire Message. Unlike the northmen of House Stark, who slay their enemies in battle, or the schemers of House Lannister, who use their intrigues to kneel enemy characters, many of House Martell’s most potent effects use clever tricks to return enemy characters to their owner’s hand. With cards like A Game of Cyvasse (A Change of Seasons, 57) or Ghaston Grey (Forging the Chain, 34), House Martell keeps troublesome characters out of play, and you’ll gain more tricks to continue this theme in A Dire Message.
Your first method for returning opposing characters to your opponent’s hand is Locked in a Cell (A Dire Message, 109). This event is prized, and it bears the text, “Any Phase: Kneel 3 influence or kneel a Noble character to choose a character without a crest. Return that character to its owner’s hand.” The versatility of this event is nearly limitless, since you can play it at almost any time. You may wait until your opponent declares only one defender, or play it after he declares a challenge with one attacker. You can even combine Locked in a Cell with Blood Orange Grove (The Champion’s Purse, 30) to target enemy characters that do have a crest! Even with the many tricks and powerful events at the Martells’ disposal, it’s possible that your opponent might still rush past you to build a formidable board of characters. At that point, it’s good to have The Boneway (A Dire Message, 108) in play. Whenever your opponent plays or reveals a prized card, you may trigger The Boneway to have each player choose up to three characters that he controls. All unchosen characters are returned to their owners’ hands. By resetting each player to three characters whenever your opponent plays a prized card, you can ensure that your opponent faces you on equal terms. You may even discourage your opponent from playing prized cards altogether, depriving him of his most powerful tools, and clogging his hand with prized cards. If that happens, Doran Martell (Spoils of War, 10) is sure to help you gain some additional power from your Intrigue challenges. Claim the Throne The coming of A Dire Message marks the thrilling finale of the Conquest and Defiance cycle. Whether you band two Houses together in a single deck, or use your prized cards to establish victory, you’ll find the cards you need in this Chapter Pack. Pick up your copy of A Dire Message at your local retailer today! ... Source: Dark Wings, Dark Words
|
|
|
|
|
Logged
|
|
|
|
RSSFeeder
Global Moderator
Deep One
Karma: 0
Offline
Posts: 3916
|
|
« Reply #173 on: 22 August 2014, 13:00:04 » |
|
Choose Your FateDarkness and Light Is Now Available for STAR WARS (TM): The Card Game
“There is good in him. I've felt it. He won't turn me over to the Emperor. I can save him.”
–Luke Skywalker, Star Wars: Return of the Jedi Darkness and Light, the final Force Pack in the Echoes of the Force cycle for Star Wars™: The Card Game, is now available at your local retailer and online through our webstore! With this Force Pack, the Echoes of the Force cycle comes to a dramatic conclusion. A long-lost Jedi returns to the Jedi Temple on Coruscant, and C-3PO raises native support on the forest moon of Endor by impersonating a deity. Meanwhile, the Imperial Navy’s Fighters grow stronger and more reliable than ever, and you gain the opportunity to delve into the secrets of Jabba’s palace and the schemes of Salacious B. Crumb. 
On the planet Cularin, however, a new power is rising in the Sith cult. The call of the cult has gone forth, and cultists are gathering to the power of the dark side. Will you join the cult, or work to destroy it? You decide in the Darkness and Light Force Pack. The Believers  Initiation into the cult of the Believers begins with the objective of this set: The Call of the Cult (Darkness and Light, 620). This objective possesses a Reaction that could certainly help you gain an early lead over the light side. When this objective enters play, you immediately set the Balance of the Force to the dark side. If this objective is among your starting objectives, you can advance the Death Star dial two spaces before the light side even has a chance to react. Even if The Call of the Cult appears later in the game, it can help you seize control or tip the balance of power in your favor. Initiation into the cult of the Believers begins with the objective of this set: The Call of the Cult (Darkness and Light, 620). This objective possesses a Reaction that could certainly help you gain an early lead over the light side. When this objective enters play, you immediately set the Balance of the Force to the dark side. If this objective is among your starting objectives, you can advance the Death Star dial two spaces before the light side even has a chance to react. Even if The Call of the Cult appears later in the game, it can help you seize control or tip the balance of power in your favor.
This objective set also offers you two copies of a highly useful Character in the Believer Initiate (Darkness and Light, 622). For only two resources, the Believer Initiate has a fine spread of combat icons, three damage capacity, and even provides a resource! The caveat, however, is that you must sacrifice the Believer Initiate if the Balance of the Force is ever with the light side. The Call of the Cult objective will let you turn the Balance of the Force to the dark side, enabling you to play your Believer Initiates on your first turn of the game. But even their sacrifice can become a tool of the dark side, if you’ve fielded the power of the Executor (Escape from Hoth, 308). You’ll find two copies of a powerful enhancement in this objective set as well, as the dark side offers you the power of Hate (Darkness and Light, 623). This card enhances any Character unit in play, blanking that Character’s printed text box. The versatility of this enhancement is vast, allowing you to neuter many of the light side’s most powerful units, such as Luke Skywalker (Core Set, 92), Chewbacca (Edge of Darkness, 319), or Yoda (Join Us or Die, 568). Enhancements such as Hate would become even more powerful if you could move them from unit to unit, and you’ll find a way to do just that with the Cularin Cultist (Darkness and Light, 621). This unit possesses a valuable  icon, and can be a useful defender. This unit also has a Reaction that reads, “After this unit resolves a strike, move an enhancement from one unit to another eligible unit controlled by the same player.” With the Cularin Cultist’s Reaction, you can move Hate to whatever unit troubles you most at any time. icon, and can be a useful defender. This unit also has a Reaction that reads, “After this unit resolves a strike, move an enhancement from one unit to another eligible unit controlled by the same player.” With the Cularin Cultist’s Reaction, you can move Hate to whatever unit troubles you most at any time. Find a Balance Whether you support the Sith cult on Cularin, fly with the Fighters of the Imperial Navy, or rally the support of the Ewoks, there are plenty of new options in the objective sets in this new Force Pack. Darkness and Light is now available at your local retailer! Pick up your copy today. ... Source: Choose Your Fate
|
|
|
|
|
Logged
|
|
|
|
RSSFeeder
Global Moderator
Deep One
Karma: 0
Offline
Posts: 3916
|
|
« Reply #174 on: 22 August 2014, 21:30:07 » |
|
Race for the River CrossingTrouble in Tharbad Is Now Available for The Lord of the Rings: The Card Game
“There are some of us still who go abroad for the gathering of news and the watching of our enemies, and they speak the languages of other lands. I am one. Haldir is my name.”
–J.R.R. Tolkien, The Fellowship of the Ring Trouble in Tharbad, the third Adventure Pack in The Ring-maker cycle for The Lord of the Rings: The Card Game, is now available at your local retailer and online through our webstore! The river town of Tharbad is little more than a collection of dilapidated buildings set amid ruined and crumbling causeways. However, this haven of freelancers and highwaymen is also home to Nalir, the Dwarf with a map to Celebrimbor’s hidden forge, the secrets of which may give the White Council some new strength to fight back against the growing Shadow. Accordingly, Saruman the White has tasked several of Middle-earth’s greatest heroes with recovering those secrets and returning them to Isengard, but they aren’t the only ones who have been sent to find Nalir and his map… In Trouble in Tharbad, Spies and Orcs harry your heroes at every turn. Confronted by their overwhelming hordes, your heroes must find a safe route out of the city and take Nalir with them. The Orcs are howling. It’s time to slip out of The Empty Mug and race for the river crossing. Move swiftly and silently. The chase is on! 
The Chase The Trouble in Tharbad begins with Nalir (Trouble in Tharbad, 68). The Dwarf who sells you the map to Celebrimbor’s hidden forge has unfortunately also made previous arrangements to deliver it to one of Mordor’s spies, Bellach (Trouble in Tharbad, 70). As Bellach shows up to collect the map, Nalir darts for the tavern door, and your heroes follow, using the momentary chaos to slip out into the city’s rundown streets. There, Orcs and spies hunt you down, and the scenario from Trouble in Tharbad begins as a dramatic chase scene. You have limited time to make your way out of the city before Bellach can direct his agents to seal off its exits, and his forces outnumber yours too badly for you to fight your way to freedom. Instead, the order of the day is secrecy. Throughout Double Dealings (Trouble in Tharbad, 66), the scenario’s first quest stage, your heroes are ducking and weaving through Tharbad’s abandoned alleys and crumbling causeways. 
You’re trying to elude the Orcs and spies that are hunting you down, even as you work your way to the river crossing. Mechanically, this translates to a reduction in threat; to slip free from your pursuers, you must reduce your threat to zero. Instead of requiring you to place progress on the quest stage, then, Double Dealings comes with a Forced effect that allows you to reduce your threat: “Forced: After 1 or more progress is placed on this quest, cancel all progress and reduce each player’s threat by an equal amount.” 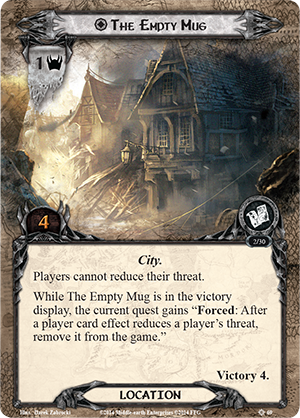 However, if you hope to get out of Tharbad, you’ll first need to put some distance between yourself and The Empty Mug (Trouble in Tharbad, 69), and that means that its Forced effect will be sitting in your victory display: However, if you hope to get out of Tharbad, you’ll first need to put some distance between yourself and The Empty Mug (Trouble in Tharbad, 69), and that means that its Forced effect will be sitting in your victory display:
“Forced: After a player card effect reduces a player’s threat, remove it from the game.” Among other things, this means that Trouble in Tharbad offers Secrecy decks their moment to shine. Not only do they start further along the path to victory, but they will find a built-in quest mechanic to help them reduce their threat and gain the full benefits of their Secrecy discounts. The only problem is that they’ll also have to deal with Nalir, who proves to be an ongoing liability. Because he knows the location to Celebrimbor’s forge, you can’t leave him behind, but you’ll probably wish you could. Nalir also comes with a Forced effect, one that makes him the center of attention wherever he goes: “Forced: At the beginning of the refresh phase, raise your threat by 1 for each player in the game.” The Help Even as your heroes race to escape the Trouble in Tharbad, the Adventure Pack introduces a number of new allies that may come to their aid. Chief among these is the new hero, Haldir of Lórien (Trouble in Tharbad, 56).  Roaming far from his home in Lothlórien, Haldir is a Ranger and Scout who extends the cycle’s exploration of the Silvan trait to new territories. With two Willpower, he can make valuable contributions to your quests, but his Ranged keyword and Combat Action may allow him to make even more valuable contributions to your fellowship’s efforts within the Combat phase. Roaming far from his home in Lothlórien, Haldir is a Ranger and Scout who extends the cycle’s exploration of the Silvan trait to new territories. With two Willpower, he can make valuable contributions to your quests, but his Ranged keyword and Combat Action may allow him to make even more valuable contributions to your fellowship’s efforts within the Combat phase.
“Combat Action: If you have not engaged an enemy this round, exhaust Haldir of Lórien to declare him as an attacker (and resolve his attack) against an enemy not engaged with you. Limit once per round.” Notably, Haldir’s ability allows him to declare an attack against an enemy before it would attack your teammate, and it even allows him to attack an enemy in the staging area. Altogether, it allows Haldir to turn the tables on any foes that would seek to assail your fellowship… like the many Orcs and spies in Tharbad. However, even Haldir’s talents won’t be enough, on their own, to see you safely through the roads of Tharbad. Fortunately, Trouble in Tharbad offers you plenty of other support. There are two Silvan allies, including the Galadhrim Minstrel (Trouble in Tharbad, 63), which can help fetch powerful events like Pursuing the Enemy (Trouble in Tharbad, 60); there’s Gwaihir (Trouble in Tharbad, 59), the great king of the Eagles, and there’s even help from Gondor, as the Herald of Anórien (Trouble in Tharbad, 57) arrives. Better yet, if you feel you’re truly doomed, you can give the Herald “doomed 2” when you play him and bring into play another ally of printed cost two or less. In this way, the Herald even allows you – or a teammate – to recruit allies that don’t match your spheres of influence, expanding your deck-building options by allowing a mono-Leadership deck to recruit powerful allies like Gléowine (Core Set, 62) or Arwen Undómiel (The Watcher in the Water, 58), whose game texts can change how your deck functions. There’s No Time to Lose! There’s no time to lose! Bellach and his horde of Orcs are moving swiftly to seal the city and hunt you down. Trouble in Tharbad is now available at your local retailer and online through our webstore. Pick up your copy today! ... Source: Race for the River Crossing
|
|
|
|
|
Logged
|
|
|
|
RSSFeeder
Global Moderator
Deep One
Karma: 0
Offline
Posts: 3916
|
|
« Reply #175 on: 23 August 2014, 06:00:07 » |
|
Stay on TargetAnnouncing an Ace Career Supplement for Age of Rebellion
“Watch your back! Fighters above you, coming in!”
–Wedge Antilles Fantasy Flight Games is proud to announce the upcoming release of Stay on Target, the first career supplement for the Star Wars®: Age of Rebellion™ Roleplaying Game! Stay on Target focuses on the Ace career, expanding it with new specializations, talents, and signature abilities. Simultaneously, it introduces new character options for all players, including new species, starfighters, modifications, and equipment, as well as options for alien mounts. These large beasts feature prominently in one of the book’s new Ace specializations but lend advantages to any combatant who rides them into battle. Additionally, GMs gain new tools to help them incorporate Aces, starfighters, mounts, and rivals into a wide range of exciting and memorable adventures. 
It’s Not Just a Career, It’s a Calling Part of the reason the Ace excels at piloting, driving, and riding is because he views his ride as a means of more than transportation; it becomes a means of expression. More than just about anyone, the Ace can intuitively adjust his actions to account for the presence and limitations of his ride. This is true whether that ride is a single-pilot starfighter, a landspeeder, or a temperamental dewback. Players looking to create an Ace, or to advance an Ace who’s ready for an new challenge, will find plenty of options within Stay on Target. The supplement rounds out the career with three new specializations: Beast Rider, Hotshot, and Rigger. Beast Rider Sometimes, instead of spending credits to adapt vehicles to worlds with extreme environments, the Rebellion finds it easier to call upon the talents of the Beast Rider. Just about anyone can ride a trained mount, but the Beast Rider is the one who can break in wild mounts and train them. Moreover, once he has trained a mount, the Beast Rider can coax it to perform incredible feats, even in the heat of a battle.  Even without a mount, the Beast Rider is an expert survivalist and can prove a great asset to any team looking to confront the Empire in rough and difficult environments. Even without a mount, the Beast Rider is an expert survivalist and can prove a great asset to any team looking to confront the Empire in rough and difficult environments.
Hotshot Where the Ace Pilot uses hard-won skill, technique, and by-the-book tactics, the Hotshot is naturally gifted, overly aggressive, and makes the rest up as he speeds along. For the Hotshot, risk-taking isn’t just a style of flying, it’s a way of life. When he sees a chance, he takes it without blinking. His unpredictable and often irrational behavior, combined with his raw talent and control in the cockpit, makes the Hotshot a lethal adversary and a valuable companion, even if you’re likely to suffer through his bragging about his exploits afterward. Rigger While most Rebel Aces operate standard vehicles maintained by engineering crews, a surprising number bring their own private vehicles with them into a fight. The Rigger doesn’t believe in risking his life from the seat of a stock-class anything, and is always adding, tweaking, and fine-tuning his vehicle not only to achieve the highest performance, but also to bring unexpected surprises with him to the battlefield. While each of these specializations further defines the Ace’s unique relationship with his ride, a pair of signature abilities allow experienced Aces to refine their talents to a degree that others simply cannot match. Recruiting for the Rag-Tag Rebellion While it focuses on the Ace career, Stay on Target nonetheless provides an abundance of materials certain to appeal to other players and GMs. The book introduces a wide array of weapons, armor, vehicles, and starfighters, as well as new Astromech Droids and rules for running Astromechs as NPCs or slotting PC Astromechs into starfighters. 
Additionally, players can choose to build characters from three new playable species: Chadra-Fan, Dressellian, and Xexto. While these species are particularly well-suited to the Ace career, they can just as easily play other roles within the Rebel Alliance, or even within games set within the Star Wars®: Edge of the Empire™ roleplaying system. Finally, as Rebel and Imperial pilots continue to fly their starfighters into engagements across the galaxy, Stay on Target offers Game Masters a range of different advice, insight, and adventure seeds to help incorporate Aces, starfighter battles, and mounts into any Age of Rebellion campaign. You’ll find new ways to think about rivals, and you’ll find ways to work your Aces into any sort of adventure. 
The Stars Are the Limit In Stay on Target, the Rebellion’s finest pilots gain the opportunity to help turn the tides of battle, but to do so they’ll need all the help they can get. Look for this Age of Rebellion rules supplement to enhance your campaign once it arrives at retailers in the fourth quarter of 2014! ... Source: Stay on Target
|
|
|
|
|
Logged
|
|
|
|
RSSFeeder
Global Moderator
Deep One
Karma: 0
Offline
Posts: 3916
|
|
« Reply #176 on: 23 August 2014, 14:30:02 » |
|
The Power of DragonsPreview the Draconic School of Magic in Bestial Forces
Dauziel chanted slowly, musically, moving his fingers and hands to a relentless, internal rhythm. In a moment the spell was complete, and the stone wall before him crumbled into sand at his feet. Behind the wall lay a treasure chest. Around the chest lay a coiled beast. It awoke, arching its back and rustling its wings before turning a lazy eye towards the intruding wizard. Dauziel started running; the first flames already licking at his cloak. The powers of all creatures are yours to command in Bestial Forces, the second expansion for Wiz-War. Whether you bring creatures into the labyrinth to use as your minions, or channel wild magic through your wizard, you’ll find cards to support both styles of spellcraft in this expansion. In our last preview, we took a closer look at the Mythology school of magic, which features a host of creatures and ancient relics drawn from the wellsprings of antiquity. Today, however, we’ll turn to a school of magic devoted to one creature: the dragon! 
Guard Your Hoard The Draconic school of magic offers a host of spells based on the unique powers of a dragon. If there’s one thing dragons excel at, it’s guarding their treasure, and you’ll find new spells to help you do just that in this school of magic. The first spell to help you safeguard your treasure is Treasure Lust. You can maintain this spell over several turns, and as long as it persists, every time you attack a wizard carrying a Relic or a treasure, that wizard must immediately drop it or take three additional damage from the attack! Whether you force your opponent to drop your treasure or deal extra damage, you’ll come closer to winning the game with every attack.  
Another way to keep your opponent from making off with your treasure is by using a Tail Slap. This attack allows you to attack a wizard and deal damage equal to a die roll. The best part, however, is that if your target takes any damage, he must drop a treasure or an item of your choice in his square, allowing you to indulge your draconic urges and steal treasure for yourself. As you jealously hoard your own treasure, you may decide to summon a deadly drake. This creature can be summoned like the creatures in the Mythology school of magic, but you may also summon the drake as a counter spell when another wizard picks up a treasure in your home sector. Summoning the drake as a counter spell places the drake in the other wizard’s square and forces him to drop the treasure immediately. What’s more, treasure in the same square as the drake can never be picked up by another wizard, allowing you to keep your treasures safe as long as the drake lives. Skin to Scales Dragons aren’t just experts at gathering and keeping treasure – they’re also very hard to kill. The Draconic school of magic offers you some of this same protection. You might choose to cast the Dragon Scales spell and harden your skin to impenetrable scales. You can cast this spell on yourself, and while this spell lasts, you are immune to fire damage and reduce all damage that you would take by one, massively increasing your chances of long-term survival in the labyrinthine hallways of Wiz-War.  
You might also take advantage of a dragon’s natural immunities by playing Magic Resistance. You may play this counter spell after you or one of your creatures is attacked. The attacking wizard must give you an energy card from his hand, or the attack is cancelled, granting you some added protection against whatever spells may target you. Of course, even a dragon is wounded sometimes. Thankfully, that’s when you can call upon the regenerative prowess of a dragon’s blood. By playing Regeneration, you or a creature immediately heal one life, and as long the spell has energy, the spell’s target heals one life at the beginning of each of your turns. A Flood of Fire The power of dragons is nearly unmatched, even in the magical world. You can take advantage of that power by harnessing the spells of the Draconic school of magic. There are plenty of other spells in Bestial Forces as well: join us next time to preview the far-reaching power of the Totem school of magic! Preorder Bestial Forces at your local retailer today! ... Source: The Power of Dragons
|
|
|
|
|
Logged
|
|
|
|
RSSFeeder
Global Moderator
Deep One
Karma: 0
Offline
Posts: 3916
|
|
« Reply #177 on: 23 August 2014, 23:00:02 » |
|
Announcing the 2014 World Championship ScheduleJoin Competitors at World Championship Weekend, November 6-9
Back in April, Fantasy Flight Games announced the dates for the 2014 World Championship Weekend. Today, it is time to announce the highlight of the weekend: the schedule for all World Championships! As November draws closer, hundreds of players around the world have begun to plan their treks to FFG’s hometown in Minnesota. Some will take the bus across town or pile into a car full of friends and drive a couple of hours, but others will be hopping on planes and flying halfway around the world to the Twin Cities. Will you join them and test your skills against the best in the world? If you are looking to attend Worlds or just want to tune in as the action happens, download the schedule now and start sketching out the most important days and times for you. The schedule for each game’s side events will be posted soon. 
World Championships While all your favorite games will be returning, the centerpiece of the 2014 event is the debut of two brand-new World Championships: Warhammer: Diskwars and Warhammer 40,000: Conquest! These two games will be played alongside our perennial mainstays throughout the weekend. 
Preregister Today If you haven’t already, preregister now and solidify your spot among the hundreds of players from around the world coming to Minnesota for the 2014 World Championship Weekend. But don’t wait too long because preregistration closes October 16th! While players can still register on site the day they arrive, the cost will increase to $50. 
More to Come While players can now begin deciding what day is best to arrive, there is a lot more to be announced. Stay tuned in the following months to learn the schedule of side events being run, the prizes that will be given away for all events at the 2014 World Championship Weekend, and more! ... Source: Announcing the 2014 World Championship Schedule
|
|
|
|
|
Logged
|
|
|
|
RSSFeeder
Global Moderator
Deep One
Karma: 0
Offline
Posts: 3916
|
|
« Reply #178 on: 26 August 2014, 01:30:03 » |
|
The Ring-bearer's TrialsA Preview of The Road Darkens by Lead Developer Caleb Grace
In the last preview of The Road Darkens Saga Expansion for The Lord of the Rings: The Card Game, I introduced the new Gandalf hero (The Road Darkens, 2) and some of the great player cards that support him. In this article, I’d like to introduce some of the ideas behind each of the expansion’s three scenarios: The Ring Goes South, Journey in the Dark, and Breaking of the Fellowship. Before we look at the scenarios individually, it’s worth noting that their design presented a few unique challenges. First of all, our team settled early on which key story moments we needed to include in this Saga Expansion, but each one had already inspired a popular scenario within the game. The existence of The Redhorn Gate, Flight from Moria, and Journey Down the Anduin meant we would need to find some innovative ways to make these scenarios unique and distinctive, even while drawing from familiar elements. Not only that, but each of the three scenarios takes place in completely different environments and feature a completely different set of enemies and obstacles.  That meant there would be no encounter sets to share between the three scenarios; we would have to build three complete adventures from a limited card pool. Lastly, as The Road Darkens is the follow-up to The Black Riders, it was important that this installment in The Lord of the Rings Saga feel more epic than its predecessor in order to mirror the tone of the book and to satisfy players who had been waiting eagerly for the opportunity to continue their campaigns. It wasn’t ever going to be enough to aim for “just as good” as The Black Riders; the scenarios in The Road Darkens had to surpass them, reaching new heights of challenges and dramatic tension, both as standalone scenarios and as part of campaign mode. That meant there would be no encounter sets to share between the three scenarios; we would have to build three complete adventures from a limited card pool. Lastly, as The Road Darkens is the follow-up to The Black Riders, it was important that this installment in The Lord of the Rings Saga feel more epic than its predecessor in order to mirror the tone of the book and to satisfy players who had been waiting eagerly for the opportunity to continue their campaigns. It wasn’t ever going to be enough to aim for “just as good” as The Black Riders; the scenarios in The Road Darkens had to surpass them, reaching new heights of challenges and dramatic tension, both as standalone scenarios and as part of campaign mode. With all of these challenges on my mind, I confess I felt a little bit like Frodo when he was reluctant to leave the safety of Rivendell and start along the path to Mount Doom. But just as the esteemed Mr. Baggins found depths of courage and wisdom he never knew that he had, I found inspiration that got me excited to work through the challenges and develop what I believe are three very memorable scenarios. Hopefully, after hearing a little bit about each one, you’ll agree. The Ring Goes South The first scenario in The Road Darkens begins with the formation of the Fellowship of the Ring in Rivendell at The Council of Elrond. That chapter of The Fellowship of the Ring is so vital to the rest of The Lord of the Rings, and so interesting to me as a fan, that I wanted to start this scenario with a stage that resembled some of the cooperation and debate that took place at the secret council. So, stage 1B of The Ring Goes South is The Council of Elrond (The Road Darkens, 20), and it reads: “Forced: At the end of the planning phase, each player places the top card of his deck faceup in front of him, in player order, until there are a total of 4 faceup cards between the players. The first player chooses 1 faceup card to play for 0 cost, 1 to add to its owner’s hand, 1 to discard, and 1 to shuffle into its owner’s deck. Then, either shuffle Lust for the Ring into the encounter deck, or raise each player’s threat by 5. Advance to stage 2.” 
Even in a single player game, this effect creates some truly meaningful choices, but it obviously becomes more interesting as you add more players. Depending on the cards the players reveal, this effect can start a lively conversation reminiscent of the debate that took place in the book. It’s entirely possible that you’ll see four players arguing for four different visions for the game, but by the end of this quest stage, you’ll need to make a single decision and share a single vision. Meanwhile, the decision whether you should raise each player’s threat by five or shuffle a burden card into the deck in particular can also become a divisive issue since an additional five threat at the beginning of the game can mean very different things to different decks… especially since this scenario makes it particularly dangerous to engage enemies. Once you depart Rivendell, the rest of The Ring Goes South recreates the first part of the Fellowship’s journey together, from Rivendell to the Doors of Durin, as they try to move secretly through Hollin. But as the Ring-bearer travels along the western edge of the Misty Mountains, he is hunted by Wargs and Crebain in the service of the Enemy. So this scenario has a heavy focus on travel with a theme of being hunted. Each quest stage after the first one shares two identical lines of game text:  “During the travel phase, the players must travel to a location, if able. “During the travel phase, the players must travel to a location, if able.
Forced: After an enemy engages a player, place 1 damage on the active location, if able.”
The first line signifies the urgency of the Fellowship’s travels as they sought to move quickly through lands they feel are being watched. The second effect represents how the Enemy’s creatures close in around them, getting closer and closer to discovering the Ring. As such, placing damage on locations is a very dangerous thing to do. Each location in The Ring Goes South has an effect that will trigger when it is explored. For example, consider Eregion (The Road Darkens, 34): “Forced: When Eregion is explored, the players as a group must discard X allies from play. X is the number of damage here.” Just as it was the Fellowship’s goal to pass through Hollin without encountering any of the Enemy’s servants, the players will also want to avoid engaging enemies and damaging locaitons while playing The Ring Goes South, or effects like Eregion’s may lead to their defeat. Journey in the Dark As I mentioned earlier, one of the biggest challenges we faced with The Road Darkens was figuring out how to present new takes on things we’ve already seen in The Lord of the Rings: The Card Game, such as Moria and the Balrog. However, the Fellowship’s journey through Khazad-dum and their confrontation with the fire demon are just so important to the story that there was simply no way around them. Still, we knew that we needed to approach Journey in the Dark in such a way as to set it apart from previous scenarios and keep it faithful to the book. One of the first things that jumped out at me as I was re-reading The Fellowship of the Ring was how close the Fellowship came to encountering the Balrog by Balin’s tomb. If it wasn’t for a quick retreat and Gandalf’s closing spell, Frodo would’ve come face-to-face with a demon of Morgoth in the Chamber of Mazarbul (The Road Darkens, 51). With no bridge, no abyss, and no way for Gandalf to cast down the beast, that may very well have been the end of Frodo’s quest right there. That realization provided the inspiration for the expansion’s new, exciting, and thematic trip through Moria. When setting up Journey in the Dark, players first set aside The Balrog (The Road Darkens, 44), out of play, and the objective, Doom, Doom, Doom (The Road Darkens, 43) is added to the staging area with ten damage tokens on it.  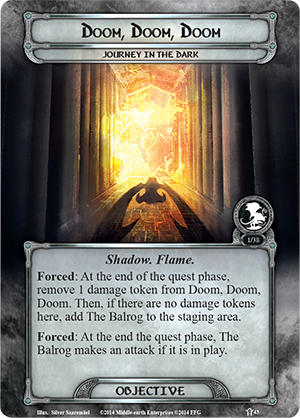
This is significant because Doom, Doom, Doom reads: “Forced: At the end of the quest phase, remove 1 damage token from Doom, Doom, Doom. Then, if there are no damage tokens here, add The Balrog to the staging area.” Just as Gandalf insisted that the Balrog was a foe beyond any of the members of the Fellowship, the enemy put into play by this effect is not something the players want to confront. Not only does The Balrog have some of most intimidating stats ever seen on an enemy card, it also shares its immunity to player card effects with the shadow cards it is dealt. That means players can neither prevent The Balrog from attacking, nor can they cancel its shadow effects.  The Balrog is a truly terrifying enemy, and it’s Indestructible, which means if it takes you too long to advance from stage one, you could end up facing its attacks at each stage of the quest. If you cannot escape from Moria before it enters play, then your one hope is to reach stage three and race across The Great Bridge (The Road Darkens, 50). The Great Bridge has an effect that reads: The Balrog is a truly terrifying enemy, and it’s Indestructible, which means if it takes you too long to advance from stage one, you could end up facing its attacks at each stage of the quest. If you cannot escape from Moria before it enters play, then your one hope is to reach stage three and race across The Great Bridge (The Road Darkens, 50). The Great Bridge has an effect that reads:
“Response: When The Great Bridge is explored, discard a hero from play to deal X damage to The Balrog. X is that hero’s threat cost. Then, The Balrog loses all keywords for the remainder of the game. Any player may trigger this response.” This effect makes it possible to destroy The Balrog. However, triggering it comes at a high price; one player must sacrifice a hero he controls in order to trigger it, and in campaign mode, that hero (as well as any ally version of the character) is lost for the remainder of the campaign. Still, that hero’s sacrifice may prove the only way that the rest of the heroes can escape from Moria. Breaking of the Fellowship The third scenario was the one I was most excited to develop because I knew from the beginning exactly what I wanted it to be about. When you have a scenario called “Breaking of the Fellowship” and it’s based on the part of the novel that sees the Fellowship split into several groups, it should very well do the same thing in the game by sending each player to his own staging area. Of course, we’ve split the players into separate staging areas in previous scenarios like Foundations of Stone, but I knew Breaking of the Fellowship would be different because there would still be a focus of working together to protect the Ring-bearer. In Breaking of the Fellowship, the players make their way down the Anduin river together through stage one until they reach the shore at stage two. There, they are attacked by Uruk-hai, and the Ring-bearer disappears. Then, each player creates his own private staging area and advances to a different stage three. This represents the different members of the Fellowship running off in all directions to look for Frodo. While they’re at different stages, the players each quest and travel separately, and they only make engagement checks against enemies in their staging area. However, unlike the aforementioned Foundations of Stone scenario, the players can still interact with each other by playing cards to support each other or making use of the Ranged and Sentinel keywords. Furthermore, each stage three quest card has a unique effect that triggers when the player at that stage quests successfully. These effects can be used to aid the other players at different stages. For example, Guard the Hobbits (The Road Darkens, 64) reads: “Response: After you quest successfully, choose a player. Ready each of that player’s heroes.” 
This effect can be used to ready your heroes or a teammate’s depending on who you think needs that benefit the most. The players will have to make good use of these effects in order to win Breaking of the Fellowship since the player who discovers the Ring-bearer at stage three will be the only one to advance to stage four, and only that player can help Frodo escape and defeat the scenario. Of course, as the players are trying to help the Ring-bearer, the enemies are also hunting for him. This is represented by cards such as the treachery, Growing Threat (The Road Darkens, 80): “When Revealed: Either move 1 enemy engaged with you to the first player’s staging area, or Growing Threat gains doomed 2 and surge.” Just like the members of the Fellowship all paid a high price to protect Frodo and help him on his way to Mordor, you, your friends, and your heroes will have to undertake real hardships in order to defeat Breaking of the Fellowship. There’s so much more I could say about each of the scenarios in The Road Darkens, and about how the cards in each encounter deck work with the overall theme for that scenario, but I don’t want to ruin all the exciting surprises that await you. Instead, I’m looking forward to hearing how you resolve the different choices you have to make and confront the all-new challenges that these scenarios present! Note: The Road Darkens is scheduled to arrive at retailers next month. In the meantime, watch for our next preview in which Caleb introduces several of the expansion’s many new boons and burdens! ... Source: The Ring-bearer's Trials
|
|
|
|
|
Logged
|
|
|
|
RSSFeeder
Global Moderator
Deep One
Karma: 0
Offline
Posts: 3916
|
|
« Reply #179 on: 27 August 2014, 19:30:10 » |
|
Gift of the EtherealsAnnouncing the Third War Pack in the Warlord Cycle for Warhammer 40,000: Conquest
“I have taken great pains not to laugh at the actions of aliens, nor to weep at them or to hate them, but to understand them.”
–Aun’shi, Tau Ethereal Fantasy Flight Games is proud to announce Gift of the Ethereals, the third War Pack in the Warlord cycle for Warhammer 40,000: Conquest! Fight for the cause of the greater good with the newest Conquest War Pack. This sixty-card expansion offers a full playset of each unit, support, event, and attachment, continuing the main themes of the Warlord cycle and giving you the cards you need to conquer the Traxis sector. In this War Pack, you’ll find more Nurgle units for the armies of Chaos, powerful Eldar Psykers, new battle tactics for the Space Marines, and more. No matter which factions you play, you’re sure to find new cards to swell your armies and revolutionize your warlord’s role forever. 
In addition, this War Pack introduces a new Tau warlord and his signature squad, creating a brand-new style of play for the Tau. Ethereal Majesty  The Tau empire is organized into a series of castes and the Ethereals reign above all. They command the Tau, enacting the precepts of the greater good across the galaxy. At times, they even lead warriors into battle, inspiring them to new heights of greatness and valor. In Warhammer 40,000: Conquest, the Tau can gain powerful benefits from the presence of an Ethereal, such as the new warlord introduced in Gift of the Ethereals. The Tau empire is organized into a series of castes and the Ethereals reign above all. They command the Tau, enacting the precepts of the greater good across the galaxy. At times, they even lead warriors into battle, inspiring them to new heights of greatness and valor. In Warhammer 40,000: Conquest, the Tau can gain powerful benefits from the presence of an Ethereal, such as the new warlord introduced in Gift of the Ethereals.
The Tau’s new warlord in the Traxis sector is the renowned Aun’shi (Gift of the Ethereals, 45). Beloved by his troops for his unflinching courage and devotion, Aun’shi brings new levels of combat power to your other Tau units. While Aun’shi is at a planet, every Tau unit you control at the planet gains the Armorbane keyword, denying your opponent the opportunity to use shields to protect damage. Unfortunately, Aun’shi cannot remain on the front lines forever. He also bears a Forced Reaction that requires him to move to HQ after resolving an attack. Although this ability denies Aun’shi’s overarching benefit to your Tau armies by removing him from the battle, in certain circumstances, it allows him to attack and retreat immediately, rather than simply exhausting to retreat, like other warlords. Aun’shi is aided in his efforts to inspire the Tau by four Ethereal Envoys (Gift of the Ethereals, 46). These units also possess the text, “Forced Reaction: After this unit resolves its attack, move it to your HQ.” Like Aun’shi, each Ethereal Envoy also has the all-important Ethereal trait. Although these Envoys grant no wide-spread bonuses to your Tau units, many abilities on new and upcoming Tau cards are only triggered in the presence of an Ethereal. Sending your Ethereal Envoys to the front lines of battle activates these powerful special abilities.  You can start to reap the rewards of your Ethereals with Aun’shi’s Sanctum (Gift of the Ethereals, 47). By exhausting this support, you can ready a target unit at a planet with one of your Ethereal units. Perhaps the most potent application of this card is to ready a unit freshly arrived from your HQ, allowing it to strike in the first round of combat, rather than waiting for all units to refresh. Alternatively, you could ready a unit after each of your opponent’s units have struck, allowing it to attack without fear of retribution. You can start to reap the rewards of your Ethereals with Aun’shi’s Sanctum (Gift of the Ethereals, 47). By exhausting this support, you can ready a target unit at a planet with one of your Ethereal units. Perhaps the most potent application of this card is to ready a unit freshly arrived from your HQ, allowing it to strike in the first round of combat, rather than waiting for all units to refresh. Alternatively, you could ready a unit after each of your opponent’s units have struck, allowing it to attack without fear of retribution.
You can increase the power of your Ethereals even more with an Honor Blade (Gift of the Ethereals, 48). This attachment may only be attached to an Ethereal unit, which gains the text, “Each other Tau unit you control at this planet get +1 ATK.” Equipping Aun’shi or one of your Ethereal Envoys with an Honor Blade allows your other Tau units to strike harder in combat than ever before. Sometimes, even your Ethereal units can’t be everywhere at once. When you have plenty of units that need the presence of an Ethereal to lead them in battle, you can make use of Ethereal Wisdom (Gift of the Ethereals, 49). You’ll find two copies of this free event in Aun’shi’s signature squad, and by playing it, you grant a Tau unit a raised attack value and the Ethereal trait, allowing the power of the Ethereals to spread throughout the galaxy, raising the zeal of your warriors and drenching your enemies with fear. Into the Traxis Sector Whether you side with the Tau Ethereals, ride with the White Scars, or lead Dark Eldar mercenaries, you’ll find the cards to conquer the Traxis sector in the Gift of the Ethereals War Pack. Lead your armies into battle, and look for Gift of the Ethereals at your local retailer in the fourth quarter of 2014! ... Source: Gift of the Ethereals
|
|
|
|
|
Logged
|
|
|
|
|


