RSSFeeder
Global Moderator
Deep One
 
Karma: 0
 Offline Offline
Posts: 3916

|
 |
« Reply #270 on: 14 October 2014, 04:00:03 » |
|
STAR WARS (R): Force and Destiny (TM) Beta Update #5News From the Developers of the Force and Destiny Beta
Hello Force and Destiny™ beta testers, This week, we’re bringing you our fourth round of errata updates (pdf, 310 KB) for the Force and Destiny beta, and we’re introducing some changes to weapons and gear. One issue we’ve been hearing a lot about is that Player Characters are having a hard time customizing their lightsabers. This is a fair complaint. Generally, modifying weapons and armor is the purview of tech-focused PCs. However, a Force user’s lightsaber is an intensely personal weapon, and turning it over to someone with a better skill level for some tweaks and added mods feels inappropriate. In addition, we wanted to add rules that emphasize the mystical bond between a Force user and his or her lightsaber crystal. Thus, we introduced a pair of changes: one for modifying any attachments on lightsabers, and one specifically for modifying lightsaber crystal attachments. These new rules “stack” with some of the Artisan’s abilities, so that specialization will still be the best at tweaking a lightsaber to peak performance. However, now all would-be Jedi can enhance and modify their personal weapons to a reasonable extent.  Meanwhile, we want to start looking more closely at adversaries as we prepare for our next update. We have some changes already in mind, but we’d like to hear how the different adversaries play in combat or narrative encounters against your Player Characters. If you use these adversaries in encounters and have some feedback on their performances, please also include the XP level and Careers and Specializations of the PCs involved in the encounter. As we examine the results of an encounter, the nature of the group against whom the adversary is squaring off against is vitally important toward understanding those results. Meanwhile, we want to start looking more closely at adversaries as we prepare for our next update. We have some changes already in mind, but we’d like to hear how the different adversaries play in combat or narrative encounters against your Player Characters. If you use these adversaries in encounters and have some feedback on their performances, please also include the XP level and Careers and Specializations of the PCs involved in the encounter. As we examine the results of an encounter, the nature of the group against whom the adversary is squaring off against is vitally important toward understanding those results.
Thanks everyone, and as always, we look forward to hearing your feedback! ... Source: STAR WARS (R): Force and Destiny (TM) Beta Update #5
|
|
|
|
|
 Logged
|
|
|
|
RSSFeeder
Global Moderator
Deep One
Karma: 0
Offline
Posts: 3916
|
|
« Reply #271 on: 14 October 2014, 12:00:11 » |
|
The Defenders of TerrinothPreview the Daqan Army and Combat in BattleLore: Command
Bodies and weapons littered the battlefield. The Daqan troops were fighting the thick rain and pervasive mud as much as they were fighting the unbroken line of Uthuk Y’llan. For a second, the commander feared the war would be lost before he could kindle the signal fires and alert the rest of Terrinoth to the danger. But then he spotted them – an unharmed unit of the Citadel Guard, young men more used to herding sheep than to warfare, but brave and capable of outrunning the demonic Uthuk infantry. “Guardsmen,” he called out. “Come here. I know you have the strength and speed necessary to reach the signal posts. Now you must prove that you have courage as well.” Muster your troops, lead the charge, and go to war in BattleLore: Command, a digital application for iOS, Android, and PC based on the tactical combat board game BattleLore Second Edition. Lead the valiant Daqan army in a single-player campaign to vanquish the vicious and demonic Uthuk Y’llan from Terrinoth, or command either army in skirmishes, playing against the CPU or against a friend on the same wireless network. Whether you have won countless battles in Terrinoth or never before ordered troops into battle, BattleLore: Command provides a challenging combat experience on your digital device. Today’s preview will introduce you to the units composing the Daqan army: farmers armed in order to defend their homes, horsemen specialized in speeding across the battlefield, Rune Golems created to be the sentinels of Terrinoth, and enormous raptors trained to fight. The Backbone of the Daqan Army The people of Terrinoth prefer peace to war, but in a time of danger they readily take up arms to defend their homeland. Farmers, trained and outfitted by the Daqan lords who govern them, become Citadel Guards, the infantry backbone of the Daqan army. The Citadel Guards are melee troops, close-knit groups of soldiers trained to move, defend, and attack as one unified being, armed with poleaxes to slash and stab at the enemy in close proximity, and thick shields to defend against counterattacks. With their determination and their Superior Tactics ability, they often force enemy units they can’t destroy to retreat, allowing the Citadel Guard unit to advance. Citadel Guards are also among the select units in BattleLore: Command that can pursue a retreating unit and attack again. This relentlessness makes them invaluable in battle, capable of taking down not just other infantry, but cavalry, elite units, or even a Chaos Lord in defense of their homeland. 
Hunters skilled in bow and arrow become Yeoman Archers and take aim at the Uthuk Y’llan instead of the wild game they are accustomed to chasing. These ranged units are capable of fighting in melee combat, but are better used to thin out unsuspecting enemies at a distance. If they do not have to move before an attack, they can take a double shot, and slay an entire enemy unit by sending arrows into their hearts. Every unit type has specific values for movement, combat, and health. A unit of Citadel Guards, as you can see above, has a health of three and a movement of two: it can move two hexes at a time, and takes three blows to kill. Combat value represents how many chances a unit has to deal a blow, force an enemy to retreat, or activate a special ability. Results appear as they are generated randomly, so that no battle is decided before it is fought and there is always an element of surprise. 
The Citadel Guard unit has slain part of the enemy unit, caused it to retreat one space
(except that the enemy unit was supported), and earned a point of lore. Vigilant Cavalry Citadel Guards and Yeoman Archers can be quickly mobilized the moment that Terrinoth is attacked and are often first on the field of battle. As they fight for their lives, news spreads to distant lords who send whatever forces they can to help vanquish the threatening enemy. These forces include the Riverwatch Riders, mounted swordsmen who have spent their lives on horseback. Their horses are fearless in battle, ready to gallop through a rain of poisoned arrows or stand firm in the face of hellish and hungry demons. With a greater movement value than any other Daqan or Uthuk Y’llan unit, the Riverwatch Riders excel at rushing behind enemy lines, or occupying a strategic position before the enemy can reach it. Although they only have a combat value of two, they are Vigilant, meaning that no unit they attack can counterattack. 
Riverwatch Riders can also enhance your other units’ strength by flanking enemy units, limiting the enemy’s options for retreat and temporarily increasing the combat value of any friendly units involved in the attack. Supported by Riverwatch Riders, the Citadel Guard have a combat value of four, meaning they are more likely to force the enemy to retreat, or destroy the enemy unit completely. Living Stone and Winged Legends Long ago, the leaders of Terrinoth made sentinels for the land which could be brought to life in a time of serious danger. They shaped clay and stone into hulking giants that could kill a man with a single blow of their fist and gave their creations life using ancient and now forgotten magics. The enchanted runes necessary to resurrect these massive constructs have been handed drown from generation to generation and now, for the first time in memory, there is dire enough need to awaken the Rune Golems. These formidable creatures ignore one retreat during combat, and have the potential to stun their enemies, so that the stunned unit cannot move or attack. Use Rune Golems to create an impenetrable line of defense, protecting a group of unarmed villagers, or send them to isolate and paralyze enemy units while your cavalry speed into Uthuk Y’llan territory. 
The most powerful units of the Daqan army are the Roc Warriors from the mountainous regions in the north. For centuries, the clans dwelling in the crags have bred giant birds of prey known as Rocs and matched them with brave fighters in life-long bonds, so that the human and bird act together in battle. These raptors swoop in and out of the fight, descending to slash the Uthuk Y’llan with their giant, sharp talons and flying away again. Only Roc Warriors have Mobility, which allows them to move both before and after they attack, so that the Uthuk Y’llan don’t get a chance to retaliate. Use Mobility to suddenly strike down a pernicious enemy unit and then pull back to a safe location so the Roc Warrior can attack again, unharmed, next round. 
You Are In Command Driven to defend Terrinoth against the most powerful enemy it has ever known, the forces of the Daqan army fight with the utmost determination, fortitude and valor. They also offer a commander many intriguing tactical possibilities, both offensive and defensive. In BattleLore: Command you can explore the full range of these units’ capabilities in a variety of missions as they fight to keep darkness and chaos out of their land. In our next preview we will examine the bloodthirsty Uthuk Y’llan army, composed of humans corrupted by demonic blood and vicious demons seeking to bleed and ravage whatever they can. In addition, we will explore lore powers– game-changing tools that you can use in the middle of combat to suddenly enhance your army’s capabilities. Finally, in our third preview we will look at the missions of the single-player campaign and the scenarios of the skirmish mode, from Strongholds, in which you must protect your own territory while trying to invade your opponent’s fortress, to Deathmatch, where your sole aim is to eradicate the enemy. BattleLore: Command will appear in the App store, Amazon Marketplace, and Google Play in the fourth quarter of 2014. Meanwhile, check the minisite for further previews and more information. ... Source: The Defenders of Terrinoth
|
|
|
|
|
Logged
|
|
|
|
RSSFeeder
Global Moderator
Deep One
Karma: 0
Offline
Posts: 3916
|
|
« Reply #272 on: 14 October 2014, 20:30:05 » |
|
The Desperate DefenseHow to Turn Back the Alien Invasion of XCOM: The Board Game
As their transport rumbled into position, the soldiers locked their armor into place and fired up their battle scanners. One last check of their plasma rifles, and they would rush out the door, into the beating heart of the alien invasion. They knew they wouldn’t all make it back, but if they failed, billions more might die. The whole human race might perish. Live or die, there was no turning back… Just in case you thought it was going to be easy to win your war against the alien invaders of XCOM: The Board Game, think about this: There are two ways to lose the game, but only one way to win it… In our last preview, we looked at the game’s free digital companion app. Integral to your XCOM experience, this app allows us to push the game’s design well beyond what would be possible without it. And it coordinates the alien invasion. There are five different invasion plans, which we’ll explore in more depth in a later preview, but all of them share three common elements: UFOs, enemies, and crises. These are the invaders’ weapons as they strike against you. With these weapons, they hope to sow chaos, topple nations, and cause the collapse of human civilization. 
Early military interventions proved ineffectual, and you – and XCOM – are now humanity’s last hope for a successful resistance. It is your job to maintain a semblance of order, to slow the descent into utter panic, and to find a way to strike at the invaders where it counts. These duties drive the game’s victory and loss conditions:
- You lose if two continents fall into panic. Not only does this mean that many hundreds of millions of people are dying, it means that your team loses its funding and XCOM shuts down.
- You lose if your base is destroyed. If your base is destroyed, so are your means of fighting back. And if XCOM can’t fight back, there’s no other power in the world capable of retaliating in any way that doesn’t harm the world more than its invaders.
- You win if you can unlock and complete your scenario’s final mission. Of course, to get to the final mission, you’ll need to protect your base, prevent nations from panicking, and complete other missions that will help you find weaknesses in the aliens’ strategy.

Can you unlock your final mission? Click on the image above to unlock Domination.
Don’t Panic! Because you’ll lose if any two of the six populated continents fall into panic, you’ll need to become familiar with the panic track. As you wage your war against the alien invaders, you’ll need to track the degree to which each continent has fallen into chaos. Time is against you. After all, your team wasn’t fully activated until the world’s military forces had already lost ground to the invaders. Thus, even at the beginning of the game, you’ll find that some of the continents have moved one or more steps along the panic track. Once you start playing, the pressure really starts to build. Each round, the world’s continents each move one step closer toward panic for each UFO in orbit over that continent. As if that’s not enough, the crises you must resolve may also move the world’s continents toward panic. 
While XCOM’s Interceptors are deployed elsewhere, two UFOs sow chaos in Australia, moving it two steps toward panic. Asia has already fallen into panic, so if Australia also collapses, the game is over, and you lose!
It’s almost impossible for you to entirely staunch the spread of panic. The best you can hope for is that you can slow it down, aid those nations that truly need your intervention, and buy yourself just enough time to plan a retaliatory strike. Defend Your Base As you route your Interceptors across the globe to confront the UFOs that threaten to topple the world’s governments, the aliens send a number of enemies to assault your base, hoping to find some way to eliminate you and the threat that your team represents to their grand design. In XCOM: The Board Game, there are nine different types of enemy cards, corresponding to each of the different types of enemies that might assault your base. At the beginning of your game, the app will identify a number of these enemies and instruct you to take all of their cards, including any Elite versions, and shuffle them together to create an enemy deck. These enemies then spawn at your base throughout the game, and if your soldiers can’t eliminate them all, each enemy remaining deals one damage to your base. If your base suffers enough damage, it is destroyed, and you lose. 
Two enemies survive XCOM’s defenses, damaging the base twice.
However, your base defense isn’t all-or-nothing. Even if your base isn’t at risk of being destroyed, you can suffer some very real consequences for letting the enemy strike. Whenever the base damage token advances to a red space, you must resolve the damage ability on the aliens’ invasion plan. 
The damage token advances to a red space, triggering the damage ability on the aliens’ invasion plan. In this example, two UFOs spawn on each continent in the red zone of the panic track.
We will look at base defense in greater detail in a later preview. The Final Mission As UFOs appear in orbit and enemies spawn on your base, you’ll be forced to decide how best to allocate your resources. They are finite, after all, and the key to XCOM: The Board Game is deciding which battles you need to win, and which sacrifices you can afford to make. As much as this is a game of tense struggles against strange and remorseless foes, it is a game of resource management. Interceptors cost money. Soldiers cost money. Scientists cost money. Satellites cost money. And your funds are limited. You need to weigh your options clearly and quickly, even in the face of disaster. 
Your team has thirteen credits… You need to make them count!
But if you can help the world’s governments retain a semblance of order long enough, and if you can keep the enemies from destroying your base and all your work, you just might be able to send a hand-picked unit of soldiers to undertake one final, surgical strike against the aliens that may hit them hard enough that you can turn the tides of war. 
XCOM’s squad leader sends a squad of two assault soldiers and one sniper to attempt the game’s final mission. Both types of soldiers excel at the early tasks, though they may need to push hard to make it through the mission’s third task.
Moreover, you can undertake other missions throughout the game to find weaknesses in the aliens’ invasion plan. By completing these other missions, you reduce the amount of time it takes your analysts to discover the target of your final mission. Both these preliminary missions and the final mission require that you complete a number of tasks, but there’s certainly no guarantee you’ll resolve them successfully on the first attempt, nor on the second, or the third. In fact, there’s a good chance that when you send your best soldiers to a mission, you’re sending them to their doom. 
Open task slots on missions are filled by enemies. Completing this final mission requires that you get one success on the first task, then get three successes on the second task, and finally manage to get one last success on the third task.
Prevail Against Overwhelming Odds The odds of XCOM: The Board Game are stacked against you. There are two ways to lose and only one way to win. By the time your team gets funding, the aliens have already launched their invasion. You need to fight your war on four fronts, but you don’t have enough funding to fight on even footing at each. Out of this situation, you must carve a winning plan. You need to shoot down UFOs to slow the rise of panic. You need to fight for your base. You need to research new tech to gain footing. You need to send soldiers on deadly missions to gain crucial military intelligence. It’s a desperate situation, and it requires bold action. The question is: How far will you push your luck? 
In our next preview, we’ll look at the game’s push-your-luck dice mechanics in conjunction with your base defense, the role of the Squad Leader, and the resolution of missions! ... Source: The Desperate Defense
|
|
|
|
|
Logged
|
|
|
|
RSSFeeder
Global Moderator
Deep One
Karma: 0
Offline
Posts: 3916
|
|
« Reply #273 on: 15 October 2014, 05:00:03 » |
|
Capital Ships in BattlePreview the Combats of STAR WARS (TM): Armada
“Move as close as you can and engage those Star Destroyers at point-blank range.”
–Lando Calrissian The battles of Star Wars™: Armada are about as large as battles get. Rebel and Imperial fleets collide above Outer Rim planets or outside of asteroid fields. Star Destroyers and Rebel frigates exchange turbolaser fire as screens of TIEs swarm X-wings and Corellian corvettes. The fate of the galaxy hangs in the balance. As large as the space battles of Armada are, they flow seamlessly over six rounds, each of which is divided into four phases. In our last preview, we looked at the Command Phase and how it forces you to plan for the future, even as you respond to the changing tides of battle. Larger ships are more powerful, though less responsive, and while they’re capable of resolving more commands within a single round, they force you to plan further ahead. A single round of combat may be the culmination of three or four rounds of planning. When the moment comes to fire, then, you’ll want to be sure to make it counts. In today’s preview, we’ll look more closely at the Ship Phase, focusing on ship-to-ship combat and its brutal exchanges of turbolaser blasts and artillery fire. 
The Ship Phase In Armada, after you and your opponent have selected all your commands and placed them on the bottom of your ships’ command stacks, you proceed to the Ship Phase, in which you and your opponent take turns activating your ships one at a time. When it’s your turn, you can choose any of your capital ships that has not already activated during the round and activate it. Each activation has three steps: Reveal Command Dial, Attack, and Execute Maneuver. 1. Reveal Command DialOnce you select which of your ships you intend to activate, you reveal the top command from its command stack and place the dial faceup next to your ship. If you want to resolve the command from the dial for its full effect, you can do so at the appropriate time. Otherwise, you can spend the command to gain the matching command token and place it next to your ship. 
The Imperial player reveals a navigate command from the top of a Victory I-class Star Destroyer’s command stack.
2. AttackAfter you reveal your ship’s command dial, your ship can perform up to two attacks, though each must originate from a different hull zone. Each attack can target a single hull zone on an enemy ship or one or more enemy squadrons. We’ll look at how your ship resolves its attacks in more detail below. 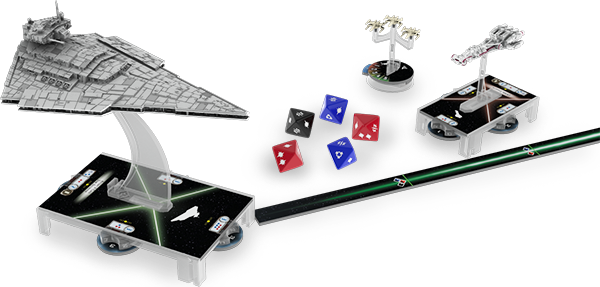
Few things in the galaxy are deadlier or more terrifying than direct fire from an Imperial Star Destroyer!
3. Execute ManeuverAfter your ship performs its attacks, it executes a maneuver. Using the game’s articulated maneuver tool, you must move your ship a distance corresponding to its current speed, tracked on its speed dial. Notably, your ship’s movement is based upon its speed. Each ship’s card features a speed chart that indicates the number of steps you can adjust the maneuver tool’s yaw at each joint, and the only way to adjust your ship’s speed is to resolve a navigate command. 
A Nebulon-B frigate uses the game’s maneuver tool to set its course for a four-speed maneuver, adjusting the template one click right at the second joint and two clicks left at the third joint.
After you finish executing your ship’s maneuver, you place its command dial faceup on its ship card, and your opponent can activate a ship. Maximum Firepower As mentioned earlier, each of your ships can perform up to two attacks when it activates, and getting the most out of these attacks is crucial to your success. As a result, it’s vital that you understand how to create the best possible pool of attack dice, anticipate your opponent’s defenses, and learn to position your ships to anticipate their attacks in the next round. The strength of your attack is represented by its pool of attack dice. There are three types of color-coded, eight-sided attack dice, and each corresponds to a different maximum firing range, as indicated on the game’s range ruler. 
Colored icons indicate which types of dice can fire at a given range. All three dice can fire at close range while only the red dice can fire at long range.
 |
Red dice have the longest range, though they are the least accurate. Only five of their sides result in hits ( ) or critical hits ( ) or critical hits ( ), although only two of their sides are blank. The final side has an accuracy ( ), although only two of their sides are blank. The final side has an accuracy ( ) result, which can be used to strip away your opponent’s defenses, which we’ll explore in more detail below. ) result, which can be used to strip away your opponent’s defenses, which we’ll explore in more detail below. |
 |
Blue dice have the second longest range and are the most accurate. They have no blank faces; the faces that don’t result in hits () or critical hits () result in accuracy (). |
 |
Black dice have the shortest range but deal the most damage. While these dice have two blank sides, they also feature multiple sides that combine both hit () and critical hit () results. |
The combination of dice that you roll for an attack against an enemy ship’s hull zone depends upon the hull zone from which your attack originates and is indicated on your ship card. If you choose, however, to have your ship perform an attack against one or more squadrons, it uses a different pool of attack dice. Each ship has an anti-squadron armament that is indicated to the right of its hull value on the ship card, and it uses this pool of dice against squadrons, regardless of the hull zone from which it fires. 
Though the Victory II-class Star Destroyer features a primary attack of six dice from its front firing arc, its anti-squadron armament consists of just a single blue attack die.
It’s also worth noting, at this point, that the different versions of your ships may feature different armaments with different combinations of attack dice. For example, the CR90a Corvette attacks out of its foreward hull zone with two red dice and one blue dice, but the CR90b Corvette attacks from the same hull zone with three blue dice. 
Two of the CR90a’s attack dice can fire at long range while the CR90b is limited entirely to shots at medium or close range.
As you can see, gaining maximum impact from your attacks is a matter of catching your target within the ideal range and firing arc of your most lethal hull zones. You can further enhance the impact of your attacks by adding dice with the concentrate fire command and spending a concentrate fire command token to reroll any unfavorable result. Against this, you’ll want to consider the sort of retaliatory fire that your opponent’s ships might be able to send your way. For example an Imperial admiral in command of a badly damaged Victory I-class Star Destroyer might choose to fire at a CR90b Corvette from long range for only three red dice, rather than plot a course to fire at it from close range for three red dice and three black dice. 
At that longer range, the Victory I is safely out of range of the Corvette (as illustrated above by the first diagram above). However, at shorter range (as illustrated by the second diagram), the Star Destroyer doubles the impact of its attack, but it also makes itself vulnerable to the three medium-range blue dice from the Corvette’s foreward hull zone. If it doesn’t destroy the Corvette, the Corvette might punch through its final defenses and destroy it. Reroute Power to the Forward Deflector Shields Meanwhile, as you batter your opponent’s ships with turbolasers, missiles, and proton torpedoes, your enemy is firing back at you. If you want your ships to survive the battle, you need to make the most of their different defenses. Your ship’s first defenses are its shields. Each hull zone has a shield value, which indicates how much damage its shields can absorb before they fail. 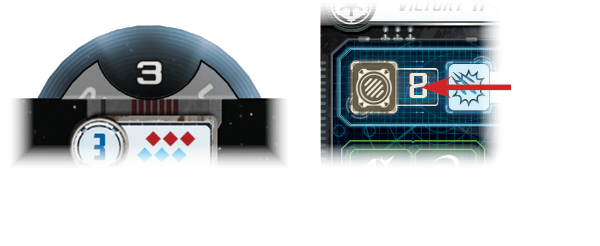
The shield value (left) and hull value (right) of the Victory II-class Star Destroyer.
Hits against a hull zone that has lost its shields deal damage to the ship’s hull. Each ship has a hull value listed underneath its title, and if it suffers damage equal to or greater than its hull, it is destroyed. To prevent your opponent from dealing damage to your hull, then, you need to do more than simply rely upon your shields. Each ship indicates a number of defense tokens that it can use while defending against an attack, and each token allows your ship to perform a different action in response to the attack in order to mitigate its results.
 |
Redirect: When you redirect an attack, you choose one of your hull zones adjacent to the defending hull zone, and you can redirect any amount of the damage dealt to your ship from the defending hull zone to the redirect zone’s remaining shields. |
 |
Evade: A ship with an evade token can spend it to cancel one attack die at long range, or to force an opponent to reroll one attack die at medium range. Against attacks made at close range and distance “1,” the evade token has no effect. |
 |
Halve Damage: A ship with the halve damage token can spend it to halve the damage from a single attack, rounded up. |
These tokens make your defense a matter not only of statistics, but also tactics. Once you use one of these tokens, it is exhausted and turned facedown, displaying its red side. Exhausted tokens aren’t refreshed until the end of the round, so if your ship is exposed to multiple attacks, you need to think carefully about when you want to use one of your defense tokens. 
Once used, a readied defense token (green) is exhausted (red).
It is possible to use an exhausted defense token, but doing so removes it from your ship entirely. You no longer have that defensive option available to you each round. Finally, it’s important to remember that you can use the engineering points you gain from the repair command to repair your ship’s hull or shields. However, you can’t use these points outside of your ship’s activation, so while they may help you recover from the damage you sustain during an attack, they don’t offer you any additional protection during the attack. Moving into Attack Position Even though your ships can each perform two attacks in the Ship Phase, those attacks must originate from different hull zones. Since each of your ship’s hull zones has its own firing arc, and none of these firing arcs overlap, your ship will often need to perform its two attacks against different targets.
 Click on the above thumbnail to download an example attack from the Armada Learn to Play rulebook (pdf, 443 KB). Click on the above thumbnail to download an example attack from the Armada Learn to Play rulebook (pdf, 443 KB).
|
|
Unfortunately, if you direct your attacks against multiple targets, rather than training them all against a single hull zone, the reduction in concentrated firepower may give your foes the time they need to refresh their defense tokens, redirect their shields, repair damage, and brace themselves for multiple additional rounds of combat. This means that you need to coordinate your attacks as much as possible, both by training the weapons from multiple ships against a single hull zone and by setting courses for your ships that leave them in position to target the same, compromised enemy hull zone with attacks from two of their hull zones. Of course, this is easier said than done, especially since you and your opponent are always trading activations. In the end, learning how to coordinate your fleet is something of an art form, and if you can concentrate the fire from multiple ships against a single target, you’re well on your way toward destroying that target and defeating your foe. You Are in Command Now In Armada, you take on the role of fleet admiral, and it is your job to coordinate the actions of the thousands of men and women under your command. As your ships tremble and groan under the barrage of enemy fire, you are the one who must direct their fire, their defenses, and their movement. Can you deliver the commands that will see your side emerge victorious? The battles of Armada are massive, and they’re brutal. Moreover, they’re every bit as much about tactics as they are about raw firepower. We’ll continue our exploration of these tactics in our next preview when we take a closer look at how capital ships make use of the game’s unique maneuver tool and how they interact with obstacles! ... Source: Capital Ships in Battle
|
|
|
|
|
Logged
|
|
|
|
RSSFeeder
Global Moderator
Deep One
Karma: 0
Offline
Posts: 3916
|
|
« Reply #274 on: 15 October 2014, 13:30:03 » |
|
Fantasy Flight Games Is Now HiringApply for the Position of Art Coordinator Today Fantasy Flight Games, leading hobby-market publisher of board games, card games, roleplaying games, and other tabletop games, is now hiring for the following position: Fantasy Flight Games, leading hobby-market publisher of board games, card games, roleplaying games, and other tabletop games, is now hiring for the following position:
Details can be found in the pdf document linked above. To apply for this position, please submit a cover letter with salary requirements and resume to HumanResources@fantasyflightgames.com; under the subject line “Art Coordinator” no later than end of business day Friday, October 24, 2014. Please do not call or visit. Our offices are located in Roseville, Minnesota, a suburb of the Twin Cities of Minneapolis and St. Paul. Candidates not already living within commuting distance must be willing to relocate. Fantasy Flight Publishing, Inc. is an equal opportunity employer committed to a diverse work force and a work environment free from discrimination. ... Source: Fantasy Flight Games Is Now Hiring
|
|
|
|
|
Logged
|
|
|
|
RSSFeeder
Global Moderator
Deep One
Karma: 0
Offline
Posts: 3916
|
|
« Reply #275 on: 15 October 2014, 22:00:02 » |
|
Use Your Talents. Make a Difference.Six New Age of Rebellion Specialization Decks Are Now Available
“The Empire doesn’t consider a small one-man fighter to be any threat, or they’d have a tighter defense. An analysis of the plans provided by Princess Leia has demonstrated a weakness in the battle station.”
–General Jan Dodonna Fantasy Flight Games is proud to announce that six new Specialization Decks are now available for the Star Wars®: Age of Rebellion™ Roleplaying Game! Available via FFG’s in-house manufacturing, these Specialization Decks provide you quick and easy access to all the talents and abilities from the Diplomat and Engineer careers. This means you will spend less time consulting your blueprints and more time updating Rebel tech, blowing up Imperial shield generators, and convincing the galaxy’s citizens to join the fight for freedom. 
With Age of Rebellion Specialization Decks, you’ll be able to stay focused, think quickly, and aid the Rebel Alliance, even if you find yourself facing a whole squad of Stormtroopers! Every Hero Has a Role to Play In your Age of Rebellion campaigns, as in the classic Star Wars trilogy, the Rebel Alliance relies upon its heroes to step forward, band together, and put their talents toward the cause. Every hero has a role to play. Every hero can make a difference. For example, Luke Skywalker fired the shot that destroyed the Death Star, but he never would have had the chance if it hadn’t been for the contributions of many different, talented individuals. Spies gathered the battle station’s blueprints, Leia Organa transported and delivered them, Rebel engineers analyzed them, Rebel commanders developed the plan of attack, and Luke’s wingmen helped him fly safely along the length of the Death Star trench. Only because all those individuals pooled their talents and played their parts did the Rebel Alliance deal the Empire a massive blow. The Rebellion is outnumbered and outgunned, and if it has any chance of winning the Galactic Civil War, it needs all of its members to shine when their moments arrive. 
Diplomat Ambassador
- As an Ambassador, you seek out others who may lend their aid to the Rebel Alliance and its struggles for galactic freedom. Your arguments help to sway planets, systems, corporations, and other groups, and your successes fuel the Alliance as you spread hope, open access to valuable new resources, and pave the way for a future free of the Empire and its tyranny. There’s no room for you to falter, so the cards in the Diplomat Ambassador Specialization Deck ensure that you enter every negotiation well prepared.
Diplomat Agitator
- The Empire’s main weapon, more effective than all of the incredible firepower at its disposal, is fear. Fear lets it maintain order and authority over the countless beings in its thrall. As an Agitator, you are tasked with helping others overcome that fear, replacing it with anger, courage, or a sense of righteousness – anything that inspires them to rise up, take up arms, reject the tyrannical government that has long oppressed them, and help restore freedom and justice to the galaxy. Your job requires that you tread carefully, and you’ll do well to keep track of all your resources with the Diplomat Agitator Specialization Deck.
Diplomat Quartermaster
- There’s an old military saying, “Empty stomachs make for poor soldiers.” As Quartermaster, it’s your job to keep the Rebellion strong by ensuring your troops get the support they need. Others rely upon you not just for food, but for weapons, ammunition, medical supplies, and everything else. Moreover, you need to do more than just secure these items, you need to get them into the right hands. Managing the flow of all these logistics is a demanding task, but you have it mastered. Plus, you can call upon the Diplomat Quartermaster Specialization Deck to help you further organize your efforts.

Engineer Mechanic
- Mechanics are the gears of the Alliance machine and the grease that makes it run smoothly. Military vehicles, starfighters, artillery, and other machines suffer constant wear-and-tear, and the Rebellion relies upon you to keep them functional for battle. Accordingly, you do everything from minor tune-ups and adjustments to massive overhauls and repairs, most of which you’ll perform in the field in order to best support your unit. There, while explosions erupt all around you and laser blasts ionize the air, the Engineer Mechanic Specialization Deck can be almost as valuable as your tool kit as it helps you focus on the task at hand and complete it as quickly and skillfully as possible.
Engineer Saboteur
- As a Saboteur, your role is nearly anathema to the usual technician’s mentality. After all, you specialize in disrupting and destroying your enemy’s technical and mechanical assets. By denying your enemy the use of its weapons and vehicles, you diminish its capacity to wage war. Of course, your job requires that you get close enough to strike, so you don’t want to leave anything to chance. You need to understand what methods will cause maximum damage and chaos, and you want to have your tools close at hand at all times, including the cards from the Engineer Saboteur Specialization Deck.
Engineer Scientist
 As it operates with just a fraction of the resources and funding of the Empire, the Alliance is constantly forced to find creative solutions to problems. These problems include matters of supply, housing, transport, effective weaponry, defenses, and a host of others. The people they turn to for those creative solutions are those who are trained and driven to identify a need and seek out a technical solution to it – in other words, Scientists like you. Most Scientists prefer to work in labs, but the reality of war is such that even Scientists must sometimes face blaster fire. In such cases, it’s helpful to consolidate your resources, and the Engineer Scientist Specialization Deck can help to keep your talents close at hand, even in the heat of battle. As it operates with just a fraction of the resources and funding of the Empire, the Alliance is constantly forced to find creative solutions to problems. These problems include matters of supply, housing, transport, effective weaponry, defenses, and a host of others. The people they turn to for those creative solutions are those who are trained and driven to identify a need and seek out a technical solution to it – in other words, Scientists like you. Most Scientists prefer to work in labs, but the reality of war is such that even Scientists must sometimes face blaster fire. In such cases, it’s helpful to consolidate your resources, and the Engineer Scientist Specialization Deck can help to keep your talents close at hand, even in the heat of battle.
Always Be Ready for Action You never know where your duties might take you next, but you know there’s always another battle and another chance to strike a blow against the evil Galactic Empire. Do your part to remain ready for action at a moment’s notice. The Specialization Decks for the Diplomat Ambassador, Diplomat Agitator, Diplomat Quartermaster, Engineer Mechanic, Engineer Saboteur, and Engineer Scientist are available now! ... Source: Use Your Talents. Make a Difference.
|
|
|
|
|
Logged
|
|
|
|
RSSFeeder
Global Moderator
Deep One
Karma: 0
Offline
Posts: 3916
|
|
« Reply #276 on: 16 October 2014, 06:00:08 » |
|
Use Your Talents. Make a Difference.Six New Age of Rebellion Specialization Decks Are Now Available
“The Empire doesn’t consider a small one-man fighter to be any threat, or they’d have a tighter defense. An analysis of the plans provided by Princess Leia has demonstrated a weakness in the battle station.”
–General Jan Dodonna Fantasy Flight Games is proud to announce that six new Specialization Decks are now available for the Star Wars®: Age of Rebellion™ Roleplaying Game! Available via FFG’s in-house manufacturing, these Specialization Decks provide you quick and easy access to all the talents and abilities from the Diplomat and Engineer careers. This means you will spend less time consulting your blueprints and more time updating Rebel tech, blowing up Imperial shield generators, and convincing the galaxy’s citizens to join the fight for freedom.
With Age of Rebellion Specialization Decks, you’ll be able to stay focused, think quickly, and aid the Rebel Alliance, even if you find yourself facing a whole squad of Stormtroopers! Every Hero Has a Role to Play In your Age of Rebellion campaigns, as in the classic Star Wars trilogy, the Rebel Alliance relies upon its heroes to step forward, band together, and put their talents toward the cause. Every hero has a role to play. Every hero can make a difference. For example, Luke Skywalker fired the shot that destroyed the Death Star, but he never would have had the chance if it hadn’t been for the contributions of many different, talented individuals. Spies gathered the battle station’s blueprints, Leia Organa transported and delivered them, Rebel engineers analyzed them, Rebel commanders developed the plan of attack, and Luke’s wingmen helped him fly safely along the length of the Death Star trench. Only because all those individuals pooled their talents and played their parts did the Rebel Alliance deal the Empire a massive blow. The Rebellion is outnumbered and outgunned, and if it has any chance of winning the Galactic Civil War, it needs all of its members to shine when their moments arrive.
Diplomat Ambassador - As an Ambassador, you seek out others who may lend their aid to the Rebel Alliance and its struggles for galactic freedom. Your arguments help to sway planets, systems, corporations, and other groups, and your successes fuel the Alliance as you spread hope, open access to valuable new resources, and pave the way for a future free of the Empire and its tyranny. There’s no room for you to falter, so the cards in the Diplomat Ambassador Specialization Deck ensure that you enter every negotiation well prepared.
Diplomat Agitator - The Empire’s main weapon, more effective than all of the incredible firepower at its disposal, is fear. Fear lets it maintain order and authority over the countless beings in its thrall. As an Agitator, you are tasked with helping others overcome that fear, replacing it with anger, courage, or a sense of righteousness – anything that inspires them to rise up, take up arms, reject the tyrannical government that has long oppressed them, and help restore freedom and justice to the galaxy. Your job requires that you tread carefully, and you’ll do well to keep track of all your resources with the Diplomat Agitator Specialization Deck.
Diplomat Quartermaster - There’s an old military saying, “Empty stomachs make for poor soldiers.” As Quartermaster, it’s your job to keep the Rebellion strong by ensuring your troops get the support they need. Others rely upon you not just for food, but for weapons, ammunition, medical supplies, and everything else. Moreover, you need to do more than just secure these items, you need to get them into the right hands. Managing the flow of all these logistics is a demanding task, but you have it mastered. Plus, you can call upon the Diplomat Quartermaster Specialization Deck to help you further organize your efforts.
Engineer Mechanic - Mechanics are the gears of the Alliance machine and the grease that makes it run smoothly. Military vehicles, starfighters, artillery, and other machines suffer constant wear-and-tear, and the Rebellion relies upon you to keep them functional for battle. Accordingly, you do everything from minor tune-ups and adjustments to massive overhauls and repairs, most of which you’ll perform in the field in order to best support your unit. There, while explosions erupt all around you and laser blasts ionize the air, the Engineer Mechanic Specialization Deck can be almost as valuable as your tool kit as it helps you focus on the task at hand and complete it as quickly and skillfully as possible.
Engineer Saboteur - As a Saboteur, your role is nearly anathema to the usual technician’s mentality. After all, you specialize in disrupting and destroying your enemy’s technical and mechanical assets. By denying your enemy the use of its weapons and vehicles, you diminish its capacity to wage war. Of course, your job requires that you get close enough to strike, so you don’t want to leave anything to chance. You need to understand what methods will cause maximum damage and chaos, and you want to have your tools close at hand at all times, including the cards from the Engineer Saboteur Specialization Deck.
Engineer Scientist - As it operates with just a fraction of the resources and funding of the Empire, the Alliance is constantly forced to find creative solutions to problems. These problems include matters of supply, housing, transport, effective weaponry, defenses, and a host of others. The people they turn to for those creative solutions are those who are trained and driven to identify a need and seek out a technical solution to it – in other words, Scientists like you. Most Scientists prefer to work in labs, but the reality of war is such that even Scientists must sometimes face blaster fire. In such cases, it’s helpful to consolidate your resources, and the Engineer Scientist Specialization Deck can help to keep your talents close at hand, even in the heat of battle.
Always Be Ready for Action You never know where your duties might take you next, but you know there’s always another battle and another chance to strike a blow against the evil Galactic Empire. Do your part to remain ready for action at a moment’s notice. The Specialization Decks for the Diplomat Ambassador, Diplomat Agitator, Diplomat Quartermaster, Engineer Mechanic, Engineer Saboteur, and Engineer Scientist are available now! ... Source: Use Your Talents. Make a Difference.
|
|
|
|
|
Logged
|
|
|
|
RSSFeeder
Global Moderator
Deep One
Karma: 0
Offline
Posts: 3916
|
|
« Reply #277 on: 16 October 2014, 14:30:02 » |
|
Strike Team EquipmentAnnouncing the Imperial Assault Dice Pack
“Your father’s Lightsaber. This is the weapon of a Jedi Knight. Not as clumsy or random as a blaster; an elegant weapon for a more civilized age.”
–Obi-Wan Kenobi, Star Wars: A New Hope Whether you’re leading an elite strike team of Rebel operatives deep into an Imperial base, or concentrating fire on your opponents with a team of Stormtroopers, it’s crucial to keep your full attention on the mission at hand. Focus completely on your Imperial Assault missions with a tool of convenience: extra combat dice! Grab Your Gear Fantasy Flight Games is proud to announce the upcoming release of the Imperial Assault Dice Pack, an accessory for Imperial Assault. The Imperial Assault Dice Pack contains eleven custom combat dice, identical to the dice found in the Imperial Assault Core Set. 
You can keep the focus on your tense missions in the Star Wars universe with these extra dice. Combined with the eleven combat dice from the Core Set, these dice ensure that you can quickly navigate even the most demanding missions. If you ever want more Imperial Assault combat dice, look for the Imperial Assault Dice Pack in the first quarter of 2015! ... Source: Strike Team Equipment
|
|
|
|
|
Logged
|
|
|
|
RSSFeeder
Global Moderator
Deep One
Karma: 0
Offline
Posts: 3916
|
|
« Reply #278 on: 16 October 2014, 23:00:02 » |
|
Old Friends and Deadly FoesAnnouncing Seven New Ally and Villain Packs for Imperial Assault
“Han Solo. I’m captain of the Millennium Falcon. Chewie here tells me you’re looking for passage to the Alderaan system?”
–Han Solo, Star Wars: A New Hope Fantasy Flight Games is proud to announce seven new Ally Packs and Villain Packs for Imperial Assault! You’ll be able to highlight iconic characters from the Star Wars universe in your games of Imperial Assault with these figure packs:
- Han Solo Ally Pack
- Chewbacca Ally Pack
- Rebel Troopers Ally Pack
- Rebel Saboteurs Ally Pack
- General Weiss Villain Pack
- Royal Guard Champion Villain Pack
- IG-88 Villain Pack
Like the Luke Skywalker Ally Pack and the Darth Vader Villain Pack included in the Imperial Assault Core Set, these new figure packs contain detailed plastic figures to replace the tokens provided in the Core Set. These figures can be used in both the Imperial Assault campaign game and the skirmish game, and every Ally Pack and Villain Pack offers you new missions for both games. Of course, every Ally Pack and Villain Pack offers far more than just a plastic figure. A new side mission that you can weave into any campaign is included in every figure pack, along with two new skirmish missions that share the same map. Villain Packs offer new Agenda cards for the Imperial player, Ally Packs introduce new Reward cards for the heroes to gain in a campaign, and all figure packs contain new Command cards for building your Command decks in a skirmish. Command cards, Agenda cards, and Reward cards will all be explored in greater depth in future Imperial Assault previews. 
Heroic Allies Ally Packs invite you to battle alongside iconic heroes from the Star Wars universe. With the Han Solo Ally Pack, you gain access to a sculpted plastic figure of Han Solo, infamous scoundrel and smuggler. You now have the chance to work with Han Solo in any adventure. You’ll find yourself fighting to repel Imperial boarders from the Millennium Falcon in a new campaign side mission. Alternatively, you may enter the Corellian underground to engage in a skirmish, whether you’re rooting out local troublemakers or seizing control of an illicit Sabacc table. This Ally Pack also offers six new Command cards for your skirmish games: cards like I Make My Own Luck allow you to seize control of the initiative for a round. 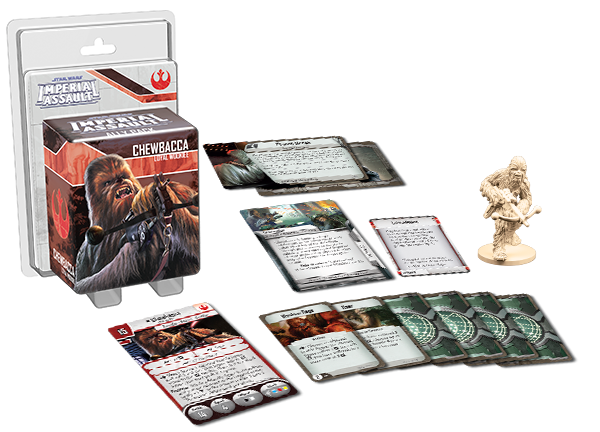
The Chewbacca Ally Pack offers you a detailed figure of Chewbacca, Han Solo’s co-pilot, compatriot, and fellow smuggler. This noble Wookiee can fight alongside the heroes of the Rebel Alliance in any campaign or skirmish mission, including the three included in this expansion. In a new campaign side mission, you must prevent the Empire from capturing and enslaving helpless Wookiees on Kashyyyk. You may also join Chewbacca for two skirmishes in an Imperial labor camp – you can engineer the escape of a vital prisoner, or infiltrate the facility and secure it for your own faction. New Command cards like Adrenaline grant your Wookiees additional health and greater power in any skirmish missions. 
In the Rebel Troopers Ally Pack, you’ll find three sculpted plastic Rebel Trooper figures for use in any campaign and skirmish missions. These fearless soldiers of the Rebellion are ready to lay down their lives to defend its ideals, and the new missions included in this figure pack give you the chance to join the fight for freedom. Journey to a Geonosis foundry for two skirmish missions that challenge you to attack your opponent’s power generators or capture a powerful, experimental weapon. Or, play a new campaign side mission that forces you to download critical data before Imperial Stormtroopers overrun the Rebel Troopers’ position. Six new Command cards bring new options to your skirmish missions with incendiary specializations like Grenadier. 
The Rebel Saboteurs Ally Pack brings you new, explosive allies – two Rebel Saboteurs. These figures can be integrated into any Imperial Assault campaign or skirmish game, and they come with their own missions for you to pursue. You may take a break from the main course of the campaign to help these saboteurs destroy a prototype starship. On the other hand, your skirmishes may lead you into the wilderness of Endor as you struggle to recover deadly hazardous materials or use sonic resonators to sabotage your opponent’s position. New Command cards like Hide in Plain Sight ensure that your Spies stay hidden until they arrive at their objective. 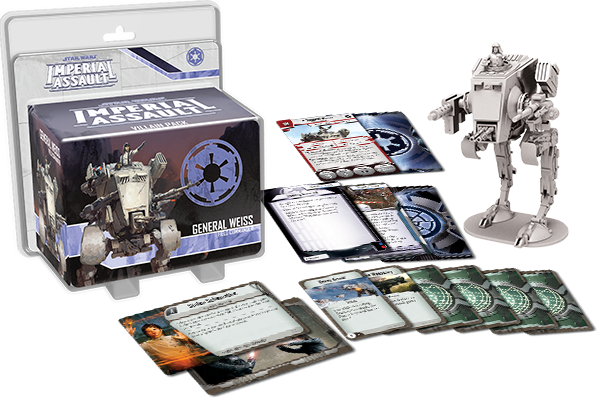
Dastardly Villains You can also turn to the dark side with Imperial Assault Villain Packs. Embrace the power of the Galactic Empire with the General Weiss Villain Pack. This pack contains the pieces to construct a standard AT-ST or General Weiss’s heavily modified assault walker, both of which tower above the battlefield and strike fear into the hears of the Rebels. New missions are also included within this expansion. During a campaign, you may lure the foolish heroes into a deadly forest ambush. While playing the Imperial Assault skirmish game, your missions might lead you to a derelict Imperial research lab in search of schematics, or you may be stranded on a planet and forced to use the facility’s communications array to reestablish contact with your allies. Meanwhile, new Command cards like Heavy Armor keep your Vehicles fully functional during an enemy attack. 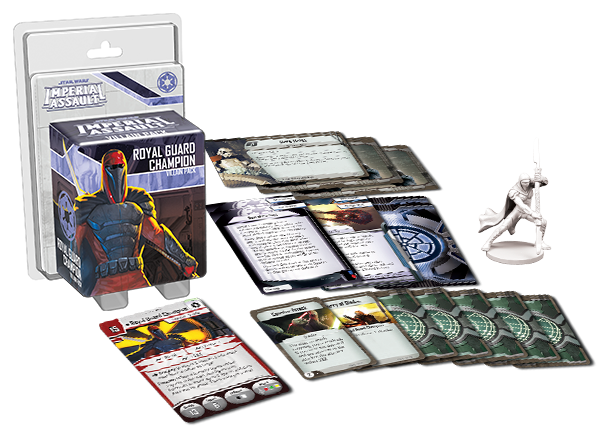
You can showcase your most vicious battle tactics with the Royal Guard Champion Villain Pack. With a detailed figure representing a fearsome champion of the Emperor’s Royal Guard, this figure pack brings new terrors to members of the Rebel Alliance. Lie in wait for the heroes during a campaign and tempt them to take on a side mission to upload a virus into an Imperial datacenter. Alternatively, you may face your opponents in a Kuat space station, whether you’re attempting a risky data heist or trying to intercept a key transmission before your opponent. No matter which skirmish you deploy the Royal Guard Champion in, Command cards like Flurry of Blades ensure that his deadly skills are used to their full advantage. 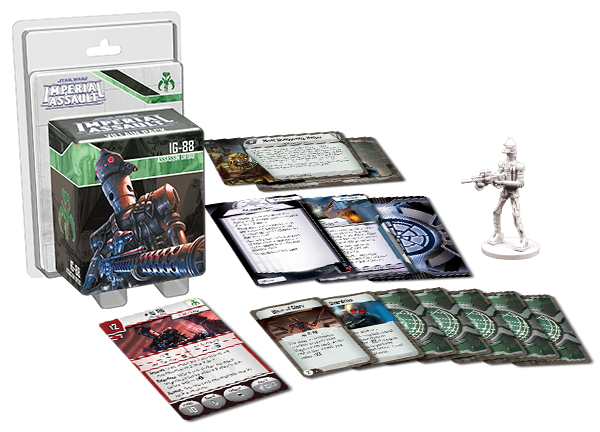
Another Villain Pack offers you the chance to begin a hunt for your opponent’s characters with IG-88. This deadly assassin and bounty hunter comes to life with a sculpted plastic figure. You may interrupt the heroes’ campaign by leading a Droid revolution against your biological oppressors. Or, in your skirmish missions, your units can enter the shifting junkyards of Ord Mantell, whether you’re hunting down a bounty or gathering crucial salvage before the junkyard’s defenses reactivate. If you muster an army of Droids in a skirmish, cards like Overdrive grant them more actions than ever before. 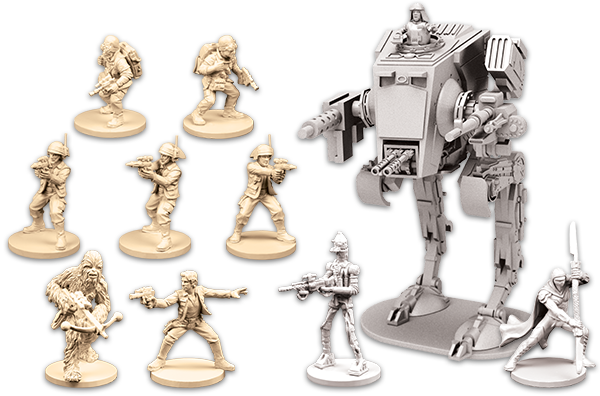
New Adventures Await No matter which Ally Packs and Villain Packs you use, you’ll be able to greatly enhance your campaigns and skirmishes within Imperial Assault. Look for these figure packs in the first quarter of 2015, and keep watching the Imperial Assault minisite for more in-depth previews of the campaign game and the skirmish game! ... Source: Old Friends and Deadly Foes
|
|
|
|
|
Logged
|
|
|
|
RSSFeeder
Global Moderator
Deep One
Karma: 0
Offline
Posts: 3916
|
|
« Reply #279 on: 17 October 2014, 07:30:03 » |
|
The Anarch WayAn Android: Netrunner Strategy Article by Guest Writer El-ad David Amir
“A parasite here. A parasite there. And time to watch the servers die.”
–Noise Android: Netrunner is a two-player Living Card Game® of high-stakes, cat-and-mouse cyberstruggles. One player assumes the role of an executive in one of the world’s largest megacorps, tasked with defending its most valuable business secrets against the other player, the Runner, a talented hacker who seeks to access and steal the secrets of the Corp’s agendas. Each agenda is worth a number of points, and the first player to score or steal seven agenda points wins the game. Based on the classic Netrunner collectible card game by Richard Garfield, Android: Netrunner received a number of updates before it was brought into the world. One of those updates was the addition of factions within the Corp and Runner sides, as well as different identity cards for each of those factions. These factions add new layers of personality and impose restrictions upon deck-building that, ultimately, spur a greater degree of creativity and variety in deck design. Likewise, each faction’s identity cards present a unique array of abilities that offer variations upon the faction’s core strengths. In today’s strategy article, guest writer El-ad David Amir explores the core strengths of one of these Runner factions, the Anarch faction, and he looks at the tactical diversity its identity cards offer as you explore your Anarch options. 
No Rules Runners in the world of Android: Netrunner all belong to one of three factions: Anarch, Criminal, or Shaper. When you build a deck, one of the first decisions you’ll need to make is which of the three to join. The game’s influence system allows a limited measure of flexibility, but it also ensures that each faction has its own character. Shapers are renowned for their efficiency and originality. Criminals are notorious for their events and daring acts of aggression. Anarchs? Anarchs have no rules, dude. Chill out. Maybe burn the world while you’re at it. Make some sysop’s day miserable for bonus points. Whereas both Shapers and Criminals are defined primarily by the motives that spur them forward, Anarchs are defined primarily by their opposition to the existing order. Anarchy, see? They don’t need to share some Runners code or moral impulse. They just need to rebel against the established order and break some rules. Maybe all the rules. At their most effective, Runners don’t just break the rules of society, they erode its very foundation. Let’s start with the Anarch identities, which introduce different ways to force the Corp into situations where formerly safe decisions suddenly become risky. Leaving high trash-cost assets in the open is a recipe for disaster against Whizzard (What Lies Ahead, 1). Reina Roja (Mala Tempora, 41) makes it painful for the Corp to rez even its cheapest, early-game ice.  
The latest newcomer to the Anarch faction, Quetzal (First Contact, 52), is an aggression powerhouse, potentially invalidating a third of the Corp’s ice. And when it faces Edward Kim (Order and Chaos, 28), one of three Anarchs from the upcoming Order and Chaos expansion, the Corp stands to lose any operations it doesn’t use; he can trash the first operation he accesses each turn. When there’s a red identity on the table, you know that something basic about the game is going to be slightly twisted.  
The next rule to fly out the window is the resilience of certain cards. All Runners can steal agendas and pay to trash assets, but Anarchs can trash anything and everything they touch. The prime example for this pernicious ability is Parasite (Core Set, 12), a virus that slowly eats away at an ice’s strength, eventually devouring it. Whether the Corp relies on large, expensive ice to tax the Runner or sets up cheap barriers to block the Runner’s path, it is sure to rue the moment that Parasite hits the table.  It’s not just Parasite, though. Wherever it goes, the faction leaves wanton destruction in its wake, blasting cards from the Corp’s hand with Imp (What Lies Ahead, 3), Hemorrhage (Fear and Loathing, 82), and Demolition Run (Core Set, 3). In fact, Anarchs can nuke a whole remote with a single Singularity (Double Time, 101). Such ruthless assaults can come from any angle. The Corp is never free from danger. It’s not just Parasite, though. Wherever it goes, the faction leaves wanton destruction in its wake, blasting cards from the Corp’s hand with Imp (What Lies Ahead, 3), Hemorrhage (Fear and Loathing, 82), and Demolition Run (Core Set, 3). In fact, Anarchs can nuke a whole remote with a single Singularity (Double Time, 101). Such ruthless assaults can come from any angle. The Corp is never free from danger. Finally, there is another, ultimate form of destruction. Anarchs are able to throw the Corp into disarray and win the game by completely burning down R&D, a strategy known as “decking.” If the Corp needs to draw a card and cannot, it loses the game. The perfect identity for this strategy is Noise (Core Set, 1), who can “mill” cards straight from R&D into archives just by installing viruses. Any virus will work, not just Anarch viruses, and this makes Cache (The Spaces Between, 37) a true treasure trove for the Hacker Extraordinaire. Another powerful card that supplements the milling strategy is Data Leak Reversal (Future Proof, 103), which translates clicks directly into milled cards. By transforming the battle field, Anarchs put the Corp on a very tight clock. Use Your Influence Unfortunately, all of this wonderful mayhem comes at a price, as Anarchs lack the discipline and organization of other Runner factions. They have neither the powerful tutoring that Shapers possess nor the various back channels that Criminals have developed, such as Inside Job (Core Set, 21) and Sneakdoor Beta (Core Set, 28). As a result, their influence is often dedicated to importing tools that address their lack of consistency. Even Anarchs need icebreakers to run, and Special Order (Core Set, 22), Test Run (Cyber Exodus, 47), and Self-modifying Code (Creation and Control, 46) are three cards that can help Anarchs fetch the right program at the right time. Quality Time (Humanity’s Shadow, 87) and Express Delivery (Honor and Profit, 33) help them dig through their decks for gems, and Wyldside (Core Set, 16) is a welcome watering hole for any troublemaker.  
To make the best out of the tools at hand, they might utilize Clone Chip (Creation and Control, 38) or Scavenge (Creation and Control, 34); losing two cards to Imp hurts, losing four or six is devastating. Anarchs’ many tricks are like pieces of a puzzle, and a with little help from the Shapers and Criminals, Anarchs can combine them to form a magnificent picture of sheer pandemonium. What’s Your Core Processor? What could serve as the core of a characteristic Anarch deck, then? There are all sorts of variations, but most of them are built from a few archetypal packages. One option is to rely on Parasite as the central ice breaking tool. Because such a deck doesn’t rely on a sensitive suite of breakers, the Runner can afford “facechecking” pieces of ice by running them with nothing on the table. Once the Corp rezzes the ice, the Anarch then uses Parasite in conjunction with Datasucker (Core Set, 8) to blow them up: 
Running Parasite as your key “breaker”? Try three Parasite plus three Datasucker, three Déja Vu (Core Set, 2), two Djinn (Core Set, 9), and two Crypsis (Core Set, 51).
Another idea is to go all gung-ho on Noise’s milling ability. Wyldside fuels your hand while Aesop’s Pawnshop (Core Set, 47) keeps the credits flowing. Once the Corp’s Archives accumulate a nice pile of face down cards, run it to find a treasure trove of agendas: 
Noise aims for the “mill” with a heavy collection of viruses, including three Wyldside, three Aesop’s Pawnshop, three Cache, three Gorman Drip (Opening Moves, 5), three Datasucker, and three Lamprey (Upstalk, 14).
The popular “Anatomy of Anarchy” build adopts Account Siphon (Core Set, 18), the most powerful weapon in the Criminal arsenal, and turns the tags it generates into an advantage through Data Leak Reversal: 
The “Anatomy of Anarchy” – three Account Siphon, three Same Old Thing (Creation and Control, 54), three Data Leak Reversal, three Joshua B. (Cyber Exodus, 42), and three Fall Guy (Double Time, 106).
Finally, Quetzal takes the faction in a new direction through her deceptively straightforward – and incredibly powerful – ability. With the following core, even if the Corp manages to find their code gates and sentries before you can send them to Archives with Keyhole (True Colors, 61), you still have an arsenal of AIs to get through key servers: 
Quetzal can unlock Corp servers with a decidedly different set of cards: three Overmind (Honor and Profit, 53), three Knight (Mala Tempora, 43), three Pawn (Opening Moves, 2), three Deep Red (Mala Tempora, 42), three Scheherazade (Second Thoughts, 22), three Keyhole, and two e3 Feedback Implants (Trace Amount, 24).
There are endless options for the Runner to pursue in Android: Netrunner, but the key is that you never want to play by the Corp’s rules. Anarchs certainly don’t. They smash their way through the world using a big hammer and a generous serving of gasoline. Thanks, El-ad! As El-ad notes, Anarchs thrive on chaos, and they have a plethora of tools with which they can burn down anything the Corp takes the time to build. However, the cyberstruggles of Android: Netrunner require more than blunt force; they require timing, as well. We’ll see more about this in other faction overviews, and we’ll see more of what the Anarchs can bring to the table in our previews of the upcoming Order and Chaos deluxe expansion. ... Source: The Anarch Way
|
|
|
|
|
Logged
|
|
|
|
RSSFeeder
Global Moderator
Deep One
Karma: 0
Offline
Posts: 3916
|
|
« Reply #280 on: 17 October 2014, 16:00:03 » |
|
STAR WARS (R): Force and Destiny (TM) Beta Update #6News From the Developers of the Force and Destiny Beta
Hello Force and Destiny™ beta testers, This week’s updates (pdf, 313 KB) focus on Chapter X: Adversaries. One of our major changes involves the IG-100 Magnaguard; its power level was a little too high for the role we wanted it to fill, so we toned down the stats a little bit. We also added silhouettes to every creature that’s not silhouette “1,” though we only list silhouettes if they’re not silhouette “1,” which is the same silhouette as Player Characters. Now Pathfinders will find it easier to adopt animal friends from some of the available options. We’re going to keep the spotlight on the Adversaries chapter for one more week. We’ll also be focusing our internal testing on Adversaries this week, so this is the best time to submit your feedback. What Feedback Is Most Helpful? Please remember when submitting feedback on adversaries to use the following guidelines:
- Do not change the profiles of the adversaries during your games. If you change the profiles by modifying characteristics, skills, gear, or talents, then we have no idea if the original profile is balanced or useful.
 Include the composition of your player characters. Information about your group’s species, careers, specializations, and XP level are sufficient. We need to know what kind of PCs are going up against the adversaries in order to tell if the results are an aberration or expected. For example, a Fallen Master will butcher his way through a group of social-specced PCs, but may get soundly and quickly defeated by a group of lightsaber wielders. If all we learn is that the Fallen Master “TPKed” a group, we don’t know if the adversary is broken or working as intended. Include the composition of your player characters. Information about your group’s species, careers, specializations, and XP level are sufficient. We need to know what kind of PCs are going up against the adversaries in order to tell if the results are an aberration or expected. For example, a Fallen Master will butcher his way through a group of social-specced PCs, but may get soundly and quickly defeated by a group of lightsaber wielders. If all we learn is that the Fallen Master “TPKed” a group, we don’t know if the adversary is broken or working as intended.
- Details help. If something about an adversary seems slightly off-balance or broken, please feel free to elaborate and explain your position. Every little bit of information helps!
Thanks again, everyone, and we look forward to your feedback next week! ... Source: STAR WARS (R): Force and Destiny (TM) Beta Update #6
|
|
|
|
|
Logged
|
|
|
|
RSSFeeder
Global Moderator
Deep One
Karma: 0
Offline
Posts: 3916
|
|
« Reply #281 on: 18 October 2014, 00:30:02 » |
|
Heroes of the RebellionPreview Two Heroes from Imperial Assault
“General Solo, is your strike team assembled?”
–General Crix Madine, Star Wars: Return of the Jedi Immerse yourself in Star Wars adventures that you create with Imperial Assault, a miniatures game of tactical ground combat for two to five players. You’ll take up arms alongside the Alliance or the Empire in the midst of the Galactic Civil War. Whether you take potshots at Stormtroopers or pilot a massive AT-ST walker, Imperial Assault pulls you into the tension and excitement of the classic Star Wars films. Within Imperial Assault, you’ll find two complete game experiences. The first is a campaign game, allowing you and up to four friends to play as heroes in an elite Rebel strike team or command the legions of the Empire. Either way, you’ll tell a cinematic tale that stretches across a series of missions. The other game is a skirmish game that invites you and a friend to muster your forces and battle head-to-head over conflicting objectives. 
In our last preview, we explored movement and combat in Imperial Assault. These actions make up the heart of gameplay, and are shared by both the campaign game and the skirmish game. As we move forward, previews will focus on either the campaign game or the skirmish game within Imperial Assault. Today, we turn our attention fully to the campaign game as we preview heroes in the campaign, and two heroes in particular: the valiant commander and the sly smuggler. Heroic Endeavors In an Imperial Assault campaign game, the Rebel players aren’t just any characters – they’re heroes of the Rebellion! To reflect this, heroes are the only figures that can use more than one action to attack, but they also have access to certain special abilities and actions. Heroes in a campaign can push their own limits by taking on strain. Many special abilities require the hero to suffer strain in order to trigger the ability. A hero may also suffer a strain to gain a movement point twice per activation. By using strain to gain movement points, you can conserve your actions for other tasks, such as attacking or interacting with the mission. Even strain has its limits, however. A hero cannot suffer strain beyond his endurance, which is shown on his hero sheet. Fortunately, there’s a way for heroes in a campaign to remove strain by using an action to rest. Resting removes strain tokens equal to the hero’s endurance, freeing the hero to take strain once more. In addition, if you have fewer strain tokens than your endurance when you rest, any remaining endurance heals damage. For example, Jyn Odan has an endurance of four. If she chooses to rest when she has two strain, she removes two strain and two damage. You can even rest when you have no strain and recover only wounds! Resting is vital to keep your heroes in the fight, but it also consumes crucial actions, giving the Imperial player more opportunities to concentrate fire and bring you down. 
Jyn Odan takes a rest action, and with an endurance of four, she removes two strain and two damage.
Defeating a hero is also more difficult than defeating an ordinary soldier. Each hero has a health listed on his hero sheet, and when the hero takes damage equal to his health, rather than being defeated, he is wounded and flips over his hero sheet. A wounded hero loses a special ability and his speed, endurance, and attributes decrease. If a wounded hero again takes damage equal to his health, his grievous wounds force him to withdraw, and he is removed from the mission. The Commander Gideon Argus, a seasoned Alliance commander, is just one of the heroes you may play over the course of an Imperial Assault campaign. Well-trained in battlefield tactics, Gideon Argus possesses a fierce intellect and the sangfroid to command calmly in the heat of battle. Argus may not deal the decisive blow, but his squadmates never get far without his guidance. Gideon Argus’s hero sheet displays a variety of information about the hero, including his two abilities. The Command ability can be triggered by spending an action and suffering two strain, and it allows Gideon Argus to choose a friendly figure within three spaces. That figure interrupts Argus’s turn to move or attack, allowing you to position the members of your squad or coordinate a decisive attack at the opportune moment. 
Gideon Argus can also draw upon his years of experience with his Disabling Shot ability. Whenever Argus attacks with a ranged weapon, he may spend a surge to inflict the stunned condition on his target. If a figure is stunned, it cannot attack or exit its space, and must spend an action to remove the stunned condition. By stunning your opponent’s figures, Gideon Argus can hamper the Imperial plan, even as Gideon’s commands allow other heroes to maneuver and attack in concert.  
Gideon Argus’s Class cards allow his already formidable leadership skills to grow even more potent. Called Shot allows Gideon to grant a surge to himself or another hero attacking a target in Gideon’s line of sight, while For the Cause! allows Gideon to suffer a strain to focus a friendly attacking figure. Other Class cards enhance the power of Argus’s Command ability. Air of Command grants more health and allows Argus to choose any friendly figure in his line of sight with his Command ability. Masterstroke, one of Gideon Argus’s most expensive Class cards, allows him to immediately use Command again after using it, doubling his ability to lead other heroes. The Smuggler After building a reputation on smuggling and gunfighting, Jyn Odan pledged her skills to the Rebel Alliance. She’s fast on the draw and light on her feet, and she’s left more than a few Stormtroopers watching helplessly as her ship blasts out of orbit. In your Imperial Assault campaigns, Jyn Odan might be just the hero you need to run rings around Imperial troops. Jyn Odan bears two innate abilities that frame her gunslinging talents. The first ability is Quick Draw. By suffering two strain at the beginning of a hostile figure’s activation, Jyn Odan can perform an attack with a Pistol that targets the activated figure, potentially dropping an enemy before he even takes an action. Being a crack shot is one thing, but even that can be useless if you don’t have a way to escape enemy blaster fire. Thankfully, Jyn Odan also has the Opportunist ability. Whenever she attacks, if her target suffered damage, she may move one space, allowing her to get behind cover or set up another shot. 
Jyn Odan’s Class cards enhance her already prodigious skills. Quick As A Whip allows Odan to move one space immediately after an attack against her, giving her more opportunities to escape from harm or prepare for her next attack. The Sidewinder Class card gives her even more movement by allowing her to move up to two spaces after resolving an attack – an ability that stacks with the extra movement from her Opportunist ability.  
Jyn Odan’s gunfighter talents also benefit from her Class cards. Gunslinger allows Odan to trigger any of her Pistols’ surge abilities when she attacks with a Pistol. In addition, she can suffer a strain and exhaust Gunslinger to apply an extra surge to her attack results, giving her even more options for Pistol attacks. Jyn can pull off seemingly impossible shots with Trick Shot, a card that allows her to draw line of sight for a ranged attack from any space within three spaces of her actual location. Muster Your Squad Call upon the talents of Gideon Argus and Jyn Odan, or use another hero included in Imperial Assault in your campaigns. We’ll preview two more heroes from Imperial Assault in a future preview, but join us next week when we examine how your heroes grow and change throughout the campaign, gaining experience and credits. Pre-order Imperial Assault at your local retailer today! ... Source: Heroes of the Rebellion
|
|
|
|
|
Logged
|
|
|
|
RSSFeeder
Global Moderator
Deep One
Karma: 0
Offline
Posts: 3916
|
|
« Reply #282 on: 18 October 2014, 09:00:03 » |
|
Controlling the Game - Part IIZach Bunn on Regaining Control in STAR WARS (TM): The Card Game
“Control, control, you must learn control.”
–Yoda, Star Wars: Return of the Jedi Light side and dark side clash in a struggle that shakes the galaxy in Star Wars™: The Card Game. To claim victory, you must build your forces, strategically plan your attacks, and overthrow your opponent’s plans. Controlling your opponent’s options and controlling the flow of the game is crucial to achieving your final victory. In Zach Bunn’s last guest article, he established some principles for gaining control in Star Wars: The Card Game. Today, he continues to expand upon those ideas and provides an example of a game where he lost control and exploring how he could reclaim it. 
Zach Bunn on Regaining Control In my last article, I laid the foundation for a definition of control in Star Wars: The Card Game, and I even claimed it was the most important concept in the game! I want to continue the discussion of board control, but this time I want to show a very real and practical example of board control at work. Below is an image of the board state during a game I played as the light side against Matt Wehner in the finals of the 2014 Star Wars: The Card Game Regional Championships in Independence, Missouri. As you can see in the image below, Matt has board control in spades. 
It’s the first game in the match. Some important things to note:
 The dark side has destroyed one objective, the light side has destroyed none. The dark side has destroyed one objective, the light side has destroyed none.
- The Death Star dial is at five.
- The Balance of the Force is currently with the light side.
- The dark side has the following objectives in play: Counsel of the Sith (Core Set, 27) with four damage, Fall of the Jedi (Core Set, 99) with one damage, and Imperial Command (Core Set, 73) with no damage.
- The dark side has four resources open, one of which is on Counsel of the Sith
- The dark side has the following units in play: Darth Vader (Core Set, 35) committed to the Force and focused, a focused Mara Jade (Lure of the Dark Side, 529) with Mara Jade’s Lightsaber (Lure of the Dark Side, 531) attached, and a ready Imperial Shadow Guard (Lure of the Dark Side, 530).
- The light side has the following objectives: Questionable Contacts (Core Set, 69), Wookiee Life Debt (Edge of Darkness, 318), and Along the Gamor Run (Knowledge and Defense, 552).
- The light side player has five open resources with the following cards in hand: Chewbacca (Edge of Darkness, 319), Millennium Falcon (Edge of Darkness, 332), Saboteur (Edge of Darkness, 329), Hired Hands (Knowledge and Defense, 554), Wookiee Warrior (Edge of Darkness, 320), and Twist of Fate (Edge of Darkness, 157).
- It’s the light side player’s turn, in the deployment phase.
In this scenario, what do you do as the light side player? What’s the correct play in this scenario where your opponent definitely has control of the board? Your answer provides some strong insight into your view of control! Here are the top two options, as I see it. The Quick and Easy Path  The first option is to play the Millennium Falcon. With enough resources in play for the dark side player to pay for a Force Lightning (Core Set, 60), you attack Counsel of the Sith first and destroy it. You can then trigger the Reaction on the Millennium Falcon and bring a different unit into play. The first option is to play the Millennium Falcon. With enough resources in play for the dark side player to pay for a Force Lightning (Core Set, 60), you attack Counsel of the Sith first and destroy it. You can then trigger the Reaction on the Millennium Falcon and bring a different unit into play.
If you decide to put Chewbacca into play, you probably need to attack because Mara Jade with her Lightsaber attached has enough unit damage to clear Chewbacca from the board without him triggering his Reaction. With Chewbacca, you probably want to attack Fall of the Jedi, hopefully bringing it to four damage. The only other real option for bringing a Character into play with the Millennium Falcon is the Hired Hands. Playing the Millennium Falcon and bringing in Chewbacca or the Hired Hands might be tempting if you’re focusing purely on dealing maximum damage, but it abdicates any chance of regaining control of the board. Whether you put Chewbacca or the Hired Hands into play, either unit will be destroyed by your opponent before the beginning of your next turn. The Path to Control The option that, in my opinion, allows you to start moving back towards control is as follows: Play the Wookiee Warrior, the Saboteur, and the Hired Hands, in that order. You’ll need to use the Saboteur to destroy Mara Jade’s Lightsaber if you want to have a chance at having units on the board next turn.  The key rule during the conflict phase is that you don’t want to attack with the Wookiee Warrior, but keep it safe from a potential Force Lightning. The protect keyword that Wookiee Life Debt grants to your Wookiee Warrior is the only thing that might maintain your board and give you better options next turn. The best attack in this case is to send the Hired Hands against Counsel of the Sith. Your opponent may block with the Imperial Shadow Guard or not, but the Wookiee Warrior’s protection can ensure that the Hired Hands destroys the objective. If you win the edge or your opponent doesn’t block, you can use the Hired Hands’s tactics icons to focus Mara Jade, who is no longer elite. The key rule during the conflict phase is that you don’t want to attack with the Wookiee Warrior, but keep it safe from a potential Force Lightning. The protect keyword that Wookiee Life Debt grants to your Wookiee Warrior is the only thing that might maintain your board and give you better options next turn. The best attack in this case is to send the Hired Hands against Counsel of the Sith. Your opponent may block with the Imperial Shadow Guard or not, but the Wookiee Warrior’s protection can ensure that the Hired Hands destroys the objective. If you win the edge or your opponent doesn’t block, you can use the Hired Hands’s tactics icons to focus Mara Jade, who is no longer elite.
Depending on whether your opponent blocked or not, you can either attack with the Saboteur or hold it back for the Force struggle. In the Force phase, you trigger Along the Gamor Run and commit the Wookiee Warrior and the Saboteur, keeping the Force and drawing a card from Along the Gamor Run. The dial goes to six, and you have two pretty annoying blockers on the board with a four-card hand. You also have Along the Gamor Run in play, so if your opponent decides to attack with Darth Vader, you stand a good chance of keeping the Force again. Regaining Control  In the above example, instead of focusing completely on dealing objective damage and ending up with no units on your next turn, you can destroy an objective, keep the Force, and still have units on the board at the end of your opponent's turn. You also still have the Millennium Falcon and Chewbacca for your next turn, leaving you with a very strong counterattack on your next turn. If you’re fortunate enough to still have the Wookiee Warrior in play on your next turn, the option of playing Millennium Falcon and Chewbacca becomes extremely viable. In the above example, instead of focusing completely on dealing objective damage and ending up with no units on your next turn, you can destroy an objective, keep the Force, and still have units on the board at the end of your opponent's turn. You also still have the Millennium Falcon and Chewbacca for your next turn, leaving you with a very strong counterattack on your next turn. If you’re fortunate enough to still have the Wookiee Warrior in play on your next turn, the option of playing Millennium Falcon and Chewbacca becomes extremely viable.
It’s easy, particularly in Star Wars: The Card Game, to get in the habit of seeing combos like the Millennium Falcon and Chewbacca and assuming they are the best play. Where that decision is going to leave you and your board, however, is often more important than the amount of damage you can deal on your current turn. This LCG isn’t a long game, but it’s made much shorter when one or both players neglect the principles of board control. Keep your eyes and mind open to maintaining board control and I expect your win percentage will increase pretty dramatically. Until next time, may the Force be with you. Zach Reclaim Control Thanks, Zach! Zach Bunn is a Star Wars fanatic, a lead member of Team Covenant, and a member of the winning team from the Star Wars multiplayer tournament held at Worlds. In coming weeks, stay tuned for more Star Wars guest articles from Zach and other writers! ... Source: Controlling the Game - Part II
|
|
|
|
|
Logged
|
|
|
|
RSSFeeder
Global Moderator
Deep One
Karma: 0
Offline
Posts: 3916
|
|
« Reply #283 on: 18 October 2014, 17:30:03 » |
|
Gather Your ToolsNew FAQ and Tournament Rules are Available for Android: Netrunner
The 2014 Android: Netrunner Organized Play calendar is set for a climax at World Championship Weekend next month. Runners and Corporations alike are reshaping the digital realm and attempting to build newer and better programs that will help them gain ultimate control. Do you have what it takes to push your faction to the fore? A deck isn’t the only thing you need if you’re looking to win your next tournament. Expand your toolbox by checking out the new FAQ (pdf, 2.5 MB) and tournament rules (pdf, 6.1 MB).  
These changes will go into effect on October 20th, 2014. A Word from the Developer Greetings Android: Netrunner players! This new FAQ covers all cards released through the First Contact Cycle Pack, including cards like Nasir Meidan (Upstalk, 17), The Foundry (The Spaces Between, 21), and Crisium Grid (First Contact, 48). The game term “use” has also been defined. There is no new card errata. In the tournament rules, the only change is that All That Remains will not be legal for the World Championships next month. We want to make sure that the competitive environment is as fair as possible and all players have access to new releases. The Up and Over Cycle Pack will be legal at the World Championships. If you have any questions about card interactions in that pack, please use the “Rules Question” link at the bottom of each page on this website to submit your question. Hope to see you at Worlds, and always be running! Lukas Litzsinger
Lead Designer Thanks Lukas! Don’t be surprised by the newest tech at your next tournament. Check out the the new FAQ and tournament rules, and be ready for whatever you encounter on your next run. ... Source: Gather Your Tools
|
|
|
|
|
Logged
|
|
|
|
RSSFeeder
Global Moderator
Deep One
Karma: 0
Offline
Posts: 3916
|
|
« Reply #284 on: 19 October 2014, 02:00:04 » |
|
Become a Master of SecretsNew FAQ and Tournament Rules are Available for A Game of Thrones: The Card Game
The 2014 A Game of Thrones: The Card Game Organized Play season is building to a crescendo. When the world is at its most chaotic, it is those who plan ahead that will come out unscathed. Will you use your knowledge to gain an advantage over your foe? Or will you fall by the wayside, just another pretender to the throne? Knowledge can be just as important as armor or a sword; be sure to read the new FAQ (pdf, 2.2 MB) and tournament rules (pdf, 1.5 MB) before heading out to your next tournament.  
These changes will go into effect on October 20th, 2014. A Word from the Developers Hello A Game of Thrones players! The 2014 World Championships are just about a month away, and in anticipation of the event we bring you a new FAQ and tournament rules update in an effort to make the environment as competitive and enjoyable as possible. For new card errata, this update includes four items. The first is an adjustment to Harrenhal (Ancestral Home, 78), which prevents people from getting more than three uses out of the card by taking advantage of the moribund timing rules. This brings the card to a place that is much more intuitive to many players and makes the decision of when to actually invest in using one of its three cancels more interesting and significant. You can no longer simply save one use with the knowledge that you can abuse the card’s moribund state during the next Valar. Next, we have adjusted The Brave Companions (Ancestral Home, 79) so that their text works in conjunction with FAQ entry 3.24, which defines the characteristics of facedown attachments; there is no functional change here, the entry simply establishes that the card text is consistent with the rules entry. Finally, we have given “House X only” restrictions to Daenerys Targaryen (Ancestral Home, 76) and to Asha Greyjoy (Where Loyalty Lies, 70). This latter errata also opens the door to remove Asha from the joust restricted list. In the rules content section, the most significant new entry is the introduction of the copy limit. Over the past couple tournament seasons, we have observed a number of powerful combo decks that, through clever cycling engines, are able to repeatedly play the same card or set of cards in a single phase until a victory condition is gained. To check the “instant-win” potential of these decks, the copy limit establishes that a player cannot play more than three copies (by title) of each card in each phase. There have been a number of players asking for a “three times per phase per ability trigger limit” to be added to the game, and while we investigated such a limit in playtesting, the final decision was that the “copy limit” solution introduced in this document was less intrusive, and carried less overhead bandwidth in moment-to-moment play, while still providing an important check against these instant-win decks.  The Joust restricted list is being updated, with two new cards being added and two cards being removed. Bran Stark (Core Set, 13) has emerged as a particularly effective means of rapidly cycling through River plots, and he is being added to the list to break up the potential of using him in conjunction with Crossing the Mummer’s Ford (Spoils of War, 20). Wheels Within Wheels (A Dire Message, 107) has also had a large impact on the metagame, and it has been added to the list to protect the relative balance between the Lannisters and the other great Houses. Coming off the list, we have the aforementioned Asha Greyjoy (Where Loyalty Lies, 70), who should give a nice boost to the House of the Kraken, and Westeros Bleeds (Core Set, 176), which, with the release of new cancel and protection effects, can now re-enter the metagame as a non-restricted card. The Joust restricted list is being updated, with two new cards being added and two cards being removed. Bran Stark (Core Set, 13) has emerged as a particularly effective means of rapidly cycling through River plots, and he is being added to the list to break up the potential of using him in conjunction with Crossing the Mummer’s Ford (Spoils of War, 20). Wheels Within Wheels (A Dire Message, 107) has also had a large impact on the metagame, and it has been added to the list to protect the relative balance between the Lannisters and the other great Houses. Coming off the list, we have the aforementioned Asha Greyjoy (Where Loyalty Lies, 70), who should give a nice boost to the House of the Kraken, and Westeros Bleeds (Core Set, 176), which, with the release of new cancel and protection effects, can now re-enter the metagame as a non-restricted card.
In order to make the environment as exciting as possible, four new cards are being added to the Melee restricted list. Daenerys Targaryen (Queen of Dragons, 22) has been the centerpiece to a strong, stable Melee Dragon presence for years, and the release of the new event card By Sword or By Guile (A Dire Message, 114) pushes this deck over the edge in the Melee environment. Each of these cards is now being added to the Melee restricted list. Melisandre’s Favor (The Horn That Wakes, 63) is also being added, to increase the opportunity cost of using this powerful card in the format when stealing power-laden characters and closing out games. And finally, we are adding Harrenhal (Ancestral Home, 78) to the list to check its prominence in an environment where it can be even more frustrating to combat. The tournament rules document contains a pair of new entries that document procedures for dealing with an illegal deck and with illegal game states that are discovered during the course of a game. With this update, we now hope that the table is set for a feast of epic games at this year’s World Championships. Looking forward to seeing you there! Nate French
Damon Stone
Fantasy Flight Games 
Thanks Nate and Damon! Don’t let yourself arrive at the 2014 World Championships unprepared. Download the new FAQ and tournament rules today so you’ll be ready as you ride into battle. ... Source: Become a Master of Secrets
|
|
|
|
|
Logged
|
|
|
|
|


