RSSFeeder
Global Moderator
Deep One
 
Karma: 0
 Offline Offline
Posts: 3916

|
 |
« Reply #300 on: 24 October 2014, 18:00:03 » |
|
The Blue Is CallingAnnouncing the Final Chapter Pack in the Wardens Cycle
It was cold in the cell, the wind screamed night and day, and worst of all, the floor sloped. Ever so slightly, yet it was enough. He was afraid to close his eyes, afraid that he might roll over in his sleep and wake in sudden terror as he went sliding off the edge. Small wonder the sky cells drove men mad. Some previous tenant had written on the wall in something that looked suspiciously like blood, the blue is calling.
–George R.R. Martin, A Game of Thrones Fantasy Flight Games is proud to announce The Blue Is Calling, the final Chapter Pack in the Wardens cycle for A Game of Thrones: The Card Game! The Eyrie rests high above the lands of the Vale, home to House Arryn. The words of their House are “As High As Honor,” but despite this noble declaration, there are still horrors to be found in the Eyrie. The sky cells and their jailor have driven men mad with terror, and in The Blue Is Calling expansion, you can turn this mindless fear against your opponents with new House Arryn characters and attachments. You’ll find new ways to pursue the Iron Throne beyond the bounds of the Vale with the sixty new cards (three copies each of twenty distinct cards) included in this expansion. The Blue Is Calling brings the Wardens cycle and its focus on House Arryn to a triumphant conclusion and expands the possibilities for your other trait-based decks, including Baratheon’s Rainbow Guard, Greyjoy’s Raiders, Lannister’s Clansmen, and more. You may race with the Dothraki across the plains of Essos, plot revenge with the Sand Snakes, or solidify your hold on the Eyrie with the unorthodox prisons of House Arryn. 
The Sky Cells For the first time in A Game of Thrones: The Card Game, The Blue Is Calling gives you the chance to condemn your opponent’s characters to the terror and imminent death of the Eyrie’s prisons. Sky Cell (The Blue Is Calling, 119) is a free attachment that you can attach to any character with a printed cost of three or lower. As soon as you imprison one of your opponent’s characters in a Sky Cell, his mind begins to succumb to madness: the controller of a character with Sky Cell attached must select his next plot card at random. The ramifications of a random plot selection can easily change the course of the game. A plot like The Power of Blood (Core Set, 194) could be wasted by using it at an inopportune moment, but revealing Rule by Decree (Core Set, 206) or Valar Morghulis (Core Set, 201) at the wrong time may completely ruin your opponent’s position.  Once the madness of a Sky Cell has begun to fester in the consciousness, there is only one escape: a step outwards, into the blue! A player with a Sky Cell attached to one of his characters can take an action during the marshaling phase to kill the attached character. This character cannot be saved, forcing your opponent to choose between being able to play that character for the rest of the game, or being forced to choose his plots at random as long as the character lives. Since you can target characters as powerful as Daenerys Targaryen (Ancestral Home, 76) or Ser Edmure Tully (The Champion’s Purse, 32) with the Sky Cell, you can be certain that you’ll give your opponent some very difficult choices whenever you play it. Once the madness of a Sky Cell has begun to fester in the consciousness, there is only one escape: a step outwards, into the blue! A player with a Sky Cell attached to one of his characters can take an action during the marshaling phase to kill the attached character. This character cannot be saved, forcing your opponent to choose between being able to play that character for the rest of the game, or being forced to choose his plots at random as long as the character lives. Since you can target characters as powerful as Daenerys Targaryen (Ancestral Home, 76) or Ser Edmure Tully (The Champion’s Purse, 32) with the Sky Cell, you can be certain that you’ll give your opponent some very difficult choices whenever you play it.
The sky cells can drive your opponent mad with terror, and the brutish jailor who oversees them can be equally dangerous to your opponent’s plans. In this Chapter Pack, you gain access to Mord (The Blue Is Calling, 118). Mord has one Strength and a military icon, but his most effective use can be found in his Response, which reads, “After you win dominance, choose a character with printed cost 3 or lower. Shuffle that character into its owner’s deck unless its controller moves 1 gold from his or her gold pool to Mord.” By preying upon your opponent’s characters, you may quickly deprive him of expendable servants, forcing him to put his more valuable characters into danger. Shuffling characters back into your opponent’s deck also denies him the chance to recur them from the dead or discard piles with tricks like Melisandre’s Scheme (Reach of the Kraken, 9). The only way for your opponent to escape this fate is to pay a bribe, moving one of his gold dragons from his gold pool to Mord. Gold on Mord can be spent as though it were in your gold pool, granting you an additional source of income that cannot be taken in the taxation phase. Into the Blue You can enact the justice of House Arryn and turn the sky cells against your opponent with the cards included in The Blue Is Calling. Expand the plots of the Arryns and claim the Iron Throne in this expansion and the other Chapter Packs in the Wardens cycle! Look for The Blue Is Calling in the first quarter of 2015. ... Source: The Blue Is Calling
|
|
|
|
|
 Logged
|
|
|
|
RSSFeeder
Global Moderator
Deep One
Karma: 0
Offline
Posts: 3916
|
|
« Reply #301 on: 25 October 2014, 02:30:03 » |
|
Across the Askellon SectorPreview the Forgotten Gods Adventure for Dark Heresy Second Edition
In Dark Heresy Second Edition, you are an Acolyte in the service of the Inquisition, battling unfathomable evils as you struggle to keep the Imperium from utter corruption. Threats may arise from within, without, or beyond… And sometimes, the greatest threats come from the distant past. We recently announced the Forgotten Gods book-length adventure, which pits you and your team of Acolytes against the Faceless Trade, smugglers of proscribed artefacts, whose wares may awaken an ancient evil. Your investigations will take you across the Askellon sector, through strange and unknown locales. Today, Tim Cox, the writer of the Forgotten Gods adventure, shares his thoughts on designing the key locations of the book. Tim Cox on the Forgotten Gods Adventure After writing Dark Pursuits, the adventure contained in the Dark Heresy Second Edition Core Rulebook, I was more than a little excited to dive into Forgotten Gods, the first book-length adventure for the new edition! Like Dark Pursuits and Desolation of the Dead, the adventure included in the Dark Heresy Game Master’s Kit, Forgotten Gods explores the central themes of Dark Heresy, as the Acolytes explore hidden threats and expose even greater dangers to the Askellon sector, striving against overwhelming odds to stem the rise of darkness. 
This time, the investigation of the xenos artefacts takes the Players Characters from the depths of the hive to the wastelands surrounding it, before leading them off-planet entirely. Players may have learned a great deal about the hive city of Desoleum in prior Dark Heresy adventures, but I’m really excited for them to see more of the strange locations and cultures in the Askellon sector. Over the course of this adventure, they’ll visit two radically different locations – the Rogue Trader vessel, Oath Unspoken, and the shrine world of Thaur, a blessed planet devoted to cemeteries. I had a lot of fun developing both locations and coming up with unique details to set them apart. Each location has a truly distinct atmosphere that brings these places to life. Into the Void  To get from Desoleum to Thaur, the Acolytes must journey aboard the Oath Unspoken. The journey through the Warp is much more than a path from point A to point B, however. Any passage through the nightmarish unreality of the Immaterium is a great undertaking, and even a relatively short Warp journey is a matter of weeks. One entire chapter of the adventure takes place aboard the Oath Unspoken, as the PCs continue their investigation into the artefact smugglers and the identities of their mysterious customers. Like any voidship, the Oath Unspoken is massive, much more akin to a location than a vehicle, a home to millennia of culture and secrets. To get from Desoleum to Thaur, the Acolytes must journey aboard the Oath Unspoken. The journey through the Warp is much more than a path from point A to point B, however. Any passage through the nightmarish unreality of the Immaterium is a great undertaking, and even a relatively short Warp journey is a matter of weeks. One entire chapter of the adventure takes place aboard the Oath Unspoken, as the PCs continue their investigation into the artefact smugglers and the identities of their mysterious customers. Like any voidship, the Oath Unspoken is massive, much more akin to a location than a vehicle, a home to millennia of culture and secrets.
Here, you’ll find a gazetteer with information about the shipboard culture and notable locations aboard the Oath Unspoken, from the Corpse-Holds to the Navigator’s Sanctum, but you’ll also discover more of the Rogue Traders’ role in the Askellon sector. Specifically, readers will learn of the great trade war between the Anzaforr and Surena dynasties, and how the two families have undertaken penance in the decades since. Of course, any benefits to their power bases as a result of services offered to the Ecclesiarchy or the Imperial Navy are surely incidental! One ship area the PCs will likely visit is the Drunnels, a large open-deck marketplace that takes up an entire cargo hold and a large portion of the surrounding corridors and chambers. The Drunnels showcases the fact that the Oath Unspoken is much more than a mere ship, and its peculiar customs have developed over thousands of years. Aboard a Rogue Trader’s vessel, it is perhaps no surprise that the importance of trade and negotiation has filtered down to even the lowliest crew-serfs. In the Drunnels, haggling is a way of life. An elaborately ritualised form of negotiating is required for any transaction, from acquiring information or lodgings to merely catching a glimpse of a performance by the Cirque Commercia. Unwary Acolytes might even find themselves entering into unintended bargains! Planet of the Dead After travelling aboard an ancient voidship, the arrival on Thaur could be a shock for the Acolytes. The PCs were unlikely to see even a single leaf on Desoleum, but now the steel corridors of hive and voidship are now replaced by vast, dense forests and ancient, crumbling mausoleums. This sparsely populated, largely low-tech world offers a distinct contrast to Hive Desoleum and the Oath Unspoken! Thaur is home to the graves of the sector’s greatest heroes and most revered saints, with monuments and tombs built from the bones of pious citizens. On this planet the dead are more important than the living. Every division of the Eulogus Askelline – the planet’s governing body and Ecclesiarchy diocese – is committed to the task of caring for and honouring the deceased, from the poor who scrimp and save their entire lives to be buried here, to powerful nobility, war heroes, and saints. 
I really enjoyed coming up with the details of the Eulogus Askelline’s beliefs and various branches, as it incorporates Thaur’s governance, religion, defence force, and more. In particular, I’m quite fond of the Ossuarian Custodians, the monastic guardians of the Great Ossuria and the ancient and mysterious catacombs that descend far beneath Thaur’s surface. From defending against tomb robbers to repairing crumbling bone-work statues, they see to the preservation of the ossuaries that house Thaur’s most esteemed residents. Unlike the Mournful Guard who watch over the surface, the Custodians carry specialised and deadly weaponry – and they do not look kindly upon intruders. Experience Askellon I hope players enjoy exploring the Askellon sector further in Forgotten Gods as they uncover and defeat an ancient threat to the Imperium. For me, one of the best parts of Warhammer 40,000 is the interesting and bizarre worlds that make up the Imperium. Even within the world classifications – hive world, forge world, shrine world, and so on – there’s no standard, and Dark Heresy offers the opportunity to explore this diversity in depth. I think players and GMs will find the wastelands of Desoleum, the Oath Unspoken, and Thaur to offer many exciting roleplaying opportunities, whether you sit down to a formal dinner with Lord-Captain Aristide Anzaforr or push through the tangled forests of Thaur to search for the grave of a god. But remember – wherever you go, there are always new heresies! Thanks, Tim! Can you stop the Faceless Trade before their artefacts awaken unspeakable corruption within the Askellon sector? Unless you act, an ancient evil will rise to prominence once more. Gather your fellow Acolytes, and purge this heresy before it can spread! Pre-order Forgotten Gods at your local retailer today! ... Source: Across the Askellon Sector
|
|
|
|
|
Logged
|
|
|
|
RSSFeeder
Global Moderator
Deep One
Karma: 0
Offline
Posts: 3916
|
|
« Reply #302 on: 25 October 2014, 11:00:03 » |
|
Enter the Marshes The Nin-in-Eilph Is Now Available for The Lord of the Rings: The Card Game
“The ground now became damp, and in places boggy and here and there they came upon pools, and wide stretches of reeds and rushes filled with the warbling of little hidden birds. They had to pick their way carefully to keep both dry-footed and on their proper course. At first they made fair progress, but as they went on, their passage became slower and more dangerous.”
–J.R.R. Tolkien, The Fellowship of the Ring A treacherous swamp lies before you. A horde of Orcs trails behind you… The Nîn-in-Eilph, the fourth Adventure Pack in The Ring-maker cycle for The Lord of the Rings: The Card Game, is now available at your local retailer and online through our webstore! After escaping the ruins of Tharbad, several of Middle-earth’s greatest heroes must quickly find their way through the treacherous swamp waters of the Nîn-in-Eilph as they race toward the location of Celebrimbor’s abandoned forge. Free from the Orcs they faced in Tharbad, the heroes must now contend with other dangers. The swamp is treacherous and filled with deadly predators. 
There Is No Time to Lose Your heroes have no time to spare as they navigate through the Nîn-in-Eilph. Their rations are limited, the insects that infest the swamp drain their energy more every day, and the Orc hordes that chased them out of Tharbad will be on their trail. Though your heroes see no immediate trace of them, nor of the spy who commanded them, the longer you spend in the swamp, the greater the chances are that you may be caught. Accordingly, as The Nîn-in-Eilph challenges you to find your way through the swamp, each of its quest stages uses the Time X mechanic to compel your heroes forward. There are three different quest cards for stage two, and there are three different quest cards for stage three. When you first set foot into the Nîn-in-Eilph, you choose your quest two stage at random. Then, once you complete stage two, you proceed through the swamp to a random stage three. However, should you fail to successfully complete one of these quest stages before its Time effect triggers, you get lost and must start following a new path forward at a random quest card of the same stage. 
Then, if you get lost, each quest card at stages two and three shares the same “When revealed” text, “When revealed: Raise each player’s threat by 1.” Each moment that you spend lost in the swamp is another moment lost to the Dark Lord’s agents. Moreover, each section of the Nîn-in-Eilph imposes its own penalties upon your travels. For example, if you arrive at A Forgotten Land (The Nîn-in-Eilph, 97), you cannot play more than one card each round. 
The result is that you must commit yourself fully to your quest so that you can push through a stage before you get lost. Even your successful efforts, though, are not without dangers. An Ancient Marsh-dweller (The Nîn-in-Eilph, 103) lurks somewhere in the swamp, hunting prey close to your eventual destination. Thus, even as your journeys lead you closer to your goal, they lead you closer to this deadly predator. Do Not Search in Vain “My search would have been in vain, but for the help that I had from a friend: Aragorn, the greatest traveller and huntsman in this age of the world.”
–Gandalf, The Fellowship of the Ring The deadly swamp of The Nîn-in-Eilph may present you a host of unforeseen obstacles, but it also presents you a number of new tools to face them, several of which tie closely to Aragorn’s talents as a leader and ranger.  While many of the new player cards from the Adventure Packs in The Ring-maker cycle focus on developing the Silvan trait, there are many, also, that explore different ground. In The Nîn-in-Eilph, we find two new, unique Title attachments, both of which reflect aspects of Aragorn’s character: Wingfoot (The Nîn-in-Eilph, 92) and Defender of the West (The Nîn-in-Eilph, 93). While many of the new player cards from the Adventure Packs in The Ring-maker cycle focus on developing the Silvan trait, there are many, also, that explore different ground. In The Nîn-in-Eilph, we find two new, unique Title attachments, both of which reflect aspects of Aragorn’s character: Wingfoot (The Nîn-in-Eilph, 92) and Defender of the West (The Nîn-in-Eilph, 93).
Wingfoot offers a thematically appropriate response to the challenges of the swamp, as it reflects Aragorn’s expert talents as a tracker, as demonstrated in The Two Towers when he tracked two Hobbits and a pack of Uruk-hai for many leagues. In Wingfoot, we see his peerless talent and his tireless devotion given shape in the form of a readying effect: “Response: After attached hero commits to a quest, name enemy, location, or treachery. If a card of the named type is revealed during this quest phase, ready attached hero.” Wingfoot combines nicely with Henamarth Riversong (Core Set, 60) and several Secrecy cards, such as Risk Some Light (Shadow and Flame, 136) and Ithilien Lookout (The Dunland Trap, 8). Even if you don’t draw a card that allows you to look at the top of the encounter deck, your odds of naming the right type of card increase as you add more players to the game and reveal more cards each quest phase. This makes Wingfoot one of the many cards from The Nîn-in-Eilph that subtly reward the different interactions available in multiplayer games.  Defender of the West, on the other hand, is less subtle in its multiplayer rewards. This Title attachment is inspired by the scene in The Fellowship of the Ring in which Aragorn swears his aid to Frodo: “If by life or death, I can save you, I will.” Defender of the West, on the other hand, is less subtle in its multiplayer rewards. This Title attachment is inspired by the scene in The Fellowship of the Ring in which Aragorn swears his aid to Frodo: “If by life or death, I can save you, I will.”
Defender of the West attaches to a unique, non-objective ally and gives control of that ally to the first player, meaning that the ally then travels from player to player so long as both it and Defender of the West remain in play. As a cooperative game, The Lord of the Rings: The Card Game offers players a great variety of ways to interact with each other and lend each other support. Your characters with the Sentinel keyword can defend against enemies engaged with your teammates, and your Ranged characters can attack those enemies. A wide range of triggered effects, such as that on Gléowine (Core Set, 62), allow you to choose the effect’s beneficiary. Still, there are always circumstances in which the first player might need the help of a powerful ally like Beorn (Core Set, 31), who doesn’t have an ability or keyword that allows him to lend his assistance across the table. In such cases, Defender of the West can save you. If you were to send Beorn to the first player, he could defend attacks for your teammate, or he could attack for as much as eight Attack Strength. In fact, given Beorn’s whopping six hit points, and the fact that Defender of the West allows the attached ally to absorb damage from undefended attacks, Beorn might even be able to absorb an undefended attack before retaliating and single-handedly destroying an enemy. Alternatively, you might play Defender of the West on an ally like Erestor (The Long Dark, 77) just so that he can offer his counsel (and card cycling ability) to each player, in turn. Lead Your Fellowship Out of the Swamp You can take advantage of Wingfoot, Defender of the West, the Ranger hero Mablung (The Nîn-in-Eilph, 84) and the other player cards from The Nîn-in-Eilph to meet the challenges of its scenario in multiplayer games, or you can brave the swamp on your own. Either way, you must hurry. The Dark Lord’s power is growing, his agents are afoot, and the White Council is counting on you to recover whatever secrets lie hidden in Celebrimbor’s abandoned forge. The Nîn-in-Eilph is now available at your local retailer and online through our webstore. Pick up your copy today! ... Source: Enter the Marshes
|
|
|
|
|
Logged
|
|
|
|
RSSFeeder
Global Moderator
Deep One
Karma: 0
Offline
Posts: 3916
|
|
« Reply #303 on: 25 October 2014, 19:30:02 » |
|
The Haunted FewPreview the Investigators of Mountains of Madness
We might have known from the first that human curiosity is undying, and that the results we announced would be enough to spur others ahead on the same age-long pursuit of the unknown…
– H. P. Lovecraft, At the Mountains of Madness In the Mountains of Madness expansion for Eldritch Horror, a savage prehistoric species that once ruled earth is awakening again in Antarctica, its primal stirrings unleashing disorder and terror across the globe: monsters assault workers in the streets of Tokyo, gates open in the heart of Africa, and cultists perform ritual sacrifices in the cold American heartland. It will take an international effort to stop the spreading horror that threatens human civilization. War must be waged on multiple physical, intellectual, and psychic fronts, not only in the coldest parts of Antarctica, but in London’s secret libraries and Arkham’s dimly lit restaurants, in lavish Australian parlors and the busy oceanfront marinas of Bombay. Today’s preview introduces you to four of the investigators who have dedicated their lives to combatting the horror. Whether by making the long voyage deep into Antarctica and over the snowy Mountains of Madness, using political influence to facilitate the expedition, or scouring dusty and cryptic tomes of ancient lore for answers, each investigator is willing to do everything in his or her power to prevent the Ancient Ones from awakening, or die trying. 
Urban Legends “Never lose track of the exit or the merchandise,” the infamous Finn Edwards tells his men. Having spent most of the 1920s running bootlegged whiskey down from Canada to the decadent cities of the East Coast, Finn has never lost track of either and has never been caught. But now he’s gotten caught up in something far more dangerous than smuggling liquor. The merchandise is far more controversial and delicate than anything he’s touched before, and there is no exit. 
The skills that made Finn excellent as a bootlegger make him invaluable in the struggle against the Ancient Ones. He can move people as well as goods, using an action to move himself and/or another investigator one space along a ship or train path. Or, he can use Whiskey to help someone regain sanity. Finn begins the game with the Cat Burgler asset, allowing him to roll one die to gain an item or trinket from the reserve, and is immune to effects that might cause him to lose his burgled possessions. He also begins the game with a Task set for him: a Courier Run to a certain city on a secret errand. Similar to Spells and Conditions, Task Assets must be flipped over when they are completed – only when Finn reaches the assigned destination will he understand what he came there for. For years, patrons eating coffee and pie at Velma’s Diner in Arkham were served by Agnes Baker, a quiet, hardworking waitress with a faraway glint in her eyes. But recently Agnes was flooded with memories of a past life as a sorceress in the ancient realm Hyperborea, and is now driven to understand the arcane ideas and images flashing through her psyche. These memories gave her more than curiosity: Agnes knows an incantation strong enough to defend her against the most vicious monsters, and carries with her a Profane Tome that can keep her sanity intact in the face of danger. 
Long nights waiting tables have made Agnes the opposite of frail. With a health of seven, she can withstand harsh conditions and brutal attacks. In a dire emergency, she can also spend a health to add two dice when resolving a lore test as part of a spell. Not only will Agnes go to any length to solve the mysteries surrounding her identity, but she possesses the fortitude to withstand Antarctica’s climate, and the arcane understanding to bring its darkest secrets into the light of day. Higher Laws Since the dawn of human civilization, it has been recognized that beautiful music flows in accordance with the fundamental laws of the universe. Internationally renowned violinist Patrice Hathaway knows this more viscerally than anyone: when she plays, the notes connect her with other consciousnesses, even other worlds. Terrified by her experiences, she will do anything to prevent those consciousnesses from further awakening, and to shut our world off from the bleak and horrifying others that she has glimpsed. When she uses her transcendent music to close a Gate, therefore, she gains a clue and a Focus. 
Introduced for the first time in Mountains of Madness, Focus tokens can be acquired using an action and spent to reroll a die when resolving a test. Patrice, however, can use an action to spend a clue and a focus to improve a skill, perhaps increasing her knowledge of arcane lore, perhaps enhancing her influence or her powers of observation. She also enters the game with a Banishment spell, which allows her to use her lore to overcome any monsters that stand between her and the Gates that she is inexorably drawn to. George Barnaby devoted his life to justice, working tirelessly over the course of his legal career to prosecute anyone responsible for human suffering, grateful every day that his own life was calm and safe– until his retirement. Having been too much in court to see the world, he embarked on a voyage around the world with his wife, only to return from buying breakfast one day to find her dead in their boat, surrounded by occult symbols. Now he seeks justice for his wife’s murder, but the answers to this mystery cannot be found in any legal brief, and this enemy is far too powerful to be brought into a courtroom. 
As a former lawyer, George has a lot of influence and can use it to prevent other investigators from going into debt or becoming Detained. The concentration that helped him untangle complicated legal texts aids him in the search for answers: once per round, he can spend a Focus to add one to the result of a die when resolving a test. He joins the struggle against the Ancient Ones with an Investment, which he can cash in during reckoning to provide funding for your investigation, or even for an Antarctic expedition. He also carries a Pocket Watch to prevent him from becoming delayed unless it is advantageous. George Barnaby’s retirement is over. He will not rest until justice has been done. 
United in the Search for Truth Once you have fought off a monster’s grasping tentacles, felt an Elder Thing’s mind probing yours, or found yourself awake in another universe, you cannot return to the innocent life you had before. The only hope is to solve the mysteries that now surround your existence and to defeat the forces of darkness that spawn monsters and splice open the boundaries between worlds. The investigators of Mountains of Madness may come from wildly different backgrounds and adhere to conflicting ideologies, but they are irrevocably united by their experiences of profound horror and by the drive to wipe such things off the face of the earth. The question is, once immersed in this struggle, can you endure the horror long enough to emerge victorious? Our next preview will acquaint you with the two new Ancient Ones featured in Mountains of Madness so that, armed with that knowledge, you can plot your first movements in the battle against them. You can also find more information on the Mountains of Madness and Eldritch Horror minisites. Pre-order Mountains of Madness from your local retailer today! ... Source: The Haunted Few
|
|
|
|
|
Logged
|
|
|
|
RSSFeeder
Global Moderator
Deep One
Karma: 0
Offline
Posts: 3916
|
|
« Reply #304 on: 26 October 2014, 04:00:03 » |
|
Pushing Deeper into DangerA Look at the Resolution Phase of XCOM: The Board Game
It was Carnival in Rio, but you couldn’t tell. The city was a ghost of itself, mostly silent, except for the faint blare of distant car alarms and the crackle of nearby fires. Smoke choked the night skies. Somewhere in the ruins, the aliens were hiding, setting their trap. That fact made the team nervous, but it was their job to spring the trap. The science division needed a body… XCOM: The Board Game is divided into two phases: the timed phase and the resolution phase. These phases are not intended to replicate the strategic and tactical dimensions of the acclaimed computer game series, but they do lend a familiar call-and-response structure to your game rounds. Much has already been made of the timed phase. We’ve offered closer looks at the game’s digital companion app and how it generates tension by forcing you to respond to the alien invaders’ three-pronged attack in real-time. Additionally, players and reviewers who participated in demos at Gen Con Indy and PAX have contributed their own insights into the nature of the app and the tough decisions that you’re forced to make quickly with limited information. They have also addressed how these elements work together to forge an XCOM experience that is every bit as intense and compelling as it is unique. Less has been said about the resolution phase. This isn’t because it’s any less interesting or vital to your game. It’s simply because, even though the app still guides you through your actions, the resolution phase isn’t as immediately tied to the app. The timer is turned off. You’re not receiving any new alerts. All the intel you need to make your decisions is openly available on the table. The pressure, however, doesn’t ease off for a second. 
Humanity’s Survival Is at Stake After you’ve closed the last of the app’s alerts from the timed phase, the timer shuts off, and the app prompts you to move through the various steps of the resolution phase. Here, you try to research the new technologies to which you’ve committed your science staff, you combat UFOs, you use your satellites to deal with UFOs hovering in orbit, you defend your base, and you conduct the missions to which you’ve assigned your soldiers. Of course, each task is loaded with significance, instilled by the fact that humanity depends upon your successes, and your failures have very real consequences: Research As your Chief Scientist researches new technologies, they grant special abilities that greatly empower the different XCOM heads. For example, when you engineer a Blaster Launcher, the Squad Leader can exhaust it to place a success on any enemy that has a heavy soldier assigned to it. Likewise, by unlocking the secrets of Elerium, you allow the Commander to add two credits to your Emergency Funding each round.  
These technologies and others create powerful advantages that add up as the game goes on, and they’re necessary. You start the game outmatched, looking to combat a foe who has already established a presence across the globe and sown panic among the world’s nations. Each round that you don’t successfully research new technology is another round that you’re almost certain to fall further behind. Orbital Defense The Central Officer, meanwhile, needs to use XCOM’s satellite defense network to destroy UFOs in orbit. He needs to eliminate these UFOs in order to maintain clear lines of communication, as we saw in an earlier preview. He also needs to eliminate these UFOs because if he can’t eliminate all of them, the nations begin to panic, and you must advance your least panicked nation or nations one space along the panic track for every UFO remaining in orbit. 
After the Central Officer resolves the team’s orbital defense, three UFOs remain in orbit. The team advances the two least panicked continents, Africa and North America, along the panic track. Then, there are three continents all at the lowest stage of panic: Africa, Asia, and North America. Forced to advance a continent one more space along the panic track, the team decides to advance Asia.
Global Defense While the Central Officer is combating UFOs in orbit, the Commander oversees your team’s global defense efforts, directing XCOM’s Interceptors in their battles with UFOs. UFOs that your team don’t eliminate each elevate the levels of chaos and fear throughout the continents over which they hover, and you have to advance each continent a number of spaces along the panic track, equal to the number of UFOs flying over it. 
After the Commander resolves the team’s global defense, two UFOs continue their invasion of Australia, forcing the continent forward two steps along the panic track.
Base Defense and Missions More than anyone else, the Squad Leader has his hands full during the resolution phase. As Squad Leader, you are responsible for both the defense of your base and the completion of the game’s various missions, including your scenario’s final mission. This means you’ll have plenty of tasks to resolve each round. Each enemy counts as a task, and each mission features three different tasks, at least one of which will be an enemy. You need to defeat these enemies and complete these missions to prevent damage to your base and advance your team toward its final mission. As with the other tasks, yours come with consequences for your failure. Should you fail to destroy the enemies that assault your base, your base suffers one damage for each remaining enemy. Should you fail to complete your mission, you almost certainly stall your advancement to the final mission by one game round. 
Your final mission, like all missions, features three tasks, including at least one enemy. To complete a mission, you must successfully resolve all of its tasks.
Thus, with all these objectives and consequences at stake, your resolution phase begins with a sense of urgency. You don’t just want to research those Battle Scanners; you feel a real need to get them to your troops. You know if you don’t eliminate the UFOs hovering over Asia, the whole continent will come within a hair’s breadth of utter panic. After suffering damage to your base in an earlier round, you’ll feel your back against the wall, knowing that you need time to win the war, and you can’t afford to allow any enemies to disrupt your plans. Are You Willing to Pay the Price? All the different tasks that you’ll undertake in the resolution phase use the same, mechanically simple push-your-luck dice system, yet to say that these tasks all feel the same is misleading. Even more, to say that the decisions you make while you undertake these tasks are as simple as the mechanics they employ is to grossly misinterpret their nature. 
XCOM: The Board Game comes with four blue XCOM dice and one red enemy die.
To complete any task in XCOM: The Board Game, you roll a pool of six-sided dice, aiming to score a number of success results indicated by the task. Some of the game elements that introduce tasks, such as enemies, leave play at the end of the round, but if the task you’re undertaking is of the majority that don’t leave play, you can save your successes from round to round. You build your pool of dice by committing resources to them. During the timed phase, when you are prompted to allocate your scientists to different research projects, you’re setting yourself up for the resolution phase. Likewise, as your team deploys your Interceptors and assigns your soldiers to base defense and the current mission, your preparing for combat. For each scientist assigned to a specific research task, for each Interceptor in battle over a specific continent, or for each soldier assigned to battle an enemy, you add one blue XCOM die to the pool of dice you use to attempt that task in the resolution phase. 
Because there are two Interceptors assigned to global defense in North America, the Commander adds two blue XCOM dice to his dice pool, as well as one red enemy die, which is added to every task’s dice pool.
One other die is automatically added to the dice pool for each task: a single red enemy die. Each task has a threat level that starts at “1,” and each time you attempt that task, the threat increases by one. This is important because if you don’t immediately succeed on a task, you can choose to push harder, committing your soldiers, scientists, or Interceptors more fully to the job. When you push, then, you reroll all the dice in your pool, both the XCOM dice and the enemy die. However, even as the game’s dice system encourages you to make multiple attempts at your tasks, there are prices to be paid whenever your result on the enemy die fails to exceed the task’s threat. 
After each roll at a task, its threat increases.
If you fail to score a result on the enemy die that exceeds the current threat while you’re performing research, all the scientists assigned to the task are turned facedown, exhausted, and cannot attempt research on the next turn. Even worse, if you fail to exceed a task’s threat level during your global defense, base defense, or mission, the Interceptors and soldiers that you have assigned to those combats are lost, and you lose the ability to use those soldiers later in the game. This means you have to build more Interceptors or recruit more soldiers, but adding to your forces once again requires that you spend more credits – credits which are in short supply. Thus, at some point, you have to decide if you can cut your losses at a task. Partial successes might have to suffice. For instance, if you assign three Interceptors to defend Europe from three UFOs and destroy two of those UFOs before the task’s threat level rises to “3,” you may decide to let Europe move one step along the panic track rather than risk all three of your Interceptors just to take down one last UFO. Yet, partial successes are also partial failures, and small advances along the panic track quickly add up. The Squad Leader 
The Squad Leader has three primary responsibilities, each of which demands he think carefully about how to use his soldiers. | | More than any of XCOM’s department heads, the Squad Leader needs to be comfortable making hard decisions in the heat of battle. When you play as Squad Leader, you are constantly sending your soldiers into lethal combats, and you have to coordinate more of these events each round than your fellow department heads. Whereas your colleagues are each responsible for a single aspect of the war effort each round, you need to conduct both the defense of your base and push toward the completion of missions. Additionally, both these responsibilities often require multiple tasks. Every mission requires three tasks, and your base may come under siege by as many as three enemies. Worse yet, some of those enemies, like a Thin Man, can spawn new enemies in their locations when they’re destroyed, meaning that you may have to defeat four or more enemies, in order to successfully defend your base defense. Finally, whereas as the Chief Scientist sees the threat level reset to “1” between each research project, and the Commander sees the threat level reset to “1” between engagements over different continents, your threat level does not reset between the different tasks in your base defense or between the different tasks of your mission. In other words, to complete any given mission in a single turn, you need to attempt at least one task while the threat level hovers at a fairly menacing “3,” and the odds are good that you’ll see your threat level rise even higher than that. Accordingly, you’re constantly forced to make hard decisions. Will you risk the lives of the men and women you’ve assigned to your base defense or a mission, or will you pull them back to regroup and allow the aliens to retain another foothold for their invasion? Engaging the Enemy As Squad Leader, you don’t just face more tasks each resolution phase than your colleagues, your tasks are more complex. Enemies require that you score a certain number of successes to defeat them, but they also limit the number of soldiers that you can assign to a combat. Each enemy features a number of skills, some of which may be bordered in gold to show that they are specialized. You can only assign one soldier per enemy skill icon, and each soldier needs to own a skill icon that matches the icon to which he or she is assigned. 
Fortunately, your soldiers are among the world’s best trained, and there are ways that you can increase the number of dice you roll for your tasks. - If a soldier who is specialized in a skill, as indicated by the gold border on that soldier’s skill, is then assigned to an enemy’s specialized skill, that soldier adds an extra die to your pool.
- If the Commander inducts one of your soldiers into Officer Training during the timed phase, that soldier becomes elite by the end of the round and adds an extra die to any task to which he or she is later assigned.
- The Chief Scientist may be able to provide your troops with other advantages by researching technologies such as Run & Gun and Battle Scanners. In fact, the Chief Scientist can help you guarantee a number of successes with technology like the Blaster Launcher.
The fact that your soldiers interact with tasks in specific ways means that you might have decisions to make during task resolution beyond simply commanding your soldiers to push further forward or fall back. For example, you may assign a squad of four soldiers to your base defense: one heavy, one sniper, and two support, one of whom is elite. 
The Squad Leader assigns one heavy, one sniper, and two support soldiers to base defense. One of the support soldiers is elite. (Click on the above image to view a larger version.)
This squad may have to gun through two Sectoids before confronting a Cyberdisc. Let’s imagine, for the sake of this example, that your squad manages to come face to face with the Cyberdisc as the threat level hits “3.” You go all-in on your first attack, placing an assault soldier on your Run & Gun and a sniper on your Battle Scanners. You assign your best squad to confront the Cyberdisc, sending the heavy, the sniper, and your elite support soldier. You’d use your Blaster Launcher, too, but you already exhausted it to destroy a Thin Man. 
As the Squad Leader builds the task’s dice pool, he adds three XCOM dice (orange) when he assigns his elite support soldier to an enemy skill that matches his specialized skill, he adds one XCOM die (purple) when he assigns his sniper to a second enemy task, and he adds one XCOM die (green) when he assigns his heavy soldier to the third and final enemy task. Wanting to complete the task in one, final push, he places an assault soldier on Battle Scanners to treat all the enemy’s skills as though they were specialized; this means that his heavy and sniper now match specialized skills with their specialized skills, and the Squad Leader adds two more XCOM dice to his pool. Finally, he places a sniper on Run & Gun to add an eighth XCOM die. (Click on the above image to view a larger version.)
Despite your massive assault, the Cyberdisc’s defenses prove too tough to crack. You roll eight XCOM dice but score only two successes. The Cyberdisc survives, and the threat level rises to “4.” Now, your next attempt to destroy the enemy is as likely as not going to require the sacrifice of your soldiers. 
The Squad Leader’s pool of eight XCOM dice yield only two successes, failing to destroy the Cyberdisc. Still, the enemy die is an “8,” which is higher than the previous threat of “3.” The threat advances to “4,” the Cyberdisc remains, the soldiers are still available, and the Squad Leader faces a tough choice in the heat of battle. (Click on the above image to view a larger version.)
What do you do? - One option is to commit your best forces one more time and hope for the best. Still, while you’re likely to destroy the enemy, there’s a real chance you’ll lose your best troops. If you lose your elite support soldier, you’ll lose his extra die, and if you lose your heavy, you’ll lose the ability to utilize your Blaster Launcher in future rounds.
- Another option is to pull back and seal off the section of your base with the Cyberdisc in it. You suffer one point of damage to your base, but your soldiers live.
- A third option is to assign a different group of soldiers to finish off the Cyberdisc. If your heavy and your elite support soldiers are the ones who are most valuable for future defenses, you can pull them back and assault the Cyberdisc with your sniper and non-elite support soldier. Perhaps they’ll finish it off. Perhaps they’ll die. Perhaps both sides will perish in a massive explosion.
As Squad Leader, you need to be able to make these types of tough calls. The men and women who form XCOM’s elite infantry put their lives in your hands, but you can’t shy away from sending them into danger. All of humanity is at stake. If you can push hard enough at the right times, and if your teammates can give you the tech and funding and time that you need, then maybe – just maybe – you can get the intel you need to launch one final, decisive mission and save humanity. Prepare to Face the Invasion The Squad Leader may be the department head responsible for conducting XCOM’s final strike, but he’ll never get the chance if you can’t get your whole team to work together. In our next preview, we’ll take a look at the Commander and explore how, as Commander, you must take the lead in your team’s efforts against the alien invaders. ... Source: Pushing Deeper into Danger
|
|
|
|
|
Logged
|
|
|
|
RSSFeeder
Global Moderator
Deep One
Karma: 0
Offline
Posts: 3916
|
|
« Reply #305 on: 26 October 2014, 12:30:04 » |
|
Set Your CourseA Preview of STAR WARS (TM): Armada
“That is the system. And I’m sure Skywalker is with them. Set your course for the Hoth system.”
–Darth Vader The Star Destroyers are on their way. Star Wars™: Armada is coming! Imperial Star Destroyers and TIE squadrons go head to head with Rebel corvettes, frigates, and X-wings in this epic miniatures game of tactical fleet battles. In our first previews, we’ve seen how Armada clearly differentiates its massive and explosive battles from the sort of lethal, fast-paced skirmishes waged between fighter squadrons. We explored the ways that the game’s command stacks add personality to the game’s different ships and force you to plan for the future. Then, we took a closer look at how your capital ships can attack your enemies, and we identified the different defenses they can use against incoming fire. Today, we look at how your ships make use of the game’s unique maneuver tool and how they interact with obstacles. We’ll also address some of the tactical implications that follow. 
Hit and Run In Armada, your capital ships both attack and move during the Ship Phase. To review, once you enter the Ship Phase, you and your opponent take turns activating your ships, starting with the player who has initiative. When you activate a ship, you reveal its command dial, perform up to two attacks, and then move.
- Reveal Command Dial
- Attack
- Execute Maneuver
Among other things, this means that you’re always setting your course to set yourself up for the next round’s attack, rather than setting a course to set yourself up for an attack in the same round. Accordingly, you have to consider where your opponent’s ships have already moved, where the unactivated ships are likely to move, and which ships are likely to activate first in the coming round. It doesn’t do you any good to line up all your guns at a single enemy ship if your opponent will just choose to have it activate first, attack you at close range, and then fly away. That said, you’ll always have a good idea of your opponent’s possible courses. You both use the same maneuver tool, your opponent’s ships have speed charts that are open information you can reference at any time, and each ship in the game has its current speed visibly locked into its speed dial. What you won’t know until your opponent activates a ship is whether or not that ship has been assigned the navigation command and can adjust its speed and bearing more than the open information would suggest. 
The game’s unique maneuver tool. (Product image not final. Pending Licensor approval.)
Thus, the game’s movement is yet another element that plays into the importance of making far-sighted, tactical commands. When you set your ship’s course, even though you know the exact location of every ship on the battlefield, you are never lining up an immediate attack. Instead, you are always anticipating the future, taking your best guess at how the battle will look by the time your ship next activates. Charting Your Course To set a ship’s course, you begin by resetting the maneuver tool so that all of its joints are straight. Then your ship’s speed indicates how far it will travel along the maneuver tool. At each joint, you can click the tool left or right a number of times away from the center position as indicated by your ship’s speed chart. 
The speed charts for the CR90 corvette (left) and the Victory II-class Star Destroyer (right).
Each column on the speed chart corresponds to the speed number at the bottom of the column and shows the number of times that each joint can be clicked while your ship travels at that speed. The rows on your ship’s speed chart correspond to the joints on the maneuver tool. The row directly above the speed number relates to the first joint, the second row relates to the second joint, and so forth. An “I” indicates that the joint can be clicked once in either direction, while an “II” means it can be clicked twice. Meanwhile, a “–” means the maneuver tool must remain straight at that joint. Of course, if you have revealed a navigate command, you can choose to adjust one of the maneuver joints by an additional click. 
A Rebel player plots a “3” speed maneuver for his Nebulon-B escort frigate, adjusting the second joint one click to the right and adjusting the third joint two clicks to the left.
When you set your ship’s course, you are allowed to use the maneuver tool to measure your ship’s possible positions before you commit to the move. Flying Through Obstacles “Asteroids do not concern me, Admiral. I want that ship, not excuses.”
–Darth Vader There may be times that your relentless pursuit of your foes may lead you into obstacles, and there may be times that your opponent’s superior firepower may prompt you to seek cover. In either case, it’s handy to understand how Armada deals with obstacles and collisions. There are three types of obstacles in the Armada Core Set: asteroid fields, debris fields, and space stations. Each interacts with your capital ships and squadrons in a different fashion.
 |
Asteroid Field
A ship that moves overlaps this obstacle receives one faceup damage card. Squadrons are unaffected.
|
 |
Debris Field
A ship that overlaps this obstacle suffers two damage on any hull zone. Squadrons are unaffected.
|
 |
Station
At the end of a ship’s movement, if it overlaps a station, it may discard one of its faceup or facedown damage cards. At the end of a squadron’s movement, if it overlaps the station, it may recover one hull point.
|
Additionally, obstacles can obstruct attacks, as can capital ships. In our last preview, we showed how you build a pool of dice for each your ship’s attacks based on the hull zone from which it’s firing, the range at which it’s firing, and whether or not you have revealed the concentrate fire command to add a die. However, obstacles and capital ships that fly between your ship and its target can also impact your dice pool. Not only must your target be within the range and firing arc of the hull zone from which you choose to launch your attack, you must have line of sight to the hull zone you want to target. To determine whether or not you have line of sight, you trace a straight line from your hull zone’s yellow targeting point to the targeting point of the defending hull zone. If this line is traced through any hull zone on the defending ship other than the defending hull zone, you do not have line of sight to that hull zone and must declare another target. If you do not have another valid target, you lose the opportunity to perform the attack. 
From the Star Destroyer’s front hull zone, the Imperial player has clear line of sight to the Rebel player’s X-wing squadron, as well as the CR90’s front and left hull zones. However, the Star Destroyer does not have a valid shot at the CR90’s rear hull zone since the line of sight first passes through the CR90’s left hull zone.
If you have line of sight, but that line traces across another ship or an obstacle, your attack is obstructed. Whenever your ship is obstructed, you roll one less die of your choice. 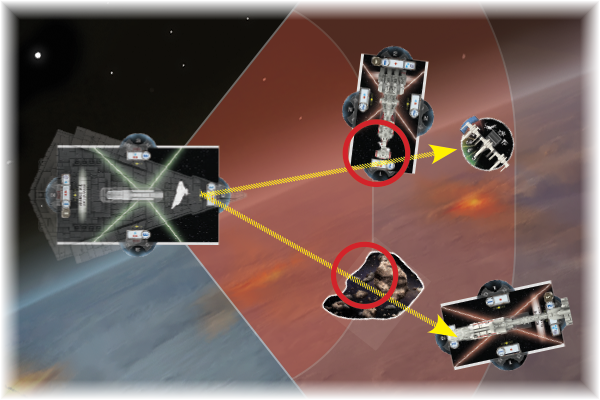
The Star Destroyer’s attacks are obstructed against the X-wing squadron and the lower CR90.
Naturally, this presents keen admirals a wide range of tactical options. As they try to take flanking positions, weaker Rebel ships may race around obstacles so that the more powerful Imperial Star Destroyers cannot find unobstructed attacks. Alternatively, an Imperial player, knowing that his opponent will want to focus fire on a damaged Star Destroyer, may commit other Star Destroyers to position between the Rebel fleet and their intended target. In this way, even though the Imperial player loses a die from his damaged Star Destroyer’s attack, that loss might just be one of six dice, whereas the Rebel player is likely to have each of its attacks cut by a third. Collisions While you follow one set of rules whenever your ship overlaps an obstacle, you follow another set of rules whenever your ship would collide with another ship or one or more starfighter squadrons. First of all, it’s worth remembering that you always have the opportunity to measure your movement before you move. Thus, if your initial course would force your ship to overlap another ship or squadron, you can adjust your course. However, in some circumstances, you may still find it impossible to avoid a collision, or you may find it advantageous to ram into your opponent’s ship. 
When the Rebel player sees that the course he wanted to set for his CR90 corvette would cause it to overlap the Imperial player’s Star Destroyer, he can either adjust the maneuver tool at its first two joints or suffer the consequences of the collision.
Whenever your ship’s final position would overlap another ship, it cannot finish its movement normally. Instead, you temporarily reduce its speed by one increment and attempt to execute your ship’s movement at the reduced speed. If reducing your ship’s speed by one still wouldn’t permit a legal movement, you continue to decrease your speed by one increment and attempt to move until your ship can legally finish its movement or until its speed is temporarily reduced to “0,” in which case it does not move. After resolving this movement, your ship and the closest ship that it overlapped both receive one facedown damage card. 
The Rebel player decides to have his CR90 corvette collide with the Imperial player’s Star Destroyer. He reduces the corvette’s speed by one so that both ships have clear shots at each other from their front hull zones, and then both ships suffer one facedown damage.
On the other hand, if your ship’s final position would cause it to overlap one or more squadrons, you complete your ship’s movement normally and move any overlapped squadrons out of the way. Then, your opponent places all of the overlapped squadrons next to your ship so that their bases are touching its base. Move to Attack Position “They’re moving to attack position!”
–Captain Needa Movement in Armada isn’t just a matter of picking a part of the battlefield and flying to it. It’s all a part of the flow of battle. You have tactical options at every turn, and it’s up to you, fleet admiral, to make the most of them, turning the battle in your favor. Next: We look at the rules for squadrons and the role they play in your fleet! ... Source: Set Your Course
|
|
|
|
|
Logged
|
|
|
|
RSSFeeder
Global Moderator
Deep One
Karma: 0
Offline
Posts: 3916
|
|
« Reply #306 on: 26 October 2014, 21:00:03 » |
|
Quest in the DarknessPreview Quests in The Witcher Adventure Game
Prince Ellander’s firstborn son has been transformed into a monster. With great sadness, the Prince requests that you put his son out of his misery. What a delicate position you have found yourself in… The world of The Witcher is filled with devious opponents and unknowable dangers. No matter where you venture, you may need to fight for your life at any moment. Yet you must face these dangers and more to become the most renowned hero in the Continent and claim victory in The Witcher Adventure Game! Your quests lie at the heart of The Witcher Adventure Game. To prove yourself a true hero, you must complete quests across the Continent and gain victory points provided by these adventures. In our last preview, we looked at the different actions that you use to travel and experience the world of The Witcher. Today, we’ll explore your goals by examining quests in greater detail! 
A World of Adventure Your quests in The Witcher Adventure Game may take any number of forms. You may need to battle a fearsome monster, study the ancient mysteries of magic, or resolve a diplomatic crisis without incident. Depending on which hero you play, you’ll have a natural inclination towards a certain category of quest. Geralt of Rivia, a hardened witcher and fighter, naturally handles combat quests more easily than quests that require delicate social interactions.  At the beginning of every game of The Witcher Adventure Game, you draw two cards from the quest deck shown on your hero sheet. You must choose one of these two quest cards to take on. Quests are difficult tasks for any aspiring hero, and they are divided into several parts: the main quest, side quests, and a support quest. To complete a main quest and claim its victory points, you must go to a specific location in the Continent and spend resources known as proof. For example, Geralt could choose the Of Dwarven Make quest card. To complete the main quest, Geralt must be in Mahakam and he must use a blue proof and a red proof to collect the materials for a new sword and convince a smith to forge the blade. Completing this quest grants Geralt the victory points listed on the right border of the card: twelve victory points in this case. At the beginning of every game of The Witcher Adventure Game, you draw two cards from the quest deck shown on your hero sheet. You must choose one of these two quest cards to take on. Quests are difficult tasks for any aspiring hero, and they are divided into several parts: the main quest, side quests, and a support quest. To complete a main quest and claim its victory points, you must go to a specific location in the Continent and spend resources known as proof. For example, Geralt could choose the Of Dwarven Make quest card. To complete the main quest, Geralt must be in Mahakam and he must use a blue proof and a red proof to collect the materials for a new sword and convince a smith to forge the blade. Completing this quest grants Geralt the victory points listed on the right border of the card: twelve victory points in this case.
Every main quest requires some amount of proof to complete, and this proof is obtained by trading in leads – resources you may obtain from traveling and investigating strange occurrences throughout the land. Although all heroes gain leads in the same ways, the amount of leads you need to exchange for a specific type of proof varies from hero to hero. Geralt of Rivia is adept at combat, but cautious and careful diplomacy isn’t his preferred means for resolving issues. To reflect this, Geralt can convert three red leads to one red proof, but he needs seven purple leads to exchange for a single purple proof. Other heroes have different specialties. Triss Merigold relies on her magical prowess, meaning she needs only three blue leads to convert to one blue proof. Once you’ve gathered the necessary leads from your travels and adventures, you can exchange them for proof at any point during your turn. To complete your main quest, you must gather proof and reach the location specified by your quest card. Some quests may even require you to do battle with a fearsome monster from another sphere, but even in these cases, you must gather proofs to complete other aspects of the quest. We’ll explore combat and monsters in greater detail in a future preview. After the main quest is completed, you immediately gain the listed main quest victory points and resolve the consequences. But even successfully resolving a main quest can have unfortunate consequences. When the Of Dwarven Make main quest is completed, you immediately draw one beneficial good fortune card and receive two gold, but you receive no sword: the dwarven smith swindles you and escapes with your treasure. Regardless of the consequences, quests are your path to gain victory points and impact the course of events in the Northern Kingdoms. When a player successfully completes three main quests, the game ends and the player with the most victory points wins! 
A Fork in the Road Of course, your quest consists of far more than the main quest. You may choose to search for special materials, or perhaps you’ll seek out training or information not easily available. These concerns make up the side quests associated with your quest. Side quests may require you to visit a specific location, spend additional leads, defeat a monster, or complete some other task. Completing a side quest may take you off the beaten path, but it brings you a few more points, adding to your renown and bringing you closer to victory in The Witcher Adventure Game. On the Of Dwarven Make quest card, for example, there are two side quests. The first requires you to travel to Dol Blathanna in search of rare oils, while the other asks you to battle a monster to collect its fangs. These side quests can be completed in any order, and whenever you complete one, you gain three victory points. 
Although your goal in The Witcher Adventure Game is to prove yourself the most renowned hero of the Continent, you can often benefit yourself by aiding another hero in their quest. Each quest card offers a support quest that you may complete if you’re at the same location as another player. Support quests offer points both to the player completing the support quest and the player who holds the quest, so you’ll need to carefully consider if completing a support quest is worth the benefit it gives to your opponent. In our example, Geralt’s Of Dwarven Make quest has a support quest that asks the supporting hero to spend three red leads. If Yarpen Zigrin moves to Geralt’s location and spends three red leads, helping Geralt fetch ore from monster-infested mines, Yarpen claims six victory points for completing the support quest, and Geralt receives three victory points. Yarpen claims more victory points than Geralt for the support quest, but when playing the game, you must evaluate the benefits of completing support quests that help a leading player. Start Your Quest The quests that await you in the world of The Witcher are your chance to prove yourself the greatest hero in the realm. Join us next week when we examine monsters and the obstacles you may face, and preorder The Witcher Adventure Game at your local retailer today! ... Source: Quest in the Darkness
|
|
|
|
|
Logged
|
|
|
|
RSSFeeder
Global Moderator
Deep One
Karma: 0
Offline
Posts: 3916
|
|
« Reply #307 on: 27 October 2014, 22:30:04 » |
|
Announcing the 2014 World Championship ScheduleJoin Competitors at World Championship Weekend, November 6-9
10/27/2014 Update: Preregistration for the 2014 World Championship Weekend is now closed. Players can still register onsite starting at 6pm on Wednesday, Nov. 5th if there is room available. If you did not preregister, we cannot guarantee you entrance in the 2014 World Championships. Back in April, Fantasy Flight Games announced the dates for the 2014 World Championship Weekend. Today, it is time to announce the highlight of the weekend: the schedule for all World Championships! As November draws closer, hundreds of players around the world have begun to plan their treks to FFG’s hometown in Minnesota. Some will take the bus across town or pile into a car full of friends and drive a couple of hours, but others will be hopping on planes and flying halfway around the world to the Twin Cities. Will you join them and test your skills against the best in the world? If you are looking to attend Worlds or just want to tune in as the action happens, download the schedule now and start sketching out the most important days and times for you. The schedule for each game’s side events will be posted soon. 
World Championships While all your favorite games will be returning, the centerpiece of the 2014 event is the debut of two brand-new World Championships: Warhammer: Diskwars and Warhammer 40,000: Conquest! These two games will be played alongside our perennial mainstays throughout the weekend. 
Preregister Today If you haven’t already, preregister now and solidify your spot among the hundreds of players from around the world coming to Minnesota for the 2014 World Championship Weekend. But don’t wait too long because preregistration closes October 16th! While players can still register on site the day they arrive, the cost will increase to $50. 
More to Come While players can now begin deciding what day is best to arrive, there is a lot more to be announced. Stay tuned in the following months to learn the schedule of side events being run, the prizes that will be given away for all events at the 2014 World Championship Weekend, and more! ... Source: Announcing the 2014 World Championship Schedule
|
|
|
|
|
Logged
|
|
|
|
RSSFeeder
Global Moderator
Deep One
Karma: 0
Offline
Posts: 3916
|
|
« Reply #308 on: 28 October 2014, 07:00:02 » |
|
2014 Worlds Tournament UpdateAn Explanation of the X-Wing 2014 World Championship Flight Structure
10/27/2014 Update: Preregistration for the 2014 World Championship Weekend is now closed. Players can still register onsite starting at 6pm on Wednesday, Nov. 5th if there is room available. If you did not preregister, we cannot guarantee you entrance in the 2014 World Championships. At the end of August, we announced the schedule for all 2014 World Championships at the 2014 World Championship Weekend. To make sure players are as prepared as possible, today’s article outlines the X-Wing™ flight structure players will encounter this year at Worlds. Why the Split Into Two Flights? With the increasing popularity of X-Wing and the space the game requires to play, we will be splitting the tournament into flights to accommodate the large number of expected players for the event.
The flight system is one that we debuted at Gen Con this year and worked well. For the X-Wing World Championship we will be making
a few, small changes to improve the system but keep the overall structure. In short, having two flights allows more players to compete in the tournament. How Will the Flights and Overall Tournament Work? Each flight will accommodate up to 128 players and be run with six Swiss rounds. At the end of six rounds, the top 16 players in each flight will be invited to compete in the Finals on Saturday. The 32 players invited back on Saturday will compete in a top 32 single-elimination format. The final player standing at the end of the day Saturday will be crowned 2014 X-Wing
World Champion! How Do I Reserve My Spot in a Flight? To reserve a spot in one of the flights, you must preregister through our online store. As players register for the 2014 World Championship Weekend, we send out a general survey to each registrant. This survey will include a question asking for your preference on which X-Wing flight you would like to compete in. Once we receive your response, we will reserve a spot for you in your chosen flight. If one of the flights fills completely, we will notify you as soon as possible. If you have already preregistered, you should have already received the survey. If you did not, please contact us at organizedplay@fantasyflightgames.com immediately. The day of each flight, and only if space is available, we will accept any players who did not preregister. We strongly recommend you preregister for the 2014 X-Wing World Championship as we cannot guarantee there will be space if you attempt to register the day of the event. Is There a Difference Between the Two Flights? Other than the flights being on separate days and the fact that different players will end up competing each day, there is no difference between the two flights. Do I Have to Play in Both Flights? No. Players can qualify for the finals on Saturday no matter which flight they play in. Can I Play in Both Flights? A player may compete in both flights only if there is room. However, a player can reserve a spot for himself in only one flight. We will accept players reserved for a different flight only after all other players have had a chance to enter that day’s flight. Players who make the top 16 cut in Thursday’s flight cannot play in Friday’s flight. For example, Karen plays in Thursday’s flight but is unable to make the top 16 cut. She returns Friday morning to try and enter Friday’s flight. 105 players have a spot reserved, and each player checks in on time. 12 other players arrive without a spot reserved in either Thursday’s or Friday’s flight. We register those 12 in the tournament. After all 117 players are registered, we open registration for players like Karen, with space for 11 more players. Karen makes it in! We will also be hosting X-Wing side events both days for those who are not playing in that day’s flight. Keep your eyes on our website! More details on side events will be announced shortly. What if I Have a Bye From a National Championship? Congratulations on winning such a prestigious and challenging event! We are in the process of contacting all
National Champions directly with additional information and the survey. You do not have to preregister for World Championship Weekend, but please fill out the survey when you receive it so that we can reserve a spot for you
in the flight of your choice. 
Preregister Today If you haven’t already, don’t forget to preregister for the 2014 World Championship Weekend. With more people preregistering this year than any year previously, space is sure to be at a premium! If you’re looking to try your hand at piloting in the 2014 X-Wing World Championship, preregistering is even more important. Guarantee which flight you’ll play in and preregister now! ... Source: 2014 Worlds Tournament Update
|
|
|
|
|
Logged
|
|
|
|
RSSFeeder
Global Moderator
Deep One
Karma: 0
Offline
Posts: 3916
|
|
« Reply #309 on: 28 October 2014, 15:30:03 » |
|
The Veteran and the ExilePreview Two Heroes from Imperial Assault
“Someone must have told them all about my little maneuver at the battle of Taanab.”
–Lando Calrissian, Star Wars: Return of the Jedi Seize the chance to be a hero of the Rebel Alliance in Imperial Assault! This board game of tactical combat and adventure in the Star Wars universe offers two complete game experiences. The campaign game allows you and up to four friends to play through a gripping narrative story, while the skirmish game invites two players to muster their own forces and battle head-to-head for victory. In a previous preview, we took a closer look at two of the heroes you can play over the course of an Imperial Assault campaign: Gideon Argus, a fearless leader, and Jyn Odan, a fast-moving smuggler. Most recently, we explored the ways that heroes grow and change throughout a campaign, gaining experience and new items, allowing you to customize your hero and make every campaign truly unique. In future previews, we’ll explore the tactical considerations of the Imperial Assault skirmish game and delve deep into the unlimited resources and countless soldiers available to the Imperial player. Today, however, we’ll look at two more heroes of the Rebellion that you can command in the campaign game! 
Haunted by the Past Although she is not a fully trained Jedi, Diala Passil is undoubtedly sensitive to the ways of the Force. Training and honing her weapon skills in secret, she has now thrown her lot in with the Rebel Alliance in the hope that she can do her part to overthrow the Empire. Diala Passil has trained with melee weapons, such as her Plasteel Staff, for years, and her expertise gives her abilities that few others can claim. Her Precise Strike ability allows her to suffer two strain after declaring an attack with a melee weapon to choose and remove a die from her target’s defense pool. Many stormtroopers, Imperial officers, and other servants of the Galactic Empire have only one defense die in their defense pool, meaning that Diala Passil’s Precise Strike leaves them helpless. 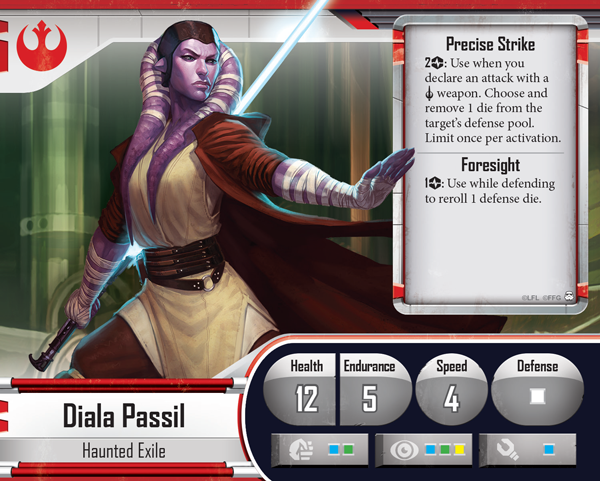
Diala Passil’s affinity for the Force also gives her an unexpected amount of Foresight in combat. She may suffer one strain to use the Foresight ability, allowing her to reroll one defense die. Diala Passil naturally rolls the white defense die, which bears fewer overall block results than the black defense die. The white die, however, is the only die with the dodge result, which causes an attack to miss entirely. With Diala Passil’s Foresight, you can double the chances of rolling a dodge when she is attacked. Diala Passil’s Class cards give her even more tools for calling upon the Force and the training of her long-dead master. Force Throw offers her a variety of useful applications. By suffering two strain and exhausting this card, you may choose another small figure within three spaces of Diala Passil and test Insight. If Diala passes this attribute test, she can push the chosen figure three spaces, forcing it to suffer a damage if it’s hostile. Diala’s Defensive Stance card, on the other hand, gives her a better chance of surviving an attack. While you possess Defensive Stance and use the Foresight ability, Diala automatically applies one block to her defense results. As an added bonus, if an attack targeting her causes no damage, she becomes Focused. Focused is a beneficial condition that adds a green die to the next attack or attribute test your figure performs, giving an extra boost to achieve your goals. 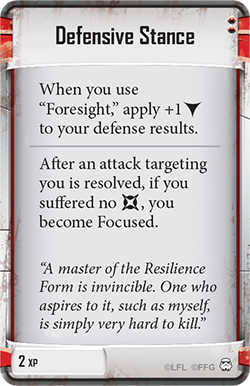 
Diala Passil can deal extra damage in combat with Snap Kick. By exhausting this card after you resolve a melee attack, you can roll a green attack die and deal its damage to an adjacent hostile figure. Not only does Snap Kick deal damage in addition to your normal attack, but your target has no chance to roll defense dice, meaning any damage is unblocked. At the height of her power, Diala Passil’s command of her weapon is truly impressive. Dancing Weapon invites you to take an action and suffer a strain to perform a deadly ranged attack with a melee weapon. With this ability, even faraway foes aren’t safe from Diala Passil’s fearsome attacks. Son of Alderaan A native of Alderaan, Fenn Signis joined the Rebel Alliance at seventeen years old and served two full tours of duty as an exemplary soldier. He was garrisoned at the Rebel base on Arda I when he heard of Alderaan’s destruction by the Death Star. Swearing to avenge his homeworld, Fenn Signis joined a Rebel SpecForces squad, and now, he aims to put his deadly skills to work against the Galactic Empire. Fenn Signis’s fury and skill with arms can quickly fell any Imperial soldier. His Havoc Shot ability allows him to suffer a strain while attacking with any ranged weapon, including the Infantry Rifle that he starts a campaign with. The attack gains Blast 1, allowing him to deal one damage to every figure adjacent to his target. By using Havoc Shot against tightly massed groups of troopers, you can quickly mow through enemy ranks. 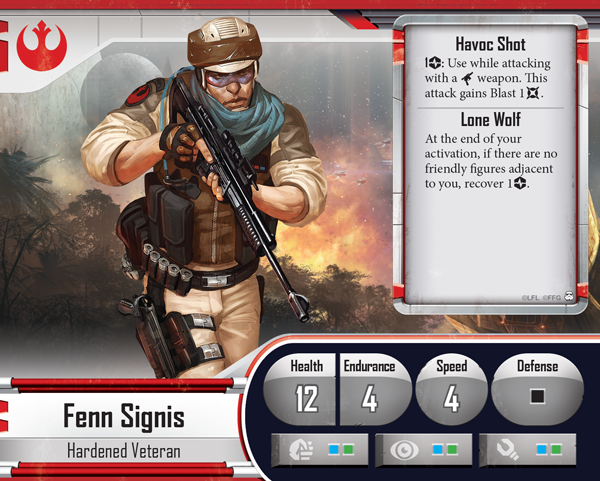
Like every professional soldier, Fenn Signis relies on his comrades, but he also has a powerful independent streak. If Fenn Signis ends his activation with no adjacent friendly figures, you can take advantage of his Lone Wolf ability to recover one strain. By positioning Fenn Signis so that he recovers a strain at the end of his activation, you’ll have more strain to move extra spaces, trigger Havoc Shot, and take advantage of his Class cards. Take Cover is just one of Fenn Signis’s Class cards that requires strain to activate. By suffering a strain and exhausting Take Cover when an attack is declared against you, you can add a white defense die to your defense dice pool. In normal situations, Fenn Signis rolls a black defense die, which can provide more blocks, but has no ability to completely dodge an attack. Adding a white defense die offers that possibility. While Take Cover increases Fenn Signis’s defenses, Weapon Expert increases the potency of his attacks. By suffering a strain when attacking, Fenn Signis can use Weapon Expert to increase his chances of a successful hit and pierce through enemy blocks.  
Fenn Signis gains a way to enhance the power of his Havoc Shot with Suppressive Fire. You can trigger Suppressive Fire whenever you attack using Havoc Shot. Every figure that suffered damage from Havoc Shot must either take an additional damage or become Stunned. Because Havoc Shot has the Blast 1 ability, damage from this attack can quickly spread through a squad of troopers, and Suppressive Fire forces even more damage upon your targets. Superior Positioning helps you set up these potent attacks. As an action, you can suffer a strain to use Superior Positioning, gaining movement points and becoming Focused. Not only that, but Superior Positioning allows you to add a bonus block while you are Focused and defending! Take the Fight to the Empire You may play an Imperial Assault campaign as Fenn Signis, Diala Passil, or another hero, but no matter which hero you play as, you’ll have to contend with the forces of the Galactic Empire before too long. Join us in our next preview, as we take our first look at the terrifying massed forces of the Galactic Empire! ... Source: The Veteran and the Exile
|
|
|
|
|
Logged
|
|
|
|
RSSFeeder
Global Moderator
Deep One
Karma: 0
Offline
Posts: 3916
|
|
« Reply #310 on: 29 October 2014, 00:00:03 » |
|
Rewards for Your ServicePreview Side Missions, Experience, and Items in a Campaign
“Well, look at you! A General, huh?”
–Han Solo, Star Wars: Return of the Jedi Enter the Star Wars universe with the thrilling campaigns and skirmishes of Imperial Assault, a tactical miniatures game of cinematic missions for two to five players. You can find two full games within Imperial Assault. The campaign game invites you and up to four friends to take part in a gripping narrative that pits a small strike team of Rebel heroes against the massive military power of the Imperial player. You’ll also uncover the tactical conflict of the skirmish game, which allow two players to muster their own forces and battle head-to-head over conflicting objectives. Whether you play the campaign game or the skirmish game, you’re sure to experience the Star Wars galaxy like never before. In our most recent preview, we explored two of the heroes that you can play over the course of the campaign. In future previews, we’ll examine the skirmish game, as well as the various rewards and threatening options available to the Imperial player as he commands countless Stormtroopers, vehicles, and villains to crush the insignificant Rebellion. Today, however, we’ll turn our attention to the missions these heroes may choose to undertake, and the experience and items they collect along the way!
Take to the Field The campaign included in the Core Set of Imperial Assault is split between story missions and side missions. Story missions form an overarching plot that reaches across the campaign – the Core Set campaign tells the story of a scheme to exterminate the entire Rebel Alliance with one fell blow. The outcome of a story mission directly influences the next available story mission, meaning that the events of your campaign will change and shift based on the actions of the heroes and villains you control. Side missions fill in the spaces between story missions, as Rebel High Command gives your strike team other missions and your characters’ personal obligations require attention. At certain points in the campaign, the heroes must choose a side mission to undertake. In most circumstances, two side missions, drawn randomly from the Side Mission deck are available for the heroes to choose.  
Before a campaign begins, the Rebel players must construct the deck of Side Mission cards. Four gray Side Mission cards are randomly included in the Side Mission deck, representing unique opportunities for the Rebel Alliance to take advantage of, including ripe Imperial targets or planets ready for rebellion. Successfully completing these missions grants the heroes a specific Reward card that may prove useful in future missions. The heroes must also include the red Side Mission cards that correspond to the heroes in the campaign. For example, if Gideon Argus participates in the campaign, the Friends of Old side mission must be included in the Side Mission deck. These side missions bring old debts and duties to the fore, and successfully completing a hero-specific side mission grants that hero a special Reward card that greatly increases his efficacy. The final step in building the Side Mission deck is for the heroes to select four green Side Mission cards. These side missions allow the heroes the chance to fight alongside an iconic Star Wars character, including Luke Skywalker, Han Solo, or Chewbacca. If the heroes successfully complete one of these mission, they may even call upon that character as an ally in other missions. Our Just Rewards The Imperial Assault campaign game offers you and your fellow players the chance to command a strike team in a series of missions that spans the Galactic Civil War. Of course, as your team embarks on mission after mission, they gain experience in their chosen area of expertise, whether leadership, stealthy movement, or use of the Force. And naturally, you’ll get paid for your hard work as well. A steady influx of credits ensures that your gear and weapons are always top-notch. Of course, if the Imperial player defeats you and achieves his objective first, he’ll receive the majority of the rewards. At the end of each mission in the campaign, the heroes collect a number of rewards. Some missions offer a special Reward card that can provide powerful bonuses, but experience and credits are much more common rewards. Heroes individually gain experience that can be spent to purchase new Class cards. Every hero in Imperial Assault has an individual deck of Class cards, each of which offers new abilities. Some of these cards are relatively inexpensive for just one experience point, but more powerful Class cards, such as Gunslinger, can cost more. We looked at two heroes’ Class cards in our previous preview, and as we explore more heroes in future previews, we’ll examine their Class decks as well. While experience invites your heroes to increase their skills, credits allow you to purchase new weapons and equipment. At the end of many missions, a number of credits are delivered to the heroes for purchasing new items. Credits can also be earned through your actions during the mission. Whenever a hero is next to a supply crate, he may use an action to claim the crate token and draw a card from the Supply deck. These cards offer a variety of helpful tools, including an Emergency Medpac or Valuable Goods, but each crate token that you claim is worth fifty additional credits at the end of the mission, giving you the chance to purchase even more equipment. Weapons, Armor, Equipment Once you’ve received your experience and credits, you have the chance to spend them both before you begin a new mission. The Imperial player also has the chance to spend his rewards, which we’ll cover in a future preview. When spending experience, all of your hero’s Class cards are available at once – you can purchase any of them, provided you have the requisite experience. Item cards, on the other hand, are arranged in three separate tiers. As the campaign progresses, you’ll gain access to new tiers of Item cards, giving you the opportunity to buy more and more effective weapons, armor, and gear. In most cases, when you purchase items, the top six Item cards are revealed from the deck. You and your fellow heroes can spend your credits to purchase any number of these items, provided you can afford the cost.  
Item cards give you the chance to customize your hero’s weapons and capabilities. As the campaign goes on, you can switch between a variety of weapons. A hero who starts with a ranged weapon may decide to use a melee weapon as well, or outdated weapons may be phased out once the campaign progresses. A DL-44 or a Vibroblade may be an excellent weapon for your first missions, but later on, a Sporting Blaster or a Force Pike proves more effective. In addition, you have the option to modify your weapons and make them truly your own. Many weapons display a number of arrows in the bottom right-hand corner of the card, which signifies the number of modifications that weapon can take. You may add a Shock Emitter to your melee weapon, for example, or an Overcharger to your blaster. You’ll find more than weapons at your disposal in the Item deck. In a mission, every hero can carry two weapons into battle, but he can also carry one piece of armor and up to three equipment items. A Combat Coat can make the difference between life and death when blaster bolts are flying, and stocking up on equipment like a Portable Medkit or Extra Ammunition keeps you and your weapons fully functional. Two Steps Ahead Your heroes have the chance to choose new missions, hone their skills, and purchase new items in every Imperial Assault campaign. Join us for our next preview as we look at two more heroes you can play as over the course of a campaign. Pre-order Imperial Assault at your local retailer today! ... Source: Rewards for Your Service
|
|
|
|
|
Logged
|
|
|
|
RSSFeeder
Global Moderator
Deep One
Karma: 0
Offline
Posts: 3916
|
|
« Reply #311 on: 29 October 2014, 08:30:03 » |
|
The Veteran and the ExilePreview Two Heroes from Imperial Assault
“Someone must have told them all about my little maneuver at the battle of Taanab.”
–Lando Calrissian, Star Wars: Return of the Jedi Seize the chance to be a hero of the Rebel Alliance in Imperial Assault! This miniatures game of tactical combat and adventure in the Star Wars universe offers two complete game experiences. The campaign game allows you and up to four friends to play through a gripping narrative story, while the skirmish game invites two players to muster their own forces and battle head-to-head for victory. In a previous preview, we took a closer look at two of the heroes you can play over the course of an Imperial Assault campaign: Gideon Argus, a fearless leader, and Jyn Odan, a fast-moving smuggler. Most recently, we explored the ways that heroes grow and change throughout a campaign, gaining experience and new items, allowing you to customize your hero and make every campaign truly unique. In future previews, we’ll explore the tactical considerations of the Imperial Assault skirmish game and delve deep into the unlimited resources and countless soldiers available to the Imperial player. Today, however, we’ll look at two more heroes of the Rebellion that you can command in the campaign game!
Haunted by the Past Although she is not a fully trained Jedi, Diala Passil is undoubtedly sensitive to the ways of the Force. Training and honing her weapon skills in secret, she has now thrown her lot in with the Rebel Alliance in the hope that she can do her part to overthrow the Empire. Diala Passil has trained with melee weapons, such as her Plasteel Staff, for years, and her expertise gives her abilities that few others can claim. Her Precise Strike ability allows her to suffer two strain after declaring an attack with a melee weapon to choose and remove a die from her target’s defense pool. Many stormtroopers, Imperial officers, and other servants of the Galactic Empire have only one defense die in their defense pool, meaning that Diala Passil’s Precise Strike leaves them helpless.
Diala Passil’s affinity for the Force also gives her an unexpected amount of Foresight in combat. She may suffer one strain to use the Foresight ability, allowing her to reroll one defense die. Diala Passil naturally rolls the white defense die, which bears fewer overall block results than the black defense die. The white die, however, is the only die with the dodge result, which causes an attack to miss entirely. With Diala Passil’s Foresight, you can double the chances of rolling a dodge when she is attacked. Diala Passil’s Class cards give her even more tools for calling upon the Force and the training of her long-dead master. Force Throw offers her a variety of useful applications. By suffering two strain and exhausting this card, you may choose another small figure within three spaces of Diala Passil and test Insight. If Diala passes this attribute test, she can push the chosen figure three spaces, forcing it to suffer a damage if it’s hostile. Diala’s Defensive Stance card, on the other hand, gives her a better chance of surviving an attack. While you possess Defensive Stance and use the Foresight ability, Diala automatically applies one block to her defense results. As an added bonus, if an attack targeting her causes no damage, she becomes Focused. Focused is a beneficial condition that adds a green die to the next attack or attribute test your figure performs, giving an extra boost to achieve your goals.
Diala Passil can deal extra damage in combat with Snap Kick. By exhausting this card after you resolve a melee attack, you can roll a green attack die and deal its damage to an adjacent hostile figure. Not only does Snap Kick deal damage in addition to your normal attack, but your target has no chance to roll defense dice, meaning any damage is unblocked. At the height of her power, Diala Passil’s command of her weapon is truly impressive. Dancing Weapon invites you to take an action and suffer a strain to perform a deadly ranged attack with a melee weapon. With this ability, even faraway foes aren’t safe from Diala Passil’s fearsome attacks. Son of Alderaan A native of Alderaan, Fenn Signis joined the Rebel Alliance at seventeen years old and served two full tours of duty as an exemplary soldier. He was garrisoned at the Rebel base on Arda I when he heard of Alderaan’s destruction by the Death Star. Swearing to avenge his homeworld, Fenn Signis joined a Rebel SpecForces squad, and now, he aims to put his deadly skills to work against the Galactic Empire. Fenn Signis’s fury and skill with arms can quickly fell any Imperial soldier. His Havoc Shot ability allows him to suffer a strain while attacking with any ranged weapon, including the Infantry Rifle that he starts a campaign with. The attack gains Blast 1, allowing him to deal one damage to every figure adjacent to his target. By using Havoc Shot against tightly massed groups of troopers, you can quickly mow through enemy ranks.
Like every professional soldier, Fenn Signis relies on his comrades, but he also has a powerful independent streak. If Fenn Signis ends his activation with no adjacent friendly figures, you can take advantage of his Lone Wolf ability to recover one strain. By positioning Fenn Signis so that he recovers a strain at the end of his activation, you’ll have more strain to move extra spaces, trigger Havoc Shot, and take advantage of his Class cards. Take Cover is just one of Fenn Signis’s Class cards that requires strain to activate. By suffering a strain and exhausting Take Cover when an attack is declared against you, you can add a white defense die to your defense dice pool. In normal situations, Fenn Signis rolls a black defense die, which can provide more blocks, but has no ability to completely dodge an attack. Adding a white defense die offers that possibility. While Take Cover increases Fenn Signis’s defenses, Weapon Expert increases the potency of his attacks. By suffering a strain when attacking, Fenn Signis can use Weapon Expert to increase his chances of a successful hit and pierce through enemy blocks.
Fenn Signis gains a way to enhance the power of his Havoc Shot with Suppressive Fire. You can trigger Suppressive Fire whenever you attack using Havoc Shot. Every figure that suffered damage from Havoc Shot must either take an additional damage or become Stunned. Because Havoc Shot has the Blast 1 ability, damage from this attack can quickly spread through a squad of troopers, and Suppressive Fire forces even more damage upon your targets. Superior Positioning helps you set up these potent attacks. As an action, you can suffer a strain to use Superior Positioning, gaining movement points and becoming Focused. Not only that, but Superior Positioning allows you to add a bonus block while you are Focused and defending! Take the Fight to the Empire You may play an Imperial Assault campaign as Fenn Signis, Diala Passil, or another hero, but no matter which hero you play as, you’ll have to contend with the forces of the Galactic Empire before too long. Join us in our next preview, as we take our first look at the terrifying massed forces of the Galactic Empire! ... Source: The Veteran and the Exile
|
|
|
|
|
Logged
|
|
|
|
RSSFeeder
Global Moderator
Deep One
Karma: 0
Offline
Posts: 3916
|
|
« Reply #312 on: 29 October 2014, 17:00:02 » |
|
A Champion's Perspective: Call of CthulhuA Tournament Report by 2014 North American Champion Tom Capor
As World Championship Weekend approaches, we will be posting articles each week so players can learn how to best prepare for their next large tournament. Whether you’re planning on attending Worlds or following along through our online coverage, these articles are a great insight into how some of the best players of your favorite game prepare for major tournaments. Today, we are joined by 2014 Call of Cthulhu: The Card Game North American Champion Tom Capor. Tom shares how he was able to defend his title a second year in a row despite significant challenges leading up to the 2014 North American Championship. 
Tom Capor on the 2014 North American Championship Ladies, gentlemen, things from beyond time and space, and everyone in between, I welcome you to my Call of Cthulhu: The Card Game Gen Con 2014 tournament report! The 2014 North American Championship stage was set as loyal Cthulhu fans from across the country traveled to Indianapolis, Indiana to compete for the title of North American Champion. It was once again time to defend the title that I have somehow managed to retain since its introduction in 2012. Deciding the Deck “It was only for a moment that I hesitated, for more than curiosity and scientific zeal was driving me on and working against my growing fear."
– Nathaniel Peaslee, Shadow Out of Time by H. P. Lovecraft After a disappointing Regional Championship season where I was unable to earn a bye, I needed to re-evaluate my deck choice. Piloting the infamous Y-Train (a combo mill deck) since its debut at the 2013 North American Championship, I was beginning to have my doubts about whether or not I could continue to pilot it effectively. The math was there; the playtesting results were there. In my opinion, even against its predictability, it was still, by far, the best deck in the format. However, my level of play skill had been heading in a downward spiral since the 2013 World Championship. Time away from the game coupled with sleep deprivation was not helping. I wasn’t on my ‘A-game’ for a long while, and if I wanted to continue to pilot arguably the most demanding deck in the card pool, I needed to get back into shape. With a more strict sleep schedule in place, training regiments designed to focus on increasing precision play, and no surprises from any last-minute FAQ entries, I gained enough confidence to use the deck again. The only question was, what version? In 2013, Yog-Shub was a clear winner with The Festival (The Key and the Gate, 51) and Shub’s support removal. However, without The Festival and Master of the Myths (Into Tartarus, 101), I had to find another way to quickly rifle through my deck. While other options such as Mono-Yog, Yog/Shub, Yog/Silver Twilight were quite viable, the Yog/Cthulhu version gave me my best test results against the broadest field. Y-Train 3.0 Characters: 25 Support: 10 Event: 15  Why Cthulhu for the second faction? Mainly, it was for Flooded Vault (Terror in Venice, 10) and Deep One Assault (Core Set, 56). Having six ways to find Lost City of Pnakotus (The Key and the Gate, 27) was the key. There are other cards that could serve as a substitute, but since Flooded Vault also had the ability to find Frozen Time (The Key and the Gate, 22) and an emergency Snow Graves (At the Mountains of Madness, 15), I couldn't pass up the utility. Deep One Assault’s versatility, while trickier to use than say Thunder In the East (Kingsport Dreams, 34) or Burrowing Beneath (Core Set, 137), proved useful in giving me more options to deal with problematic characters such as Alternative Historian (Seekers of Knowledge, 15). To help fill out the ranks, I called upon an old favorite of mine: Dreamlands Fanatic (In the Dread of Night, 47), usually a ‘free’ character with Fast and an Arcane Icon. Why Cthulhu for the second faction? Mainly, it was for Flooded Vault (Terror in Venice, 10) and Deep One Assault (Core Set, 56). Having six ways to find Lost City of Pnakotus (The Key and the Gate, 27) was the key. There are other cards that could serve as a substitute, but since Flooded Vault also had the ability to find Frozen Time (The Key and the Gate, 22) and an emergency Snow Graves (At the Mountains of Madness, 15), I couldn't pass up the utility. Deep One Assault’s versatility, while trickier to use than say Thunder In the East (Kingsport Dreams, 34) or Burrowing Beneath (Core Set, 137), proved useful in giving me more options to deal with problematic characters such as Alternative Historian (Seekers of Knowledge, 15). To help fill out the ranks, I called upon an old favorite of mine: Dreamlands Fanatic (In the Dread of Night, 47), usually a ‘free’ character with Fast and an Arcane Icon.
The other biggest trick I’ve added since last year was Walk the Path (Written and Bound, 18). Normally a weak utility card against most matchups, it is a critical card for the mirror match. I theorized that I would see a lot of mirror matches at the North American National Championship despite not facing a single one throughout the Regional Championship season. The Big Day Arrives! An amazing turnout for the event! I won’t lie, it brings a smile to my face to know that the game is still growing since its LCG release in 2009. Through the Swiss rounds there were some amazing games with everyone having a lot of fun. Even some new faces like Jonathan Lekse, Shawn Macleod, and Vince Urbonas, managed to gain some valuable experience as they claimed top 8 spots before being eliminated. A cut must be made, a champion must be crowned, and the top 8 had some serious contenders:
- Jonathan Lekse
- Jim Black
- Jeremey Zwirn
- Tom Capor
- Chase Causey
- Vince Urbonas
- Shawn Macleod
- David Boeren
My path would begin against Chase Causey and his Cthulhu/Miskatonic University deck. Chase was hoping to rekindle a bit of the spirit of Research and Destroy, a Cthulhu/Miskatonic Deck popularized by Graham Hill during last year’s European Championship and used by Jim Black to knock me out of the top 8 in the 2013 World Championship. But thanks to my pre-tournament preparation and some adrenaline, I managed to take the game. Next up was David Boeren fresh off his defeat of Jonathan Lekse, who aside from being a good friend of mine, was the top seed in the top 8, went undefeated in the Swiss, and was running a deck nearly identical to my own. David is a powerful player of his own, and you may recognize him from his Elder Things podcast, his 2nd-place finish at the 2012 National Championship (in which he nearly defeated me), or from his constant support of the community via the forums. I was a little nervous. With a little luck from my deck and some well-timed plays, I was able to finesse my way through to the final round! Epic Battle of Ultimate History My final opponent of the day was Jeremy Zwirn! Jeremy is a strong player, the current Cthulhu World Champion, and a former Android Netrunner and Warhammer: Invasion World Champion. And those are just the titles I know about. We were both running the Y-Train, making the match even tighter. Jeremy’s deck was using a more traditional Yog/Shub powerhouse. However, my deck contained Walk the Path, which gave me a pretty sizable advantage going into the
mirror match. The opening moves were pretty tenuous. Compared to a normal game, I had a bad start and did not see any of my engine pieces. What I did have, though, was tons of character removal. So, after a soft opening turn one from Jeremy, and myself not drawing into any combo pieces, I decided to go for a story win! An unconventional move for the deck I was playing, but since I was in no position to use deck discard as my route to victory, my only chance was to force Jeremy off his game as well, and hope that it would force him to do things he wouldn’t normally do. I think for the most part this plan worked. I was able to take and maintain board control, I was able to rack up success tokens, and Jeremy could only cycle a pair of Speak to the Dead (Whispers in the Dark, 20) to fill his discard pile. I wouldn’t be shocked if he had other options, as his hand became massive fairly quickly, but if using Speak to the Dead was his best option, I couldn’t ask for more.  Going into the final turn, I had 2/4/4 success tokens with a Descendant of Eibon (The Terror of the Tides, 75) in play and a massive board presence, an open domain for a Walk the Path, and Deep One Assault that I was using to bluff as a Black Dog (Words of Power, 29) the whole game. Whether or not the bluff actually worked I’ll probably never know, but we both respected the Black Dog the whole game. Regardless, I was threatening to win the game on my next turn, and Jeremy’s deck was getting awfully low. Any lower and he wouldn’t be able to survive a Walk the Path that would eventually copy his trigger of an Interstellar Migration (The Key and the Gate, 37). Without the aid of his second and third Snow Graves, Jeremy was forced to go for the win hoping against all hope that his Snow Graves already on the board would go uninterrupted. Going into the final turn, I had 2/4/4 success tokens with a Descendant of Eibon (The Terror of the Tides, 75) in play and a massive board presence, an open domain for a Walk the Path, and Deep One Assault that I was using to bluff as a Black Dog (Words of Power, 29) the whole game. Whether or not the bluff actually worked I’ll probably never know, but we both respected the Black Dog the whole game. Regardless, I was threatening to win the game on my next turn, and Jeremy’s deck was getting awfully low. Any lower and he wouldn’t be able to survive a Walk the Path that would eventually copy his trigger of an Interstellar Migration (The Key and the Gate, 37). Without the aid of his second and third Snow Graves, Jeremy was forced to go for the win hoping against all hope that his Snow Graves already on the board would go uninterrupted.
After a lot of counting by both of us and Jeremy putting a few final Yithian cards he needed into the discard pile via Studying the Void (The Key and the Gate, 35), Jeremy launched his first Interstellar Migration. I responded with a Deep One Assault to remove his lone Snow Graves. Dismayed, Jeremy knew it was over, but not giving up, he began to look for a way out. Doing anything he could, he pinged me with a Yithian Scout (The Key and the Gate, 15) from his discard pile. Then, it was my turn to make sure I could win the game. After some stressful counting, I did indeed have enough Yithians in my own discard pile to launch my first Interstellar Migration. Counting again to make 400% sure, the game was over. If Jeremy launched a second Migration, I could use my Walk the Path to copy the effect for the win; waiting it out would allow me to win with my second Migration. The Streak is still alive! Counting My Lucky Stars I've been very fortunate over the years to be able to continue to play this amazing game at such a high level. Through the game I have met some awesome people, many of whom I'm lucky enough to call friends, and it is a trend I hope to continue as far into the future as possible. The 2014 World Championship Weekend is Approaching Thanks, Tom! Tom didn’t quit despite a slump in his tournament results. Will you have the courage and passion to continue forward and improve yourself before your next tournament? Check back in the coming weeks to hear stories from other North American Champions, and join us for the 2014 World Championship Weekend in a couple weeks for your chance to gain fame in your favorite game! ... Source: A Champion's Perspective: Call of Cthulhu
|
|
|
|
|
Logged
|
|
|
|
RSSFeeder
Global Moderator
Deep One
Karma: 0
Offline
Posts: 3916
|
|
« Reply #313 on: 30 October 2014, 01:30:03 » |
|
A Champion's Perspective: Call of CthulhuA Tournament Report by 2014 North American Champion Tom Capor
As World Championship Weekend approaches, we will be posting articles each week so players can learn how to best prepare for their next large tournament. Whether you’re planning on attending Worlds or following along through our online coverage, these articles are a great insight into how some of the best players of your favorite game prepare for major tournaments. Today, we are joined by 2014 Call of Cthulhu: The Card Game North American Champion Tom Capor. Tom shares how he was able to defend his title a second year in a row despite significant challenges leading up to the 2014 North American Championship.
Tom Capor on the 2014 North American Championship Ladies, gentlemen, things from beyond time and space, and everyone in between, I welcome you to my Call of Cthulhu: The Card Game Gen Con 2014 tournament report! The 2014 North American Championship stage was set as loyal Cthulhu fans from across the country traveled to Indianapolis, Indiana to compete for the title of North American Champion. It was once again time to defend the title that I have somehow managed to retain since its introduction in 2012. Deciding the Deck “It was only for a moment that I hesitated, for more than curiosity and scientific zeal was driving me on and working against my growing fear."
– Nathaniel Peaslee, Shadow Out of Time by H. P. Lovecraft After a disappointing Regional Championship season where I was unable to earn a bye, I needed to re-evaluate my deck choice. Piloting the infamous Y-Train (a combo mill deck) since its debut at the 2013 North American Championship, I was beginning to have my doubts about whether or not I could continue to pilot it effectively. The math was there; the playtesting results were there. In my opinion, even against its predictability, it was still, by far, the best deck in the format. However, my level of play skill had been heading in a downward spiral since the 2013 World Championship. Time away from the game coupled with sleep deprivation was not helping. I wasn’t on my ‘A-game’ for a long while, and if I wanted to continue to pilot arguably the most demanding deck in the card pool, I needed to get back into shape. With a more strict sleep schedule in place, training regiments designed to focus on increasing precision play, and no surprises from any last-minute FAQ entries, I gained enough confidence to use the deck again. The only question was, what version? In 2013, Yog-Shub was a clear winner with The Festival (The Key and the Gate, 51) and Shub’s support removal. However, without The Festival and Master of the Myths (Into Tartarus, 101), I had to find another way to quickly rifle through my deck. While other options such as Mono-Yog, Yog/Shub, Yog/Silver Twilight were quite viable, the Yog/Cthulhu version gave me my best test results against the broadest field. Y-Train 3.0 Characters: 25 Support: 10 Event: 15 Why Cthulhu for the second faction? Mainly, it was for Flooded Vault (Terror in Venice, 10) and Deep One Assault (Core Set, 56). Having six ways to find Lost City of Pnakotus (The Key and the Gate, 27) was the key. There are other cards that could serve as a substitute, but since Flooded Vault also had the ability to find Frozen Time (The Key and the Gate, 22) and an emergency Snow Graves (At the Mountains of Madness, 15), I couldn't pass up the utility. Deep One Assault’s versatility, while trickier to use than say Thunder In the East (Kingsport Dreams, 34) or Burrowing Beneath (Core Set, 137), proved useful in giving me more options to deal with problematic characters such as Alternative Historian (Seekers of Knowledge, 15). To help fill out the ranks, I called upon an old favorite of mine: Dreamlands Fanatic (In the Dread of Night, 47), usually a ‘free’ character with Fast and an Arcane Icon. The other biggest trick I’ve added since last year was Walk the Path (Written and Bound, 18). Normally a weak utility card against most matchups, it is a critical card for the mirror match. I theorized that I would see a lot of mirror matches at the North American National Championship despite not facing a single one throughout the Regional Championship season. The Big Day Arrives! An amazing turnout for the event! I won’t lie, it brings a smile to my face to know that the game is still growing since its LCG release in 2009. Through the Swiss rounds there were some amazing games with everyone having a lot of fun. Even some new faces like Jonathan Lekse, Shawn Macleod, and Vince Urbonas, managed to gain some valuable experience as they claimed top 8 spots before being eliminated. A cut must be made, a champion must be crowned, and the top 8 had some serious contenders: - Jonathan Lekse
- Jim Black
- Jeremey Zwirn
- Tom Capor
- Chase Causey
- Vince Urbonas
- Shawn Macleod
- David Boeren
My path would begin against Chase Causey and his Cthulhu/Miskatonic University deck. Chase was hoping to rekindle a bit of the spirit of Research and Destroy, a Cthulhu/Miskatonic Deck popularized by Graham Hill during last year’s European Championship and used by Jim Black to knock me out of the top 8 in the 2013 World Championship. But thanks to my pre-tournament preparation and some adrenaline, I managed to take the game. Next up was David Boeren fresh off his defeat of Jonathan Lekse, who aside from being a good friend of mine, was the top seed in the top 8, went undefeated in the Swiss, and was running a deck nearly identical to my own. David is a powerful player of his own, and you may recognize him from his Elder Things podcast, his 2nd-place finish at the 2012 National Championship (in which he nearly defeated me), or from his constant support of the community via the forums. I was a little nervous. With a little luck from my deck and some well-timed plays, I was able to finesse my way through to the final round! Epic Battle of Ultimate History My final opponent of the day was Jeremy Zwirn! Jeremy is a strong player, the current Cthulhu World Champion, and a former Android Netrunner and Warhammer: Invasion World Champion. And those are just the titles I know about. We were both running the Y-Train, making the match even tighter. Jeremy’s deck was using a more traditional Yog/Shub powerhouse. However, my deck contained Walk the Path, which gave me a pretty sizable advantage going into the
mirror match. The opening moves were pretty tenuous. Compared to a normal game, I had a bad start and did not see any of my engine pieces. What I did have, though, was tons of character removal. So, after a soft opening turn one from Jeremy, and myself not drawing into any combo pieces, I decided to go for a story win! An unconventional move for the deck I was playing, but since I was in no position to use deck discard as my route to victory, my only chance was to force Jeremy off his game as well, and hope that it would force him to do things he wouldn’t normally do. I think for the most part this plan worked. I was able to take and maintain board control, I was able to rack up success tokens, and Jeremy could only cycle a pair of Speak to the Dead (Whispers in the Dark, 20) to fill his discard pile. I wouldn’t be shocked if he had other options, as his hand became massive fairly quickly, but if using Speak to the Dead was his best option, I couldn’t ask for more. Going into the final turn, I had 2/4/4 success tokens with a Descendant of Eibon (The Terror of the Tides, 75) in play and a massive board presence, an open domain for a Walk the Path, and Deep One Assault that I was using to bluff as a Black Dog (Words of Power, 29) the whole game. Whether or not the bluff actually worked I’ll probably never know, but we both respected the Black Dog the whole game. Regardless, I was threatening to win the game on my next turn, and Jeremy’s deck was getting awfully low. Any lower and he wouldn’t be able to survive a Walk the Path that would eventually copy his trigger of an Interstellar Migration (The Key and the Gate, 37). Without the aid of his second and third Snow Graves, Jeremy was forced to go for the win hoping against all hope that his Snow Graves already on the board would go uninterrupted. After a lot of counting by both of us and Jeremy putting a few final Yithian cards he needed into the discard pile via Studying the Void (The Key and the Gate, 35), Jeremy launched his first Interstellar Migration. I responded with a Deep One Assault to remove his lone Snow Graves. Dismayed, Jeremy knew it was over, but not giving up, he began to look for a way out. Doing anything he could, he pinged me with a Yithian Scout (The Key and the Gate, 15) from his discard pile. Then, it was my turn to make sure I could win the game. After some stressful counting, I did indeed have enough Yithians in my own discard pile to launch my first Interstellar Migration. Counting again to make 400% sure, the game was over. If Jeremy launched a second Migration, I could use my Walk the Path to copy the effect for the win; waiting it out would allow me to win with my second Migration. The Streak is still alive! Counting My Lucky Stars I've been very fortunate over the years to be able to continue to play this amazing game at such a high level. Through the game I have met some awesome people, many of whom I'm lucky enough to call friends, and it is a trend I hope to continue as far into the future as possible. The 2014 World Championship Weekend is Approaching Thanks, Tom! Tom didn’t quit despite a slump in his tournament results. Will you have the courage and passion to continue forward and improve yourself before your next tournament? Check back in the coming weeks to hear stories from other North American Champions, and join us for the 2014 World Championship Weekend in a couple weeks for your chance to gain fame in your favorite game! ... Source: A Champion's Perspective: Call of Cthulhu
|
|
|
|
|
Logged
|
|
|
|
RSSFeeder
Global Moderator
Deep One
Karma: 0
Offline
Posts: 3916
|
|
« Reply #314 on: 30 October 2014, 10:00:03 » |
|
Can You Survive?Preview Character Creation in Zombie Apocalypse
“We just gotta survive. If we can hole up, we’ll be fine. The government will handle this. I mean, we’re just regular people. What could we possibly do?”
–A survivor who hasn’t quite grasped the situation It’s up to you and your friends to survive the rise of the undead in Zombie Apocalypse, the first book in The End of the World roleplaying line! Future books in this line will pit you against the Wrath of the Gods, an Alien Invasion, and the Revolt of the Machines, but for now, it’s your job to keep yourself safe from hordes of zombies desperately hungry for your brain. In Zombie Apocalypse and every other book in The End of the World line, you’ll find a shared set of rules and five distinct scenarios, each offering a different take on how humanity may enter its final days and continuing through the post-apocalypse, as humanity adapts to a world forever changed. These books also give you the chance to experience the apocalypse in a unique way: as yourself, using your own skills, talents, and equipment! Today, we’ll take a closer look at character creation within Zombie Apocalypse, exploring how to bring an abstracted version of yourself to life. In this preview, I’ll create a character version of myself for a game of Zombie Apocalypse. 
What if I don't want to play as myself?
The character creation rules in Zombie Apocalypse and the rest of The End of the World roleplaying line allow you to create characters very unlike yourself. Instead of creating stats based on your own characteristics, you can simply envision a different person and create a character who embodies the traits and abilities of that person.
|
|
Physical, Mental, Social Before you face the reanimated corpses rising from their graves, you’ll need a way to accurately reflect the characteristics that serve as the basic building blocks of your character. There are six distinct characteristics that help define your character in Zombie Apocalypse and The End of the World roleplaying line. These six characteristics are split into three categories: physical, mental, and social, each consisting of a pair of characteristics. The physical characteristics are dexterity and vitality, the mental characteristics are logic and willpower, and the social characteristics are charisma and empathy. Each of these characteristics receives a number between one and five, which forms the basis for determining your success during a test, as we’ll explore in a later preview. When I begin creating my character – an abstract version of myself – I have ten points to split between the six characteristics. Each characteristic starts at one, and none can be raised higher than five. I start by adding points to my mental characteristics, which I think of as my strongest category. It can be important to consider the differences between the offensive and defensive characteristics within a category when you assign points. In Zombie Apocalypse, logic represents your awareness of your surroundings and your ability to think on your feet, while willpower is your memory and mental resilience. With this in mind, I assign two points to logic and three points to willpower, raising them to three and four, respectively. _Plate.jpg) I split the remaining points between the physical and social categories, ending with a dexterity of two, a vitality of two, a logic of three, a willpower of four, a charisma of three, and an empathy of two. In Zombie Apocalypse, I’m most at home using my mind to outsmart the zombies, rather than facing them in combat or gathering a strong group of other survivors. I split the remaining points between the physical and social categories, ending with a dexterity of two, a vitality of two, a logic of three, a willpower of four, a charisma of three, and an empathy of two. In Zombie Apocalypse, I’m most at home using my mind to outsmart the zombies, rather than facing them in combat or gathering a strong group of other survivors.
After I create the initial characteristics for my character, the group has the chance to vote on the accuracy of the result. For each category, the group secretly votes whether a characteristic should be raised or lowered. In my case, the group determines that one of my physical characteristics should be raised, and I raise my dexterity by one point, giving me a final dexterity of three. What Makes You Different Characteristics form the starting point for building your in-game version of yourself, but that’s not enough to differentiate you from the dozens of others fighting to keep their brains intact and survive another day at the end of the world. What truly sets your character apart from any other are your features – the strengths, weaknesses, special training, insecurities, and quirks that set you apart from everyone else. During character creation, every player thinks of a positive feature and a negative feature for each category. A feature can be nearly anything you can think of – anything that makes you different from other survivors. For my physical category, I have the +Fast Reflexes and -Very Nearsighted features, along with +Well Read and -Easily Startled for mental and +Cheerful Disposition and -Too Proud for social features. Whenever one of these features comes into play in the game, it can add positive or negative dice to a test, as we’ll explore in a later preview. 
The characteristics and features on my character sheet
In addition, because the group voted to raise one of my physical characteristics, I must either remove my positive feature for that category or take on another negative feature. I don’t want to lose my positive feature, so I add the -Gets Hungry Quickly feature to my physical category – a serious drawback in any apocalyptic scenario! Grab Your Gear Your game of Zombie Apocalypse begins with your group sitting down to play a roleplaying game, which means your gear is limited to whatever you may happen to have close to you. My list of gear consists of the objects close to me, and I’ll need to make important decisions about what to bring. I have a backpack and a half-full water bottle with me, as well as my wallet, which has $6.85 in cash. My cellphone has roughly ten hours of battery life left. I need to decide whether or not to take my laptop and its charger – it could prove useful for maintaining communication or gathering information, but it’s heavy and no one knows how long the Internet will keep functioning as more dead rise daily. I also find a welcome surprise in one of my backpack pockets – a fully-functioning compass that I’d forgotten! 
Unfortunately, I don’t have many weapons at this point: I’m limited to a small, folding pocketknife and a pair of scissors. Finding better weapons means venturing out of the office, and it could prove a deadly first outing for me and my coworkers. We don’t have much food at the moment, but the Fantasy Flight Games Center across the parking lot could prove a valuable source of non-perishable food or kitchen knives for weapons… provided other panicking civilians haven’t had the same idea first! Every survivor in the midst of the Zombie Apocalypse is massively different, and between features and characteristics, any player in your group can create a character that reflects himself. You may rely on your skills with making friends to survive, or you may manipulate those you encounter into helping you. Your fight for survival begins wherever you live, from sub-arctic climates to the equator. Zombie Apocalypse gives every player the chance to live (and die) in humanity’s last days! Fight to Survive Your characteristics, your features, and your equipment and gear all form parts of your character as you struggle to survive the impossible danger of Zombie Apocalypse. In our next preview, we’ll turn to rules developer Andrew Fischer for a discussion of how the rules for Zombie Apocalypse developed, including how players complete tasks and fight to survive in the last days of civilization! Pre-order Zombie Apocalypse at your local retailer today! ... Source: Can You Survive?
|
|
|
|
|
Logged
|
|
|
|
|


